| |
FirstClass 7 Internet Services Administrator's Guide
Contents
Introduction
Planning your internet services environment
Creating your Internet Services environment
Maintaining your Internet Services environment
Copyright 2001, 2002 by Centrinity Inc.
SOF3716.1A
Centrinity Inc.
905-762-6000 or 1-800-763-8272
Web: www.centrinity.com
Notices
You must accept the FirstClass License Agreement before you can use this product. If you do not accept the terms of the License Agreement, do not install the software and return the entire package within 30 days to the place from which you obtained it for a full refund. No refunds will be given for returned products that have missing components.
Information in this document is subject to change without notice. Certain features and products described in this document may not be currently available in all geographic regions. Distribution or reproduction of this document in whole or in part must be in accordance with the terms of the License Agreement.
All rights reserved. FirstClass is a registered trademark of a Centrinity subsidiary used under license. Centrinity, the Centrinity logo, and the FirstClass logo are trademarks of Centrinity Inc. All other trademarks are property of their respective owners.
This edition applies to Release 7.0 of FirstClass and to all subsequent releases and modifications until otherwise indicated in new editions. This document is bound by international copyright law and the FirstClass Software License Agreement and Limited Warranty included with every FirstClass product.
Technical support
Telephone technical support is available to registered administrators at the following numbers:
Toll free in North America: 1-800-346-9108
Toronto: 905-762-7060
International: +353-61-725-200.
Online support questions may be directed to support@centrinity.com.
Overview
Internet Services is a module that connects your FirstClass server to the Internet and supports a wide variety of Internet protocols. For an explanation of how Internet Services works and the different Internet protocols supported, see Internet Services concepts.
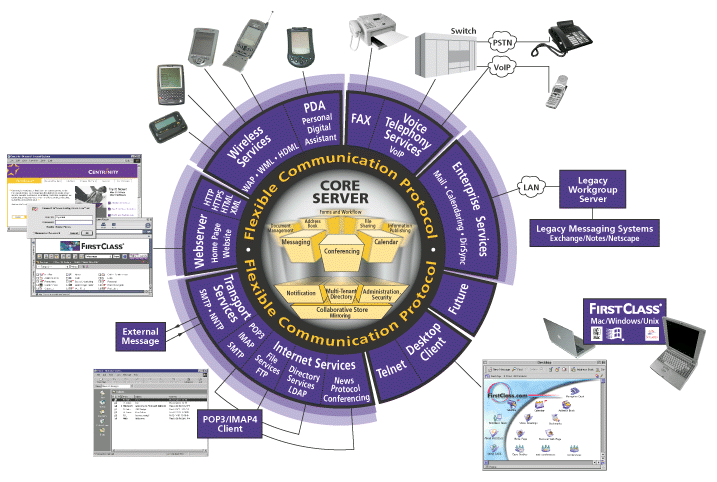
Internet Services plays a key role in the FirstClass architecture, as it is the module that acts as the gateway connecting the core server (which is at the center of the FirstClass system) to the Internet.
About this book
This document describes the responsibilities and activities of an Internet Services administrator, including:
• performing basic and advanced setup
• understanding Internet Services works and Internet Services concepts
• clustering Internet Services
• creating web sites and supporting different languages
• customizing web sites
• serving out FirstClass content to the web
• filtering mail
• enabling FTP, Java, CGI, and security certificates.
This book is partitioned into the following five sections:
• Introduction
This section provides conceptual information about Internet Services and the administrator’s role. This section also provides requirements and instructions for installing Internet Services components and forms and configuring and customizing them to suit your needs.
• Planning your Internet Services environment
This section provides information on features that help you plan your Internet Services system, including browser steering and clustering.
• Creating your Internet Services environment
This section provides information for creating items on and customizing your Internet Services system, including web sites, CGIs, MIME types, and web content.
• Maintaining your Internet Services environment
This section provides information for daily maintenance of Internet Services, including understanding the Internet Services console, Internet Services monitor, filters, and security certificates.
You might find it useful to follow along with the examples provided. Keep in mind, the examples used are for illustrative purposes only. While it should help you understand some of the principles involved in setting up an Internet Services system, it will not provide you with a fully developed system.
For information on setting up a FirstClass server on your system, see FirstClass Administrator’s Guide. For detailed how-to descriptions of features, see our online help or press F1. For descriptions of forms and fields, see our online help or press F1 when you have the form open.
Who should read this book
This book is meant for FirstClass administrators responsible for supporting Internet Services on either Mac® OS or Windows® platforms.
What you should already know
You should be familiar with the capabilities and terminology of your:
• FirstClass server
• FirstClass administrator’s Desktop
• FirstClass client software
• Mac OS or Windows operating system
• a general understanding of Internet protocols and Domain Name System (DNS) servers.
You should also be familiar with basic Internet concepts. For information on the Internet, it is recommended that you read relevant materials.
Documentation conventions
We use certain documentation conventions for menu items and variables in this guide.
Menu items
Each level of menu items is separated by >. For example, the Clear item under the Edit menu is shown as Edit > Clear.
Variables
Text in italics indicates arguments, variables, or other information for which you must type your own value.
New in this version
These are the new features and additions in Internet Services:
• Realtime Blocking List (RBL) or Realtime Blackhole List support allows administrators to configure their FirstClass systems to block Internet mail considered spam, as listed on a chosen RBL service site, see Configuring Internet Services and Managing system security
• SMTP Auth provides stricter login security that requests exact credentials from users logging into a FirstClass system and considers these users fully trusted if relaying is enabled
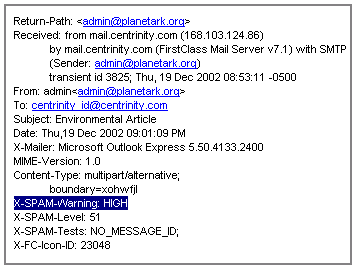
• SMTP mail rules provide the administrator with the ability analyze inbound SMTP messages and control the actions he can take as a result of this analysis, see Managing system security
At this time, only the Internet headers can be examined, not message bodies or attachments. SMTP mail-rule documents must be placed in the Filters folder.
• web user interface support for new user mail rules, see our online help.
• support for the new Webmail templates, which offer a simplified web interface oriented at messaging or unified messaging only access
For information on how to configure Webmail templates, see Displaying different template sets. For information on how to use Webmail templates, see our online help.
• added support for Enhanced web layout
You can now optionally switch between a standard layout view and an enhanced layout view for your FirstClass web interface, see Displaying different template sets. Since the Enhanced view of the standard templates includes many of the features of the legacy full templates, this set is no longer shipped with the product. For information on how to enable the Enhanced template view, see Customizing your
web user’s interface.
Administrator tasks
As the FirstClass administrator for your organization, you are responsible for many tasks. For server administrator tasks, see FirstClass Administrator’s Guide. In this chapter, we outline your responsibilities and categorize them by stages. In subsequent chapters, we expand on these responsibilities.
Your responsibilities as Internet Services administrator
The icons on the administrator’s Desktop represent most of the functions you will perform in your FirstClass system. However, there are other responsibilities not represented by those icons. As the Internet Services administrator, your ongoing responsibilities fall into these categories:
• installing and configuring Internet Services and its required components
• planning your Internet Services environment
• creating your Internet Services environment
• maintaining your Internet Services environment.
Installing and configuring Internet Services
Installing and configuring Internet Services involves:
• installing the FirstClass Internet Services module, as described in Installing Internet Services
• configuring FirstClass Internet Services, as described in Configuring Internet Services
At this point, you should have Internet Services installed on your system and be able to log in.
Planning your Internet Services environment
Planning is the most important stage before creating your FirstClass environment. Equally, before creating your Internet Services environment, you should establish the setup that you want to achieve. When planning, remember that although Internet Services is a separate module in the FirstClass architecture, it does not act independently. FirstClass Server and Internet Services are strongly interdependent, so what you create in Internet Services may have an impact on the FirstClass server. The same holds true in the reverse situation. For information on planning and creating your FirstClass Server environment, see FirstClass Administrator’s Guide.
Planning your Internet Services environment involves these main tasks:
• planning your users’ FirstClass web site experience
• coding the HeaderMatch document to steer different users to your site(s), as described in Using the HeaderMatch document to plan your system
• clustering Internet Services to separate protocols and domains, as described in Clustering Internet Services to plan your system.
Creating your Internet Services environment
After planning your Internet Services environment, the next step is to create it. Creating your Internet Services environment involves these tasks:
• creating single or multiple web sites on your FirstClass system, as described in Creating your web sites
• understanding and configuring the Multiple Sites and Languages form, as described in Using the Multiple Sites & Languages form
• customizing your web user interface, as described in Customizing your web user’s interface
• publishing web site content, as described in Publishing content to the web
• customizing templates, as described in Creating custom templates
• configuring the Aliases document, as described in Creating and editing the Aliases document
• creating CGI applications for your system, as described in Creating CGIs
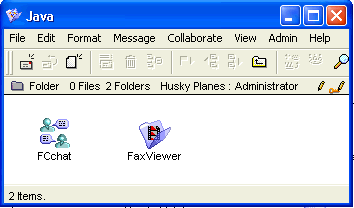
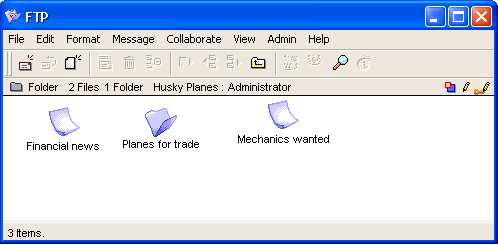
• working with the Java and FTP folders, as described in Using the Java and FTP folders
Maintaining your environment
After you have planned and created your Internet Services environment, you need to maintain your system and provide some level of security. Maintaining and securing your Internet Services environment involves these tasks:
• understanding the Internet Services console and available pull down menus, as described in Internet Services console
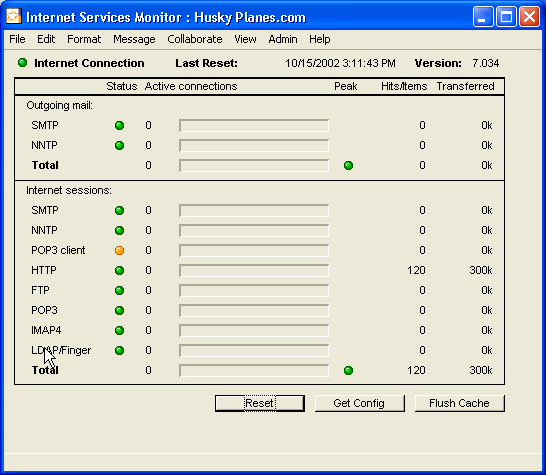
• reading the information displayed on the Internet Services Monitor, as described in Internet Services Monitor display
• managing your Internet Services system security, as described in Managing system security.
Internet Services concepts
Before you can begin working as an Internet Services administrator, there are certain concepts you should understand. In this chapter, we discuss:
• Internet Services and FirstClass server interaction
• Internet Services protocols
• domains and Internet Protocol (IP) addresses
• gateways
• system reserved words.
Understanding how Internet Services and FirstClass server work together
Internet Services converts data from FirstClass format, FirstClass protocol (FCP), into the appropriate Internet format and sends it out to the Internet. In turn, Internet Services takes incoming information from the Internet and converts it back into FCP. All FirstClass content can be sent out to the Internet including messages, conferences, documents, server-parsed files, and web pages. FCP is the language the FirstClass server speaks and is used to access the core services of FirstClass. FCP can be thought of as the glue that connects FirstClass clients, gateways, and core servers together.
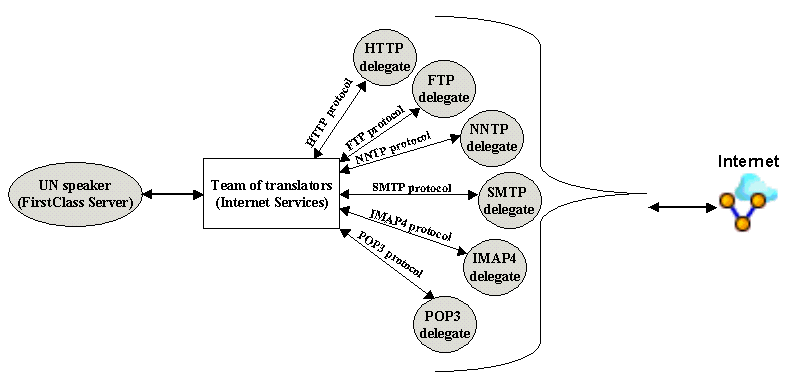
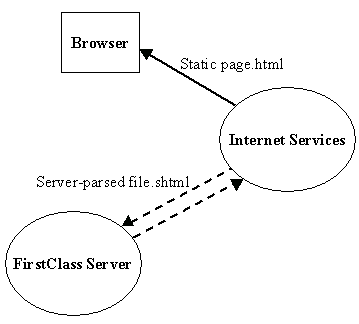
Internet Services bi-directionally translates FirstClass formatted data from the server into the appropriate protocol for the Internet and back again. The diagram below shows this relationship:
Let’s use an analogy to explain the role of Internet Services. You can think of a FirstClass system as a United Nations (UN), meeting, where Internet Services acts as a team of UN translators. The FirstClass server represents the UN speaker standing on a podium giving a speech in one language to delegates speaking different languages. This speech must be translated into several different languages that each delegate can understand. In turn, if the delegates respond, their respective languages must be translated back to the speaker into the one language he understands. This is handled by Internet Services . The graphic below shows this interaction:
Just as the team of translators must make sure languages are translated between the UN speaker and the delegates, so must Internet Services make sure data is translated between the Internet and the FirstClass server.
You can think of the multiple languages as different Internet protocols, see Understanding Internet Services Protocols. These protocols must be translated into the one language the server understands (FCP). Internet Services must then translate FCP back into Internet-friendly protocols. The traffic moves in both directions simultaneously, and many conversations can occur at once. There is no place to store missed conversation, so it is important for everything to get translated on the fly. The translation must happen quickly, accurately, and without fail.
Understanding Internet Services protocols
Although Internet Services is implemented as a single protocol module, it is actually comprised of a series of protocol services: gateway, client, and Directory.
Gateway services
Gateway services moves bulk content in and out of FirstClass using:
• Simple Mail Transfer Protocol (SMTP)
• Network News Transfer Protocol (NNTP)
• Internet Mail Application Protocol (IMAP4)
• Post Office Protocol 3 (POP3) importer
• Hyper Text Transfer Protocol (HTTP) for web servers.
Client services
Client services renders post office content to alternative clients using:
• HTTP
• File Transfer Protocol (FTP)
• POP3 client
• Internet Mail Application Protocol (IMAP4).
Directory services
Directory services renders Directory content to alternate clients using:
• Finger
• Lightweight Directory Access Protocol (LDAP).
Using Gateway, Client, and Directory services, Internet Services expands the server's functionality to encorporate popular Internet protocols.
Protocol definitions
• HTTP
HTTP is the underlying protocol used by the World Wide Web (WWW). HTTP defines how messages are formatted and transmitted, and what actions web servers and browsers should take in response to various commands. For example, when you enter a URL in your browser, this actually sends an HTTP command to the web server directing it to fetch and transmit the requested web page.
• SMTP
SMTP is a protocol for sending email messages between servers. Most email systems that send mail over the Internet use SMTP to send messages from one server to another; the messages can then be retrieved with an email client, such as FirstClass, POP3 or IMAP4. In addition, SMTP is generally used to send messages from a mail client to a mail server. This is why you need to specify both the POP or IMAP server and the SMTP server when you configure your email application.
• POP3
POP is a protocol used to retrieve email from a mail server. Most email applications use the POP protocol.
• IMAP4
IMAP is a protocol used for retrieving email messages. The latest version, IMAP4, is similar to POP3 but supports some additional features. For example, with IMAP4, you can search through your email messages for keywords while the messages are still on the mail server. You can then choose which messages to download to your machine.
• FTP
FTP is a protocol used on the Internet for sending files. Many organizations have a designated FTP server used only for uploading and downloading files for their users.
• Lightweight Directory Access Protocol (LDAP)
LDAP is a directory access protocol used to search, read, and write directory information over a network. LDAP supports TCP/IP, which is necessary for any type of Internet access.
FirstClass LDAP support consists of Internet Services listening on the LDAP TCP port (389) and servicing lookup requests. In other words, using any LDAP client, for example Outlook Express, you can access your FirstClass Directory including your network Address Book. FirstClass LDAP support includes both authenticated and unauthenticated access but does not support using LDAP to update the FirstClass Directory (no Dir Sync) or credentials lookup. If you access a name in FirstClass using LDAP these are the information fields you get:
• Name
• Email address
• Company
• Department
• Web page
You can set what your users can view in the Directory (accessed through LDAP or any other protocol) using FirstClass Directory filtering, see FirstClass Administrator's Guide. For example, you can configure your system to prevent unauthenticated users from accessing your system's Directory, while authenticated users can continue to have full access to the Directory including their network Address Book. To configure the LDAP protocol for your system, see Basic Internet Setup - Directory.
• Finger
Finger is a UNIX program that takes an email address as input and returns information about the user who owns that email address. On some systems, finger only reports whether the user is currently logged on. Other systems return additional information, such as the user's full name, address, and telephone number, which the user must first enter.
Understanding domain names and IP addresses
You can think of domain names as the user-friendly form of an IP address. Users find it easier to remember addresses such as, www.huskyplanes.com as opposed to numbers, such as 192.166.0.0. A domain name identifies one or more IP addresses. An IP address is a unique number that identifies any machine, for example, your mail server, web server, FTP server (if any), and end user computers.
If you are using Windows, you can define multiple IP addresses (that is, you can define multiple servers) on your network interface card (NIC). If you choose not to define multiple IP addresses, you should list your default domain IP address on the Multiple Sites & Languages form. You can also register multiple domain names and point them to one IP address, see Using the Multiple Sites & Languages form.
Domain names are used in both URLs and email addresses to identify particular web pages and email recipients respectively. For example, the Husky Planes web site address is www.huskyplanes.com. The whole domain name in this address is huskyplanes.com and represents one IP address, 192.166.0.0. Roy Allen’s email address on Husky Planes is roy_allen@huskyplanes.com. Again the domain name is huskyplanes.com. In the case of the email address, roy_allen signifies the recipient’s unique name.
Note
Each name in an email address must be unique to each user on your system. Otherwise, you may find your server unable to distinguish between two recipients and, thus, unable to properly deliver mail.
Every domain name has a suffix that indicates which top level domain (TLD) it belongs to. There are only a limited number of such domains. For example:
• gov – Government agencies
• edu – Educational institutions
• org – Organizations (nonprofit)
and others.
Understanding the role of the DNS server
Because the web servers work with IP addresses and not domain names, every system requires a separate Domain Name System (DNS) server. This server tells a web or mail server where to deliver messages by translating domain addresses into IP addresses and verifying that both are the same.
Generally, when a FirstClass user sends an email message to a recipient (either inside or outside of a FirstClass system), Internet Services sends it out using the SMTP protocol. This message then finds its way to the recipient’s machine through the recipient’s mail server, where the recipient’s system performs its own DNS server verification on the email address and then delivers it to the recipient. DNS servers keep a list of all registered domain names and corresponding IP addresses worldwide.
Let’s take a look at the path of an email sent by Husky Planes employee Roy Allen:
All of the steps in the above diagram may not always occur, depending on how your server and network are configured to handle mail. For example, you may not have reverse DNS enabled for your system.
In this example, Roy Allen sends an email message from his client machine to his friend Ann Jones at Avalon Academy. In Step 1, this message goes to the FirstClass server, where it is then handed over to Internet Services.
In Step 2, Internet Services queries Husky Plane’s DNS server as to which outside server it must send the message (DNS lookup). The DNS server then matches the domain name in the email address (avalon.com) to the IP address of the recipient’s server. If an IP address is correctly matched with the domain name of the email address, this information is sent back to Internet Services , which then promptly sends out the message (this is Step 3).
The message, now on its way to Ann Jones at Avalon Academy, will have to go through a similar process but in reverse. In Step 4, Avalon Academy’s Internet Services queries its DNS server as to which server the message came from. Avalon Academy’s server then sends the message to Ann Jones’ client machine.
The same process occurs when a user enters a web site address (for example, www.huskyplanes.com).
Understanding gateways
Gateways are a bridge between your system and other devices or systems. There are two major types of gateways: server-to-server and third-party. The purpose of either gateway is to transfer mail, conference content, and Directory information to another messaging server. Server-to-server gateways connect two FirstClass systems directly, while third-party gateways allow FirstClass servers to exchange mail and synchronize directories with foreign mail systems. For a complete explanation of gateways and creating gateways, see FirstClass Administrator’s Guide.
Understanding reserved words
There are special words that are reserved for system use only. These words cannot be used to name any other object (document or container) in your FirstClass system. An example of a reserved word is "Permissions". For a complete listing of reserved words, see Reserved words in our online help.
Installing Internet Services
This chapter describes the system requirements and installation procedures for Internet Services.
Windows
You can install Internet Services on Microsoft® Windows 95, 98, NT, and Windows® 2000.
Note
Although Internet Services can be run on Microsoft Windows 95 and 98, we do not recommend it. Microsoft Windows NT and Windows® 2000 is preferable, especially for systems with large Internet Services traffic.
System requirements
For Internet Services system requirements for Windows, see FirstClass Administrator’s Guide.
Installing FirstClass Internet Services
For Internet Services installation instructions for Windows, see FirstClass Administrator’s Guide.
Mac OS
You can install Internet Services on Mac OS 8.x, 9.x, and X.
System requirements
For Internet Services system requirements for Mac OS, see FirstClass Administrator’s Guide.
Installing FirstClass Internet Services
For Internet Services installation instructions for Mac OS, see FirstClass Administrator’s Guide.
Configuring Internet Services
As a FirstClass administrator, you must configure several forms before you can properly run Internet Services. In this chapter, we will discuss how the Husky Planes' administrator configures information in:
• advanced forms (if required).
Note
All form fields and tabs may not be described. For a description of all the fields on these and other forms, see our online help or press F1 when you have the form open.
Most administrators with standard running sites only configure the Basic Internet Setup form.
Basic Internet Setup form
You must complete the Basic Internet Setup form to enable the various Internet protocols on your system. The form may seem large, but you only need to complete those sections that are important to you. For instance, if you don’t intend to poll for newsgroups, you need not complete the News tab. In this section, we’ll walk through the Husky Planes setup. For a complete description of all fields on the Basic Internet Setup form, press F1 when you have the form open.
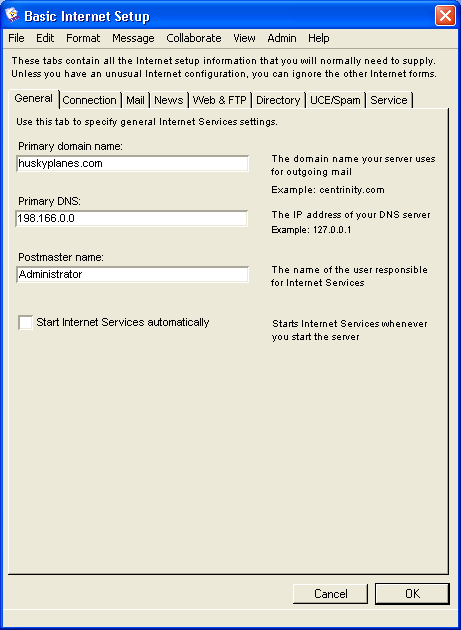
Basic Internet Setup - General
On this tab, we provide some general information about the Internet Services system setup.
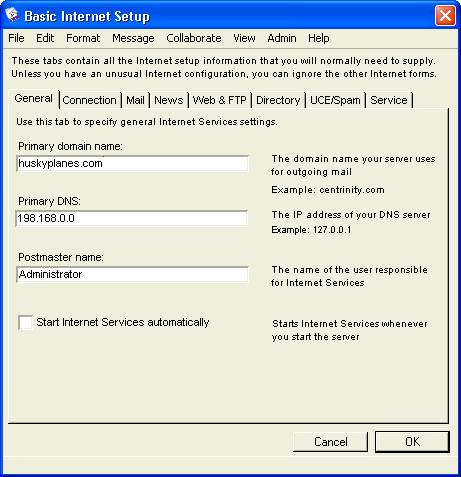
The "Primary domain name" for our company is "huskyplanes.com". When we send Internet mail to people, our address will be in the format user@huskyplanes.com. Since we maintain our own DNS machine we entered, "198.166.0.0" in "Primary DNS". If you use your ISP’s DNS, you’ll need to get this IP address from them. If you have more than one DNS machine available, you will need to add those addresses on the Advanced DNS form, see our online help or press F1 when you have the form open.
We want all email directed to postmaster@huskyplanes.com to go to an account we have created for the user called "webadmin". We’ve done this rather than using administrator because we want to separate Internet and server administration duties.
We've selected "Start Internet Services automatically" because we always want Internet Services to automatically run when the FirstClass server is started and both modules are located on the same machine.
Note
If the server and Internet Services are installed on separate machines, you cannot select this feature, as the server cannot control another machine. Also, if you run FirstClass server as a Windows NT service, it will not automatically start Internet Services. For details about running FirstClass server as a Windows NT service, see FirstClass Administrator’s Guide.
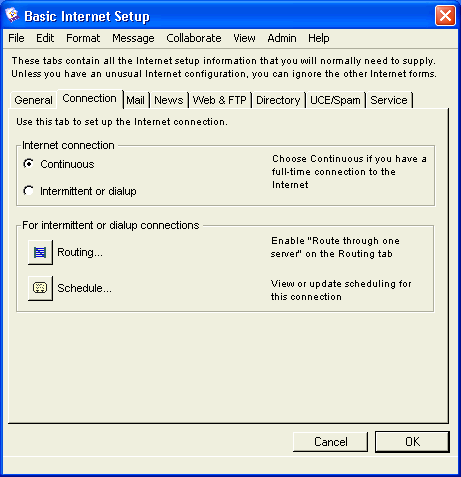
Basic Internet Setup - Connection
On this tab, we indicate how we connect to the Internet. Husky Planes has a continuous Internet connection, so all we need to do is select Continuous. We will need to set some scheduling information, but we’ll deal with that in Setting the Internet Services connection schedule. We’ll discuss dial-up connections in Configuring a dial-up connection.
Basic Internet Setup - Mail
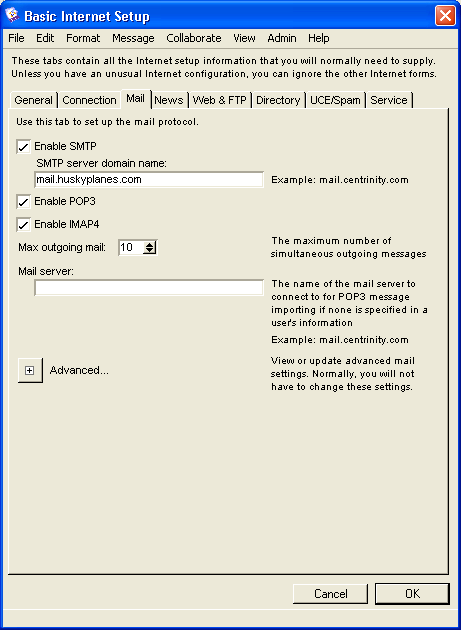
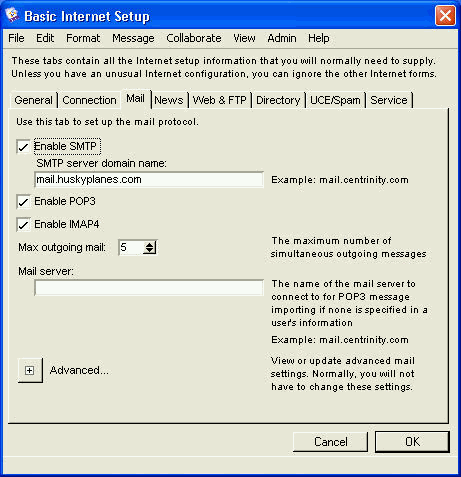
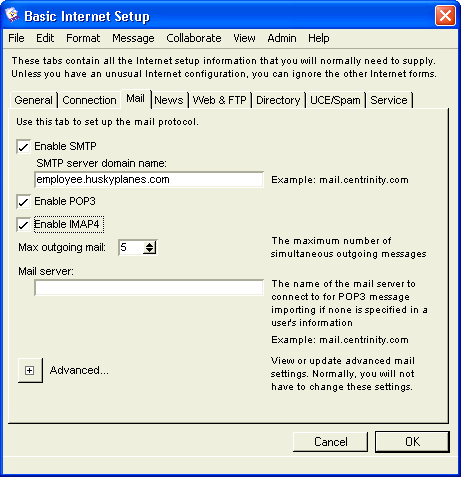
On this tab, we set basic Internet mail protocols. You only have to do this if you want your users to receive Internet email. On Husky Planes we have all mail protocols selected, as we want of our users to be able to receive SMTP, POP3, and IMAP4 mail.
If you enable SMTP mail, you must enter a server domain name, in our case "mail.huskyplanes.com". This name resolves to the IP address of the computer that Internet Services is installed on. We have registered it in the DNS. If you enable POP3 mail, your users users will be able to log in using a POP3 mail client, like Eudora, and retrieve their email. Your users can enter their own POP3 mail accounts in their user preferences, see our online help or press F1 for more information. If you enable IMAP4 mail, your users will be able to log in using an IMAP4 client, like Outlook Express, and retrieve their email. For more information about logging in with an IMAP4 client, see our online help or press F1.
We picked "10" as the number for "Max outgoing mail". This is large enough to maintain significant mail flow but not so large as to cause memory problems. You may want to adjust this number if you notice mail overflow or low memory problems on your system. You can monitor your mail status on the Internet Services Monitor, see Internet Services Monitor display.
On Husky Planes we leave "Mail server" blank, as we leave it up to our users to fill out their own Mail Import Accounts form, see our online help or press F1 when you have the form open. This field only needs to be filled out if all your users are going to be retrieving POP3 mail from the same mail server.
Basic Internet Setup - News
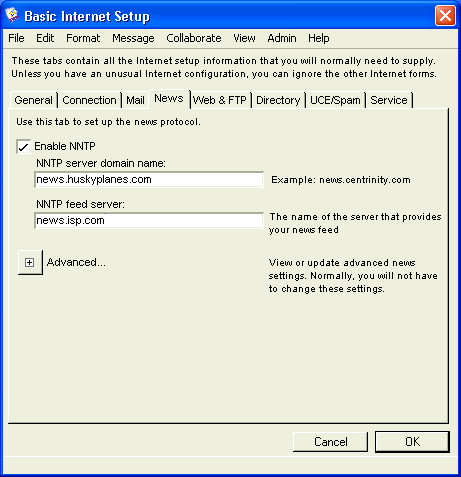
On this tab, we set basic Internet news settings. You should only do this if you want to receive newsgroups.
On Husky Planes we allow our users to register with Newsgroups and have, therefore, selected this choice. We use "news.huskyplanes.com" as our news server domain name and have registered it in our DNS. Since Husky Planes does not maintain its own news server, we use the name of the news server our Internet Service Provider (ISP) owns. If you don’t maintain your own news server, you will need to arrange with your ISP which newsgroups they send to you.
Basic Internet Setup - Web & FTP
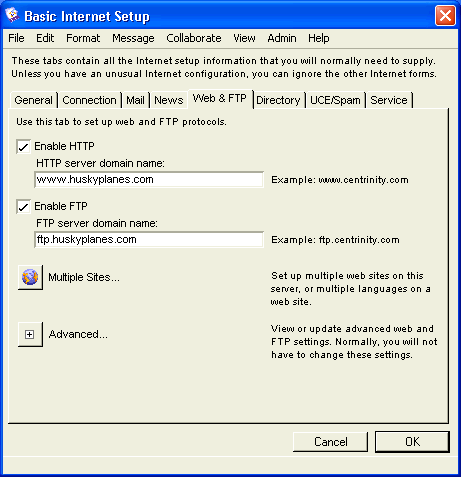
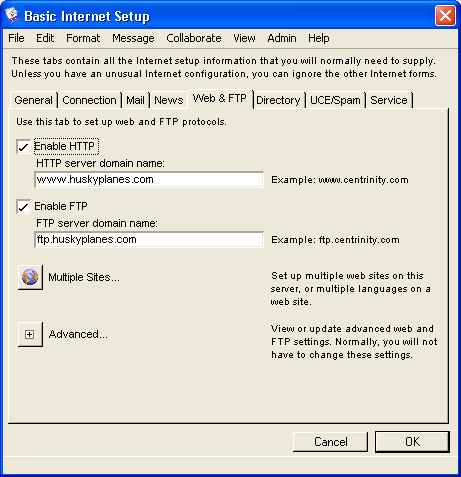
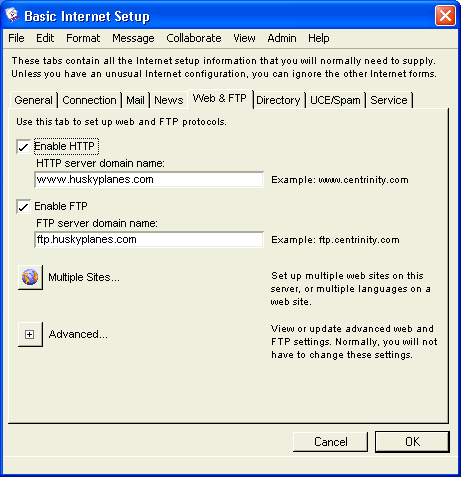
On this tab, we set up the HTTP protocol (allowing people to access our web site with their web browsers) and the FTP protocol (allowing people to download files from our web site).
On Husky Planes, we have enabled both HTTP and FTP protocols and entered their corresponding domain names. Since we are a business, it is very important for people to be able to access our web site and download files using an FTP client. For information on the FTP folder, see FTP folder. As with other domain names configured on this form, both the HTTP and FTP domain names are registered in our DNS.
Basic Internet Setup - Directory
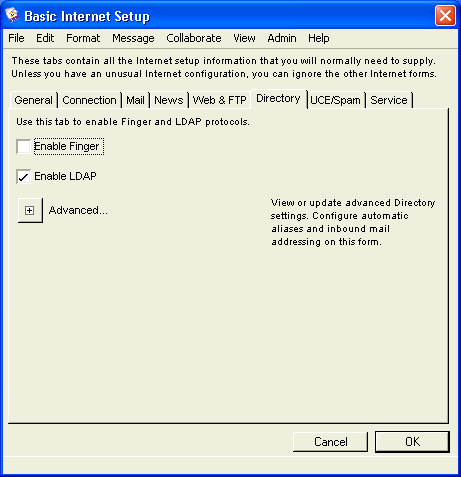
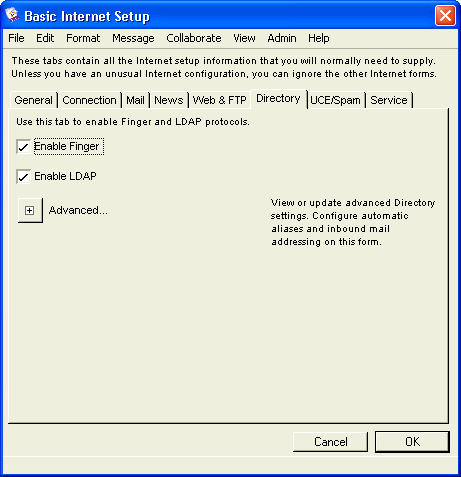
On this tab, you enable Directory filtering to control the exposure of users’ email addresses through Finger or LDAP clients. For more information on LDAP, see Understanding Internet Services protocols.
On Husky Planes, we have disabled the Finger protocol but enabled LDAP lookup on our system.
Basic Internet Setup - UCE/Spam
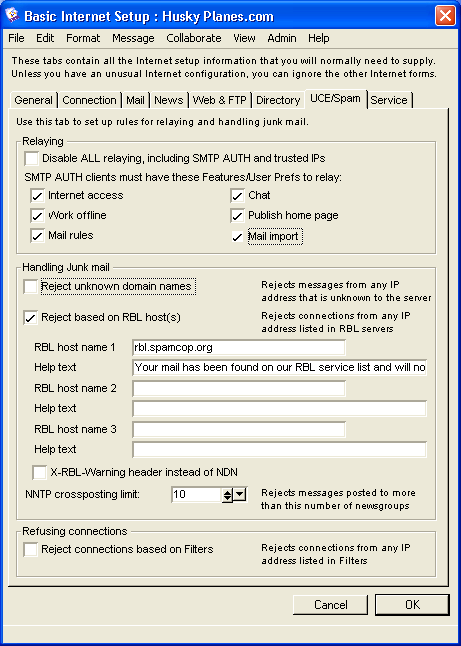
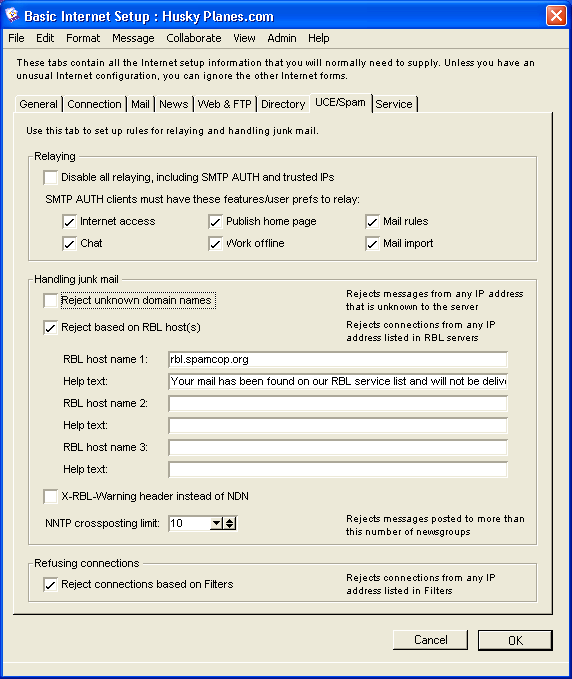
On this tab, we deal with the problem of SPAM, or unsolicited email. For more information on controlling SPAM and securing your Internet Services environment, see Managing system security. On this tab, you can control which messages your site relays, which messages to accept, and how to handle these messages based on your choices.
Depending on your system security needs, there are different options you can choose.
Relaying
In this section, you choose if you want to relay messages and, if so, what criteria is required for your users. The first and most secure choice is to disable relaying for all including SMTP AUTH users (fully authenticated users) and trusted IP addresses. If you are experiencing many problems on your site due to relaying, this option provides you with the opportunity to stop the flow completely and fix the leaks.
The other choice you have is to allow relaying for SMTP AUTH users only. You can either allow authenticated users to relay regardless of which features they have on their User Information Form, or you can limit relaying to users with certain features.
As per the above picture, the Husky Planes administrator allows relaying but only for authenticated users with certain features.
Handling Junk mail
In this section, you choose how to handle the junk mail entering your system. Husky's administrator does not automatically reject unknown IP addresses but prefers to use the RBL options instead to deal with junk mail.
Reject based on RBL hosts(s)
Husky's administrator checked this option. This is to ensure all incoming mail will be checked by the RBL service and any known SPAMmers automatically rejected with a corresponding message in "Help text" (see online help for details on "Help text" messages or press F1). This message describes why the connection was refused and contains a link to the RBL site where corrective action can be taken. Husky's administrator uses this message for senders who are refused:
"Your mail has been found on our RBL service list and will not be delivered. Go to rbl.spamcop.org for more information".
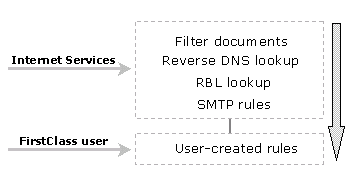
There are several reliable RBL services you can use with varying degrees of aggressiveness. We recommend you choose one or two good RBL services, which you can find on the Internet, that are not too aggressive in their spammer listings. If you are using more than one RBL service you should put the least aggressive service first and the most aggressive service last. Internet Services checks the RBL servers from the most aggressive service (to filter out the majority of bad mail) to the least aggressive service (to catch any remaining SPAM that may have slipped through).
X-RBL-Warning header instead of NDN
This option forwards email to the recipient but with a warning in the header. This warning tells the recipient that the email address has been found in the system RBL service and that he should use his personal mail rules to handle it, see online help.
We left this option unchecked, as we want to control incoming mail before it hits the recipient's Mailbox and deal with any spammers before they enter our system. So any IP addresses from mail senders found on our RBL service list will automatically receive an NDN with the corresponding "Help text" message.
Note
Your Filter document overrides any settings on the UCE/Spam tab, see Using the Filters folder for system security.
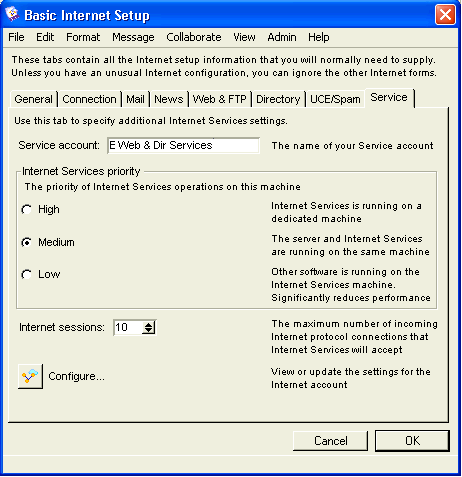
Basic Internet Setup - Service
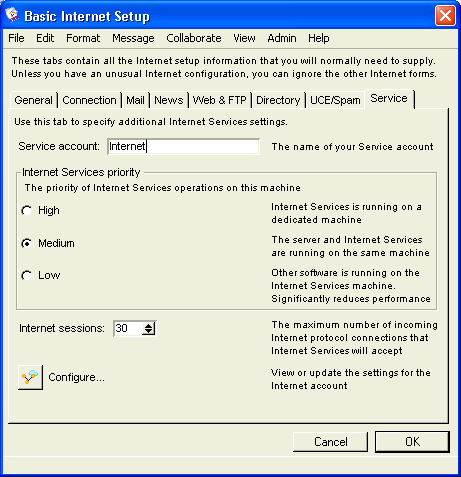
On this tab, we configure additional Internet Services settings.
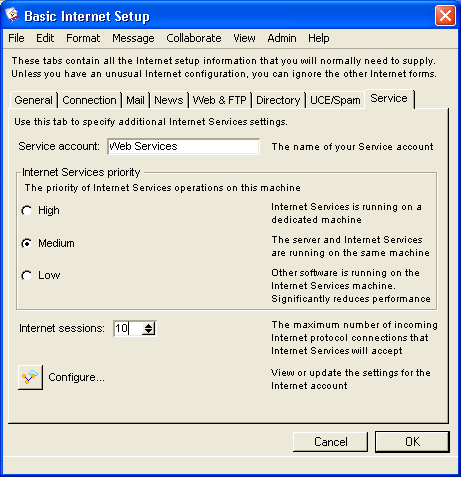
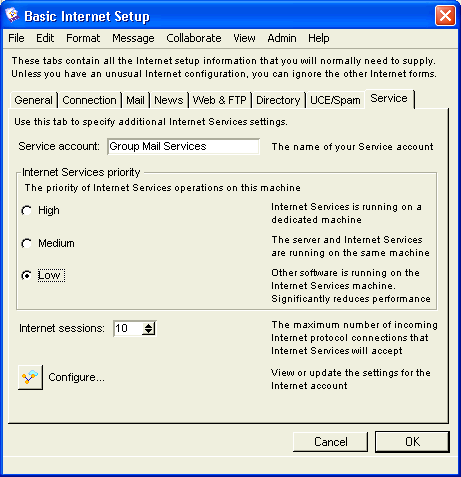
On Husky Planes the name of our gateway service is "Internet". This name must match the name on the gateway form in order for the gateway to connect to the server. For the "Internet Services priority", we selected "Medium" because we have Internet Services and FirstClass server installed on the same single processor machine. If they were installed on different computers or on a single multiprocessor computer, we would choose "High". If you have other software running on the Internet Services machine, you would choose "Low".
For "Internet sessions", we are basically estimating the number of concurrent users of Internet protocols, in this case "30". Each of these sessions has the potential to occupy one server network session, see FirstClass Administrator’s Guide for information on sessions. Since Internet Services uses caching, the actual number of sessions used may be less than the number of requests. For information on checking your session load, see Monitoring your system.
Configuring the Internet gateway form
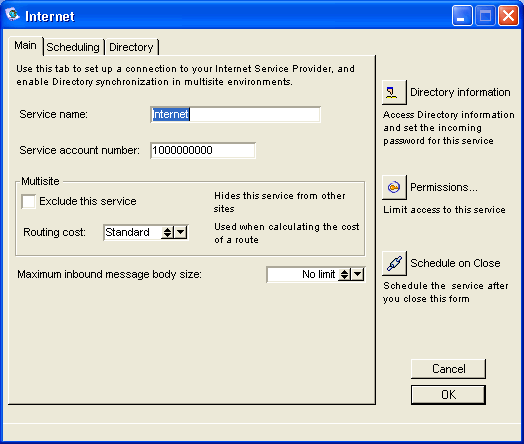
The Main tab on the Internet gateway form holds general information about your account and Directory synchronization. In order for the gateway to connect to the server, the name entered in "Service name" must match the gateway name entered in "Service name" on the Service tab on the Basic Internet Setup form, see our online help
or press F1 when you have the form open.
Note
In a clustered Internet Services environment, you will have multiple instances of this form each with a different configuration as per your service, see Clustering Internet Services to plan your system.
Setting the Internet Services password
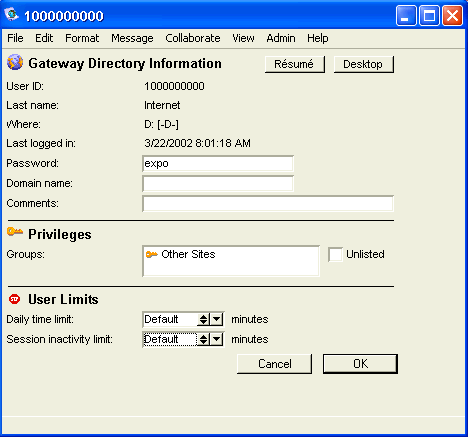
You must set the Internet Services gateway password so Directory services can work properly. By default, the password is blank so, for security reasons, we recommend you enter a password immediately.
Note
The password you set on the Internet gateway form must be the same as the one set in the InetSvcs.rez settings file, see Logging into Internet Services.
To set the Internet Services password:
1 Click Directory information on the Internet gateway form in the Gateways folder on the administrator’s Desktop.
2 Enter the password you want to use to log into Internet Services . After you have entered your information, click OK to save your settings:
Internet Services and FirstClass Server resident on same machine
If Internet Services is installed on the same machine as FirstClass server, you can either connect with a local connection (default) or with a TCP/IP connection. If you connect locally, you don’t need to modify the settings. If you connect with TCP/IP, you must enter the IP address of your server machine.
Note
It is strongly recommended that you use the TCP connection method, as it is more reliable than connecting locally.
After you have entered your information, click Save.
Internet Services and FirstClass server resident on separate machines
If Internet Services is installed on a different machine from FirstClass server, you must connect using TCP/IP and enter the IP address of your server machine. This tells Internet Services where the FirstClass server is, enabling communication between machines.
After you have entered your information, click Save.
Setting the Internet Services connection schedule
Now that we have gone through a basic setup, we need to configure the Internet Services connection schedule. You can open this form by:
• logging in as the administrator and opening the Internet form in the Gateways folder on the administrator’s Desktop
• clicking Configure on the Basic Internet Setup - Service tab, see our online help or press F1 when you have the form open.
Setting the Scheduling tab
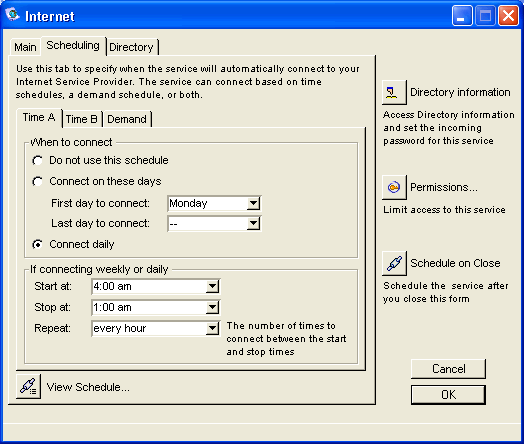
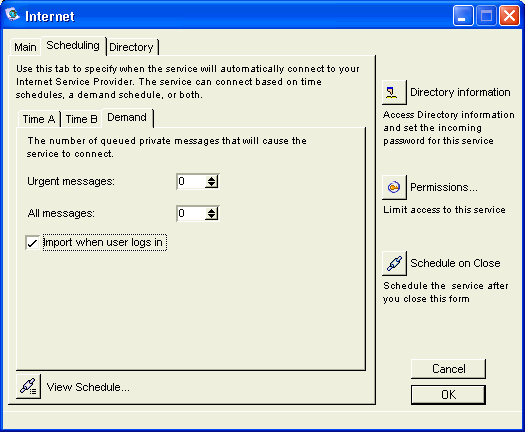
The Time A and Time B tabs control incoming email (POP3), news (NNTP), and dial-up connectivity. The Demand tab controls when the service will connect based on the number of incoming emails queued or when the user logs in (depending on what you choose).
This is how we we set Husky Plane’s schedule:
Since Husky Planes does business 24 hours a day, 7 days a week, we want to receive Internet email from our ISP using POP3 everyday. We chose a 4:00 am start time so email will be there for early risers and a 1:00 am stop time for trash collection and administrative tasks when usage would probably be low. Between 1:00 AM and 4:00 AM no email or news is retrieved.
In "Repeat" we selected "every hour" as the interval to connect between the start and stop times. If users find they are waiting too long for information, you can increase the "Repeat" entry. Of course, if there is a great deal of email and news, the individual connections will be long.
On Husky Planes, we don’t need to use the Time B tab. The Time B tab performs the same function as the Time A tab but adds more flexibility when setting up your schedule. For example, if you have a connection where you are charged by time, or you don’t want to frequently retrieve email and news during off hours (for example, if you have a continuous connection but don’t want to put extra pressure on your system’s broadband capacity).
Setting the Demand tab
We decided to retrieve messages and deliver them to users when they connect (or on the hour as set on the Time A tab). This setting lightens the load on our server, as the messages are stored on the delivering mail server until the user is logged in (or on the hour as set on the Time A tab). Coupled with our selections on the Time A tab, this means Husky Planes will retrieve messages every hour or if a user logs in during that hour.
Configuring a dial-up connection
Husky Planes has a continuous connection to the Internet. However, if your organization uses a dial-up connection (you dial into an Internet Service Provider to send and retrieve email and news) rather than a continuous connection to the Internet, you must configure a dial-up connection. We will cover a basic dial-up setup here.
To configure a dial-up connection:
1 Select Intermittent or dial-up on the Connection tab on the Basic Internet Setup form.
2 Select "Route through one server", on the Advanced Mail - Routing tab, and enter the IP address of that server.
3 Install and configure dial-up software on the same computer where you have Internet Services installed.
Note
Configure Dial-Up Networking on Windows or a third-party software router (such as the Vicom Internet Gateway) to handle routing of network and IP traffic for dial-up connection support on Mac OS.
4 Set a low time-out value on your dial-up software.
5 Complete the Basic Internet Setup form, as described in this chapter and our online help.
6 Enter information in the Scheduling tab on the Gateways form and complete the Demand tab to force a dialup connection, based on the number of queued messages for outgoing mail (SMTP).
Note
The Demand tab can also be used on continuous connections.
The schedule you set on the Scheduling tab controls when you connect. The low time-out value you set on your dial-up software controls when that connection is dropped. If you have a set rate for peak hours you can set the Time A tab for frequent polling (for example, every five minutes). During off hours, where you are charged higher rates, you can set the Time B tab for less frequent polling (for example, every two hours).
You should configure your Demand tab according to how many messages you want queued before initiating an automatic dial-up connection. For example, if you want all urgent messages sent out immediately, set "Urgent Messages" to a lower number. If you don’t require all your messages to go out immediately, set "All messages"
to a higher number.
Advanced Internet setup
Most administrators with standard running sites only configure the Basic Internet Setup form. However, if there are any exceptions or particular issues to be addressed outside of the normal site configuration, you must use the advanced Internet setup forms. Since Husky Planes is a standard running site, the advanced forms are left with the default settings. For a description of the advanced Internet Services forms and other forms, see our online help or press F1 when you have the form open.
Since the Advanced Directory form is somewhat more complicated to understand provide a discussion here of how you should configure it if you use it.
Advanced Directory
Use this form to configure Finger and LDAP protocols and to set up Internet aliases, if they differ from what you have on the Basic Internet Setup form.
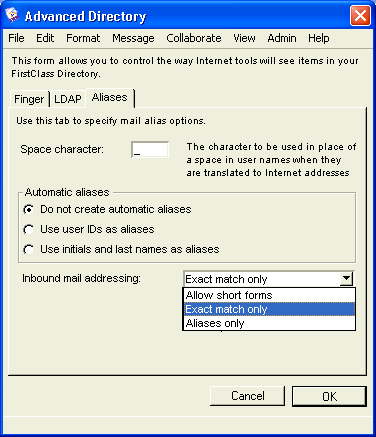
Advanced Directory - Aliases
With the exception of the default aliases, Husky Planes does not allow its users to have additional email aliases. Each user can only receive email at his standard Internet address, for example, roy_allen@huskyplanes.com. If you want to provide your users with additional aliases, you can do so on this tab, or you can manually configure them individually on the User Information form (see our online help or press F1 when you have the form open).
The Aliases tab provides options for the delivery of inbound SMTP mail. The "Automatic aliases" options allow you to set the type of mail addressing, whereas "Inbound mail addressing" lets you decide the level of matching you want to allow on your system. This feature could even be used to stop some of your users from receiving Internet mail. Using a combination of these two fields, you can set tighter controls on how inbound SMTP mail reaches your users.
For "Automatic aliases", we selected "Do not create automatic aliases" because we don’t want Internet Services automatically creating email aliases outside of the default alias, firstname_lastname@huskyplanes.com. For "Inbound mail addressing" we selected "Exact match only"
Both of these settings is the default because we want the recipient’s name to have to match the entire entry on his User Information form. Husky Planes has this option selected to only allow addresses with exact matches to be delivered, for example, roy_allen@huskyplanes.com or roy@huskyplanes.com. Both of these email addresses are on Roy Allen’s User Information form.
Let’s take a look at some addressing scenarios:
Scenario 1
If we selected both Do not create automatic aliases and Allow short forms, the following address could no longer reach Roy Allen:
• rallen@huskyplanes.com (as this is his user ID)
However, the following addresses would reach Roy Allen:
• ro_al@huskyplanes.com (or any other short form that produces a single match)
Internet Services does best single match automatic aliasing. This means, if you have the above settings on your system, Roy Allen can receive Internet mail addressed to different combinations of his email address roy_allen@huskyplanes.com, if no other user on the Husky system has a similar name. If there are other users on the system with a similar combination of letters, the fully qualified email address of the recipient must be used (for example, roy_allen@huskyplanes.com).
Scenario 2
If we selected both Do not create automatic aliases and Exact match only, the following address could no longer reach Roy Allen:
• ro_al@huskyplanes.com (or any other short form that produces a single match).
However, the following addresses would reach Roy Allen:
• roy_allen@huskyplanes.com (from the first and last name on his User Information form)
• roy@huskyplanes.com (from the mail alias entered on his User Information form).
Scenario 3
If we selected both Do not create automatic aliases and Aliases only, the following address could not longer reach Roy Allen:
• ro_al@huskyplanes.com (or any other short form that produces a single match)
• roy_allen@huskyplanes.com (from the first and last name on his User Information form).
However, the following address would reach Roy Allen:
• roy@huskyplanes.com (from the mail alias entered on his User Information form).
Scenario 4
If you want to stop your users from receiving incoming mail altogether:
• Select Do not create automatic aliases from the Automatic aliases options.
• Select Aliases only from the Inbound mail addressing options.
• Clear Mail aliases on the User Information form.
Starting Internet Services and logging in
Before you can log in to Internet Services, you must:
• set a password for Internet Services on the Gateway Directory Information form and save it
• enter information in the Internet Services account form in the Gateways folder.
Starting Internet Services
You can have Internet Services start automatically when you start your server, by choosing the right setting on the General tab on the Basic Internet Setup form. If you choose to start Internet Services manually, or if Internet Services is running on a different machine than your FirstClass Server, do the following:
Double-click the Internet Services icon:
The Internet Services application resides in your FCServer folder. The file is called Fcintsrv.exe (Windows) or FirstClass Internet Services (Mac OS).
Hint
If Internet Services does not start, check your password or connection protocol in your connection settings file.
Internet Services console
When you start Internet Services, a console appears on your screen. Some of the information the console displays is:
• the Internet Services version running
• the operating system running
• a confirmation that your server is running
• any error messages pertaining to Internet Services
• a confirmation that debugging is turned on.
The same menus exist on Windows and Mac OS with the exception of the Edit menu, which is not available on Mac OS. The Help menu has the usual system specific help options.
Note
Not all menu items are mentioned below. For debugging levels and categories, see our online help or press F1.
The following information describes the Internet Services console and some of its more common menu items:
File
Exit (Windows), Quit (Mac OS)
Exit Internet Services.
Edit (Windows only)
Copy
Copy selected text.
Mark
Set the point at which to select text.
Select All
Select all text in the window.
Font
Change the font of console text.
Service
Get configuration
Reload the configuration information from the forms in the Internet Services folder.
Force Internet connection
Force an immediate connection to the Internet.
Priority
Set Internet Services priority. For more information, see the Service tab on the Basic Internet Setup form.
Diagnostics
Flush HTTP Cache
Flush system cache.
You do not need to flush HTTP cache after most changes to your web sites, unless you are serving out content from read-only files from external volume(s).
Logging
Set debugging categories and their logging levels for Internet Services .
If logging is set from the Internet Services console, the settings are not saved and will be reset the next time Internet Services is started. For more information on Internet Services debugging categories and logging levels, see Setting Internet Services debugging in our online help.
The Diagnostics menu is intended for use by your reseller or Centrinity Customer Support in resolving technical problems you may encounter. If required, they will explain the use of the menu items.
The Internet Services console, coupled with the FirstClass Server console, is useful as a first line of defense in troubleshooting system problems. For information on the FirstClass Server console, see FirstClass Administrator’s Guide.
Logging into Internet Services
When you installed Internet Services, a settings file called Inetsvcs.rez was placed in your FCServer folder. Use this file to connect to Internet Services.
Note
You need a client installed on your machine or you will receive an error.
Before you can log into Internet Services, the InetSvcs.rez file has to be configured correctly. This is done through the Internet gateway form located in the Gateways folder on the administrator’s Desktop, see Configuring the Internet gateway form or by clicking Service tab on the Basic Internet Setup form.
Note
Remember, you must enter the same user ID and password on the login screen that you entered on the Internet gateway form.
After you have configured your settings and set your password, you should log in as Internet Services, using the settings file, to check that your information is correct.
Using the HeaderMatch document to plan your system
The HeaderMatch document is a configuration file located in the Internet Services folder on the administrator’s Desktop. It contains scripting commands to provide limited control over the internal behavior of the Internet Services HTTP module. Its main purpose is to look at incoming Internet headers and steer users according to both the content of these headers and how you have coded the HeaderMatch document to deal with this content. This is called browser steering. If you have a standard default FirstClass web site setup, you probably won't need to change the HeaderMatch document at all, as it is already configured to steer users to appropriate template sets based on how they log in to your system.
Note
You can only have one HeaderMatch document per site, or per cluster on your site.
The HeaderMatch configuration command
Internet Services reads the HeaderMatch document on a line-by-line basis, where each line can be either a comment or a HeaderMatch configuration command. Lines that contain only whitespace or that begin with a pound (#) sign are comments. All other lines are command lines.
The HeaderMatch configuration command has three components: site specifier, condition, action, and has the following syntax:
site specifier: [condition] action
where
• site specifier specifies which sites are affected by the command
• condition sets a particular condition to trigger the action
• action is the action of the condition.
Site Specifier
If you have used the Multiple Sites and Languages form to configure multiple sites, you can specify which site should be affected by entering the site alias name, see HeaderMatch examples. If the site has multiple languages, you can specify the language by adding a period after the site alias followed by the appropriate ISO language code. If you have not used the Multiple Sites and Language form, or if you want a command to affect all sites, you use an asterisk (*) at the beginning of the line.
Condition
You can use condition when you want to execute a command under certain circumstances. For example, you may have a template set that only works with one type of browser, see HeaderMatch examples, or you may want to disable some advanced feature using site preferences.
The condition argument can take three forms:
• a test of one of the browser's HTTP headers
• a test of a site preferences field
• a test of an Internet Services script variable.
To test an HTTP header, use this syntax:
IF http header name [ == | != ] <regular expression>
where
• http header name is the name of the HTTP header you wish to examine, for example user-agent
• regular expression is an expression matched against the value of the header in question
To test the value of a site preferences field, use this syntax:
IF SITEPREF FieldID[.Index][== | != | > | < | >= | <=] value
where
• FieldID[.Index] retrieves field data from the currently opened object
• [== | != | > | < | >= | <=] are logical operators
• value is the value of the preferences field you want to test
To test the value of an Internet Services script variable, use this syntax:
IF VAR variablename [== | != | > | < | >= | <=] value
where
• variablename is the name of the Internet Services script variable
• [== | != | > | < | >= | <=] are logical operators
• value is the value of the Internet Services script variable variable you want to test
Action
The action is what you want the command to actually do. Actions fall into two categories: SET actions, which are used to control certain aspects of HTTP's internal behavior and VAR actions, which set Internet Services script variables.
Note
SET and VAR variables are enhancements to the HeaderMatch syntax that allow you to omit the IF<condition> if you want <condition> to always be true.
VAR actions
VAR actions take the form:
• VAR variablename = value
SET actions
An important thing to remember about SET commands is that each parameter may only be configured once during the execution of the HeaderMatch document. If a second SET command is issued for the same parameter, it will be ignored.
Note
If a condition prevents a SET command from execution, this does not count as a single configuration.
The SET parameters and their possible values are:
• SET .templates = foldername
This parameter changes the name of the folder from which Internet Services uses to load templates. You can use this syntax to set up multiple template sets to be used on a single site depending on certain conditions, for example, different template sets for different browsers.
• SET calview = formID
This parameter changes the default formID used when viewing calendars. Normally, all calendars open in week view (formID 159), but you may wish to override this behavior. Other form IDs you may want to use here are: 167 (Daytimer view), 164 (Today view), 160 (Daily View), 158 (Monthly View) and -1 (List View).
• SET allowbasicauth = 1 | 0
This parameter disables the use of the browser's internal authentication mechanism.
Note
Some sites using the FirstClass 7.0 login form may wish to do this in order to increase security.
• SET contenttype = mimetype
This parameter overrides which content type Internet Services tries to use when loading templates. This overrides the Internet Services default code and forces Internet Services to look for templates with the specified content. For instance, some older WAP/WML browsers do not correctly ask for WML content. You can force Internet Services to try and use WML templates (if you have them on your system) by configuring the contenttype to an appropriate value.
• SET forcehttpver10 = 1 | 0
• SET keepalive = 1 | 0
The forcehttpver10 and keepalive SET variables control how an HTTP server sends HTML and handles connections. You should only set them on the recommendation of customer support. Each of these variables can be set to either true or false, for example:
• setting allowbasicauth to false (default is true, which allows login if the authorization form is disabled) prevents the use of "basic authentication scheme" as a fallback if forms-based authentication is disabled or fails.
• setting forcehttpver10 to true (default is false) will force Internet Services to return the response as HTTP/1.0, which disables certain features, primarily chunked encoding
• setting keepalive to false (default is true) forces Internet Services to close the connection to the browser after it has sent the current response.
• SET icons = icons file name
• SET pictures = pictures file name
These parameters can be used to override the Internet Services default icon and picture resource files. By default, Internet Services looks for icons in the icons.rez file and pictures in the pictures.rez file. However, sometimes when running multiple template sets on a single site it becomes necessary for one of those template sets to use alternate icon or picture resources. In this case, the SET actions can be used to enable the alternate resources under the right circumstances.
HeaderMatch examples
Now that you understand the basic HeaderMatch document guidelines, let's take a look at some examples for:
• steering users to different template sets
• steering users to different web sites on your system
• Setting HTTP error responses
• Setting Internet Services script variables
• Adding HeaderMatch SET variables
Browser steering for different template sets
When planning your FirstClass system, you should be aware of the different browsers and platforms with which your users log in and where you want them go once they arrive on your web site. In this way, you can configure your HeaderMatch document accordingly. On a standard web site, you will have Mac OS users, Windows users, and those using different versions of both Netscape® and Microsoft® Internet Explorer (and perhaps other browsers, such as Opera). If you are running the default template set shipped with FirstClass in standard mode, your users will get the same web view of their Desktops using any browser.
Note
You can also run the default template set in an enhanced mode, see Customizing your web user’s interface for further information.
Say you want to point all Microsoft Explorer versions 5-9 users to a set of custom templates. This could be necessary if your custom templates contain content that can only be seen using higher version browsers. Using the HeaderMatch general syntax, you could add this line into your HeaderMatch document:
*: IF User-Agent == "MSIE [5-9]\..+Win" SET .templates = .customtemplates
where
• * is universal for all web sites on your web server
• User-Agent sets the specific browser (in this case Microsoft Internet Explorer versions 5 to 9)
• \..+Win backslash is an escape character that removes the special meaning for + and turns [] and 0 - 9 into special characters
• .templates = points users to the default template set on your system (in this case .customtemplates).
To create customized templates, see Creating custom templates.
Note
If you want to steer Mac OS users to a particular set of templates, substitute Win in the line of code with Mac.
Browser steering for different web sites
You can also configure your HeaderMatch document to steer users to different template sets you may have for different web sites you support, see Creating your web sites. To do this, you must configure your HeaderMatch document to a particular site based on the site alias name on the Multiple Sites and Languages form. As mentioned earlier, if you want to steer users to different
web sites on your system, don’t place an asterisk (*) in front of the code line, as this makes the code universal for all of your sites. Consider this example:
The line of code below steers users on Windows platforms and using Internet Explorer 5 or higher to the set of custom templates called .spanishtemplates, located in the site folder Spain. This does not affect steering on any other sites.
Spain: IF User-Agent=="MSIE [5-9]\..+Win" SET .templates= .spanishtemplates
where
• Spain is the web site alias name entered on the Multiple Sites & Languages form
If you want to steer only Mac OS users to this set of templates, the line of code would be:
Spain: IF User-Agent==".+Mac.+" SET .templates= .spanishtemplates
Setting HTTP error responses
You can set HTTP error responses in the HeaderMatch document. In the code below it states that on all sites, if the browser is Blazer, substitute a 204 error response with a 202. This is useful if some browsers cannot understand certain error responses; they can be directed to another one:
*: IF User-Agent == "Blazer 1\\.0/*.+UPG1 UP/4\\.0" SET 204response = 202
where,
• User-Agent sets the specific browser (in this case the Blazer)
• 204response is an error response
• 202 is the actual error substituted for error response 204
The 202 response is in .templates as "error202". There is no "error204" template, as the error is "No content", which means that Internet Services is acknowledging a request, but telling the browser not to display anything new. Some browsers don't handle 204 properly, so this is a way to tell Internet Services to send a 202 response instead of a 204 response.
Setting Internet Services script variables
If you want to set a particular interface format for users on more space-limited platforms, such as handheld devices, you can use Internet Services script variables to accomplish this task. The following entry states that on all sites, set the row number to ten and the column number to twenty.
*: IF User-Agent == "Windows CE" VAR ROWS = 10 AND COLS = 20 AND DEVICE = ""Compaq Ipaq""
Note
You must place double quotes ("")around a string if it contains spaces or tabs.
Adding HeaderMatch SET variables
The line of code below detects if an HTTP request has arrived from a caching net appliance, and adjusts the Internet Services response to the request to prevent problems encountered on the part of the appliance:
*: IF Via == "NetCache NetApp/5" SET keepalive = false AND forcehttpver10 = true
where
• * applies to all sites
• IF is the keyword that initializes an action if a condition is met
• Via is the HTTP header name
• == tests if a pattern is contained in the HTTP header value
• "NetCache NetApp/5" is the pattern to match
• SET sets one or more internal variables if the HTTP header contains the pattern to match
• keepalive = false is an internal variable that tells Internet Services to close the connection after sending the response to the current request
• AND is the keyword that indicates there is another variable to set
• forcehttpver10 = true is an internal variable that tells Internet Services to return HTTP/1.0 as part of the response (Normally, HTTP/1.1 is returned).
Clustering Internet Services to plan your system
Clustering refers to running multiple services of the same type, for example Internet Services or Voice Services, from a single FirstClass server. For details on clustering Voice Services, see the Voice Services section of the FirstClass Administrator’s Guide. You can use clustering to route different Internet protocols (for example, SMTP, NNTP, or HTTP) to better organize and balance your FirstClass environment. For example, you can dedicate a clustered machine to only handle one protocol or you can have multiple clusters for the same protocol to balance the traffic. You can also run multiple
clusters on separate machines gatewayed to one FirstClass server and on both Mac OS and Windows platforms.
In all cases, you must have Internet Services already installed on your clustered machines. Although each clustered service is set up and configured independently, it is possible to share components such as web content or filters using FirstClass folder linking.
Note
You must have the client loaded on your clustered machines to configure your gateway login settings file and for testing purposes.
In this chapter, we discuss:
Although the examples we cover in this chapter may cover many of the scenarios you may want to implement on your system, they are by no means exhaustive. Once you understand Internet Services clustering you can configure multiple combinations (either simple or complex) for your FirstClass site. For clarity, we highly recommend you diagram out your clustered environment before you create it.
Creating a simple clustered service
Use the following steps to create any basic FirstClass clustered service:
1 using a text editor
Open the FirstClass server Cluster script batch admin file.
This file is located on the CD in \Clustering\isCluster.ba (Windows) or \FirstClass Installers\ Clustering\ isCluster.ba (Mac OS).
2 Copy the file into the body of a new message.
3 Replace all instances of <GatewayName> with the name of the new service, for example, New cluster.
Note
Replace the angle brackets as well.
4 Replace all instances of <GatewayUserID> with the user ID of the new gateway, for example, 20000000079.
Note
Replace the angle brackets as well.
Note
Use logical ID numbers for the Gateway User ID. For example, if your primary Internet Services ID is 1000000000 use 1000000001 or 2000000000. Do not use the 9000000000 or 9000000001 ID, as they relate to Voice Services and Call Answer respectively.
5 Send the message to batch admin to run the batch admin script.
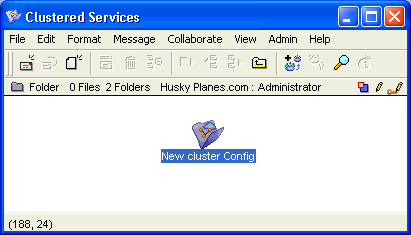
Repeat steps 2 to 5 for each Internet Services you want clustered to one FirstClass server. Once you have run the batch administration script, you will find a new folder on the administrator’s Desktop named Clustered Services.
Note
If you have already created this folder by clustering other services, for example Voice Services, the batch administration script will detect the existing folder and place the new service in it.
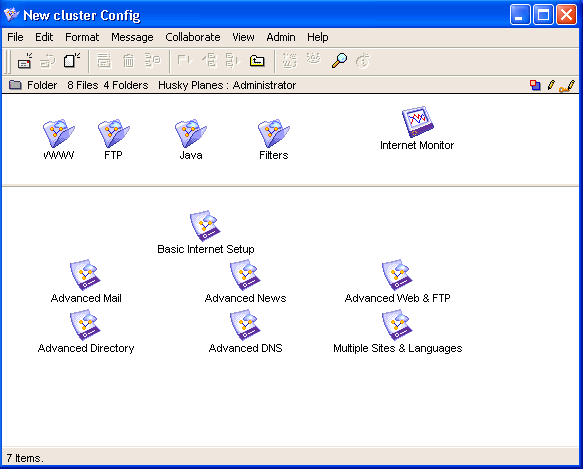
Inside the Clustered Services folder you will find a folder for each clustered service you have created.
The new folder name is the gateway (service) name with "Config" after it: in this case, New cluster Config. With the exception of the WWW folder and the HeaderMatch documents, you will find all of the same folders and forms that are in your primary Internet Services folder in this folder as well.
Warning
Never delete the primary Internet Services folder from the administrator’s Desktop or move it to another place.
6 Configure the Basic Internet Setup form.
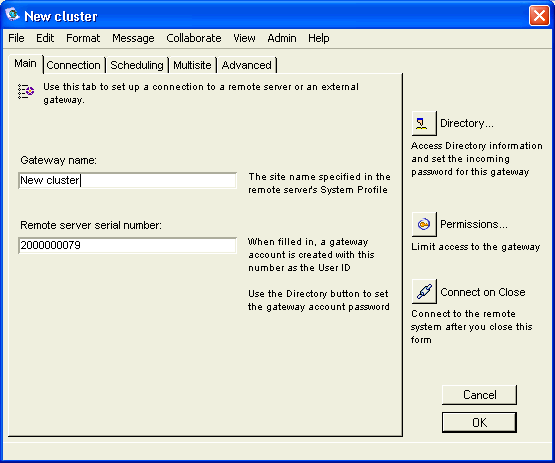
After you have set up your new service(s), you must configure the Gateway form. To do this:
7 Open the New gateway (clustered service) form, located in the Gateways folder on the administrators Desktop, created by the batch admin script:
Note
"Service name" and "Service account number" should already be filled in on the Main tab.
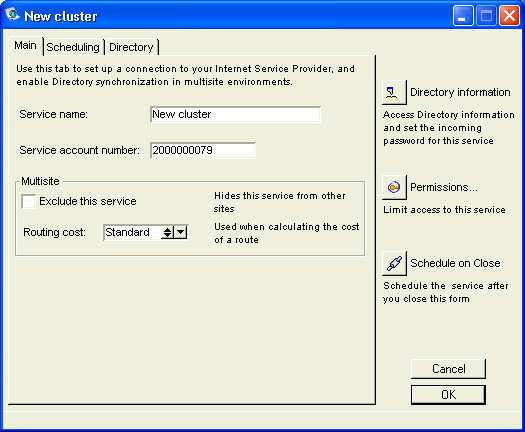
At this point, you must make a change to the form (for example, retype the name in "Gateway name") and save the form. When you reopen the form you will see this:
This three-tab form indicates your new clustered service has successfully been created.
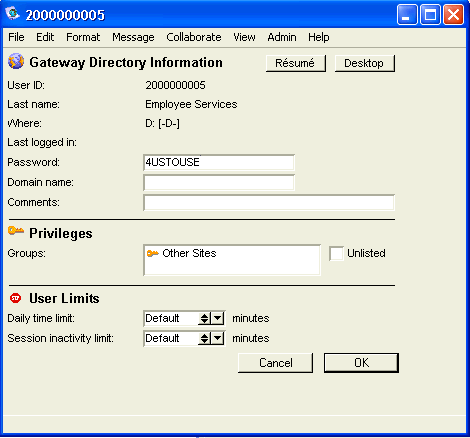
Click Directory Information and fill "Password" for the gateway on the Gateway Directory Information form:
For details on setting a gateway password, see Starting Internet Services and logging in.
Close and save both the New cluster Gateway Directory Information form and the New cluster Gateway form.
After you have completed the above steps you must connect your new clustered service to the server machine.
Note
The information you enter on the Basic Internet Setup form may vary for each clustered service; there is no generic setup (see Basic Internet Setup form).
Connecting your new service to the server machine
After you have completed the above steps, you must install one copy of Internet Services for each new clustered service. Follow the installation procedures as you would for a regular Internet Services install, see FirstClass Administrator’s Guide for details. Then you must configure your new service to gateway to the server machine.
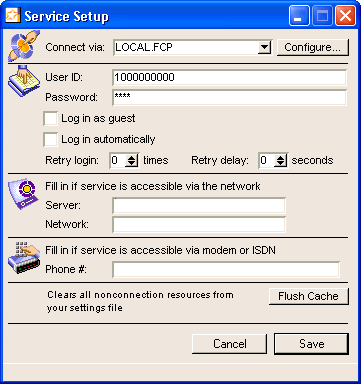
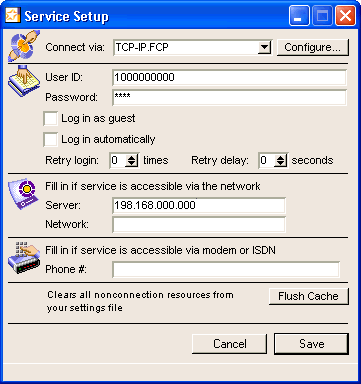
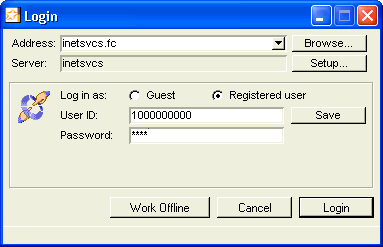
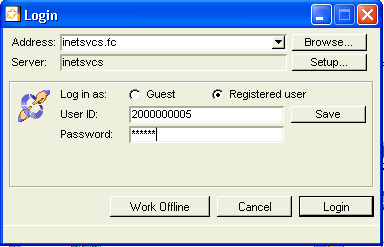
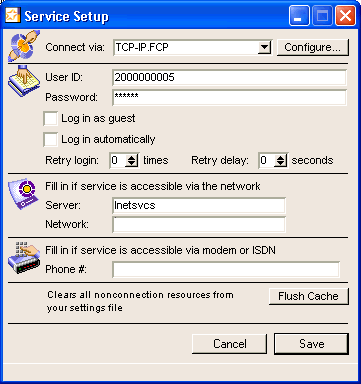
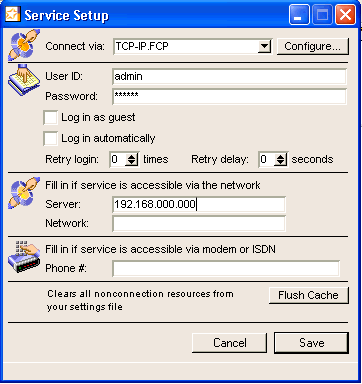
1 Double-click the Inetsvcs.rez settings file (for each clustered service) and enter:
• user ID
• password of the clustered Internet Services
• name or IP address in the "Server" field on the Service Setup form (the FirstClass server to which it points).
2 Click the Setup button.
This is what the setup should look like for the new clustered service:
3 Close the Service Setup form and log into the server, using the new settings file.
After you have successfully logged in, you can close your client on this machine.
Note
You must use the same password in the login setup form that you used in the gateway form on the server machine.
Clustering scenarios
In the remainder of this chapter, we will discuss three different possible clustering scenarios on Husky Planes:
• clustering services by protocol
• clustering services by domain
• clustering services by a combination of protocols and domains.
Clustering services by protocol: Scenario 1
You can dedicate a clustered service to route all outbound mail (SMTP) on your system and, if desired, bind certain user groups to this service. This is useful if you have a large site with heavy SMTP traffic and want to have all mail (or certain group mail) routed through one Internet Services.
Think of dedicating one Internet Services cluster to one protocol as similar to having a dedicated Internet phone line in your house. Your regular phone line is used only for incoming and outgoing calls, whereas your Internet phone line is only used for logging onto the web.
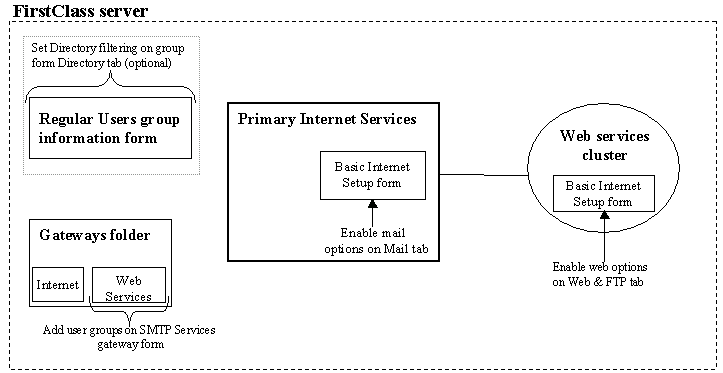
The diagram below shows the different areas and forms on your system that you must configure to have dedicated SMTP and HTTP clustered services:
On Husky Planes, we decided to dedicate the primary Internet Services to route all outbound mail (SMTP) and create an HTTP clustered service to route all web and FTP traffic. By doing this, we will create a more efficient system for handling both outbound mail and web traffic. To accomplish this setup, the FirstClass administrator uses Internet Services clustering as follows:
Note
All field name entries are for example purposes only.
1 Create a new clustered service, following the steps in Creating a simple clustered service.
In this example, we named the clustered service Web Services.
2 Open the Web Services Config folder in the Clustered Services folder on the administrator’s Desktop.
3 Double-click the Basic Internet Setup form.
4 Select both "Enable HTTP" and "Enable FTP" and fill in "HTTP server domain name", and "FTP server domain name" on the Web & FTP tab:
5 Enter the gateway name in "Service account" on the Service tab:
6 Clear "Enable SMTP" and make sure "SMTP server domain name" is empty, on the Mail tab.
7 Click OK.
8 Double-click the Basic Internet Setup form, in the primary Internet Services folder.
9 Clear all fields on the Web & FTP tab.
10 Select "Enable SMTP", "Enable POP3", and "Enable IMAP4" and fill in "SMTP server domain name", on the Mail tab:
11 Click OK.
Note
Make sure your POP3 and IMAP4 users have the correct server domain name (mail.huskyplanes.com) configured in their POP3 or IMAP4 clients.
Now all outbound mail for Husky Planes employees is routed through the primary Internet Services and all web traffic is routed through the web clustered service.
Binding one or more user groups to a clustered service
You can balance your system’s load even more by binding one or more user groups to a clustered service. For example, you could have all mail for certain user groups route through one clustered service and the mail for the rest of your employees route through another clustered service.
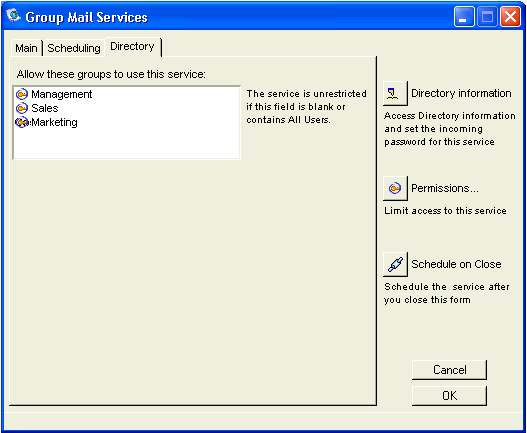
On Husky Planes, we decided to route SMTP mail for the Management, Sales, and Marketing groups through a separate SMTP clustered service and have all other employee mail continue to route through the primary Internet Services. To accomplish this setup, the FirstClass administrator uses Internet Services clustering as follows:
Note
All field name entries are for example purposes only.
Note
If SMTP is enabled on two or more clusters for different groups, you must define these groups on each cluster’s gateway form.
1 Create a new clustered service, following the same steps in Creating a simple clustered service.
In this example, we named the clustered service Group Mail Services.
2 Open the Group Mail Services Config folder in the Clustered Services folder on the administrator’s Desktop.
3 Double-click the Basic Internet Setup form.
4 Select "Enable SMTP", "Enable POP3", and "Enable IMAP4".
5 Fill in "SMTP server domain name", on the Mail tab:
6 Clear "Enable HTTP" and "Enable FTP" on the Web & FTP tab.
7 Enter your Service name in "Service account" on the Service tab:
8 Click OK.
At this point, you must configure the primary Internet Services (for all other employee mail) and the gateway forms:
1 Open the primary Internet Services folder on the administrator's Desktop.
2 Double-click the primary Internet Services Basic Internet Setup form.
3 Select "Enable SMTP", "Enable POP3", and "Enable IMAP4" on the Mail tab.
4 Enter your information in "SMTP server domain name" and "Mail server" (if applicable).
Important
We recommend that you leave SMTP enabled on your primary Internet Services, as any messages already delivered into the server through the primary Internet Services are already tagged for that gateway and all replies will attempt to send mail out through this same gateway. If you turn off SMTP in this primary gateway, outbound replies will sit indefinitely in the Internet Services Mailbox.
5 Open the Gateways folder.
6 Open the Group Mail Services gateway form.
7 Enter "Group Mail Services" in "Service name" on the Main tab.
8 Enter the user groups to which you want to limit this service (in the example, the user groups are: Management, Sales, Marketing) in "Allow these groups to use this service" on the Directory tab:
9 Click OK.
10 Open the primary Internet Services gateway form.
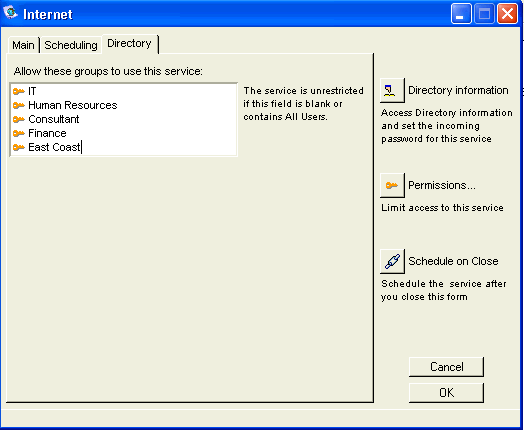
11 Click the Directory tab and enter the other groups (excluding the original groups you entered in Step 8) in "Allow these groups to use this service":
12 Click OK.
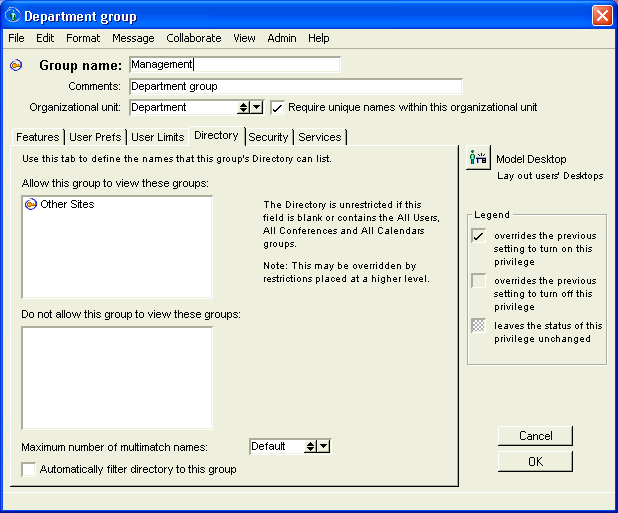
13 Open each user group form, click the Directory tab, and enter Other Sites in "Allow this group to view these groups":
This enables each user group to see other gateways.
Note
If the user group is already configured to see all other sites, you do not have to configure the Directory tab.
14 Click OK.
Now, all mail for the Management, Sales, and Marketing groups routes through a separate SMTP clustered service and all other employee mail continues to route through the primary Internet Services.
Clustering services by domain: scenario 2
Another way to cluster Internet Services is by domain. Let’s say you have a company with a large customer base and want to route all your customer and employee traffic through two different domains to reduce congestion.
Note
You must register any external domain names you use on your system.
You may also want your customers and staff to view a different home page and FirstClass interface. This is handy if you do not want your customers to have access to confidential company information or have to authenticate each time they access your site.
Note
The WWW folder is not automatically created in clustered folders. If you need to create a unique FirstClass interface and home page, you must batch in or copy all of the templates from the .templates folder in the primary Internet Services folder.
We decided to route all employee traffic on the primary Internet Services domain and all customer traffic on a cluster with a separate domain. By doing this, we provide both our customers and employees with totally different home pages and FirstClass information, while reducing the mail and web traffic for both groups of users.
To accomplish the above configuration:
1 Create a cluster called Customer Services, following the same steps in Creating a simple clustered service.
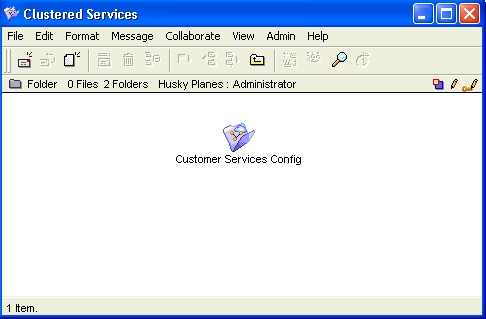
The Clustered Services folder, on the administrator’s Desktop, now has a new Customer Services Config folder:
2 Open the primary Internet Services folder.
3 Double-click the Basic Internet Setup form.
4 Fill in "Primary domain name", on the General tab:
4 Select "Enable SMTP" and fill in "SMTP server domain name", on the Mail tab:
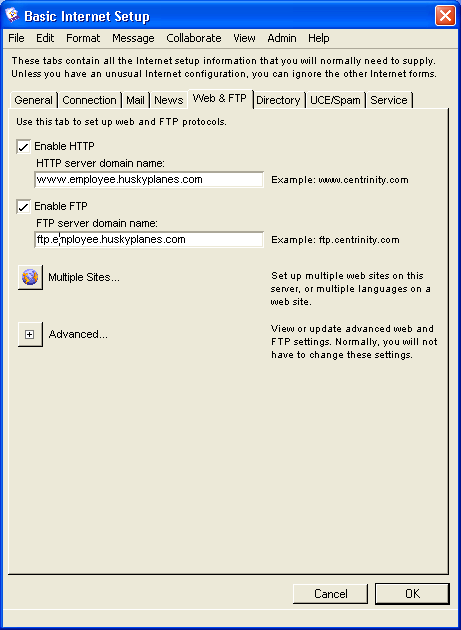
5 Select "Enable HTTP" and "Enable FTP", and fill in "HTTP server domain name "and "FTP server domain name", on the Web & FTP tab:
6 Open the Gateways folder on the administrator’s Desktop.
7 Double-click the Employee Services gateway form.
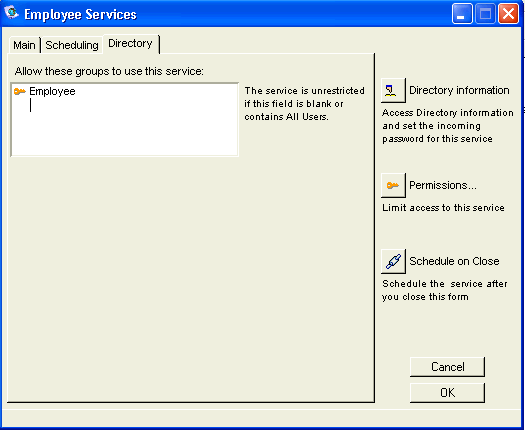
8 Enter the groups to which you want to bind this service (Employees), on the Directory tab:
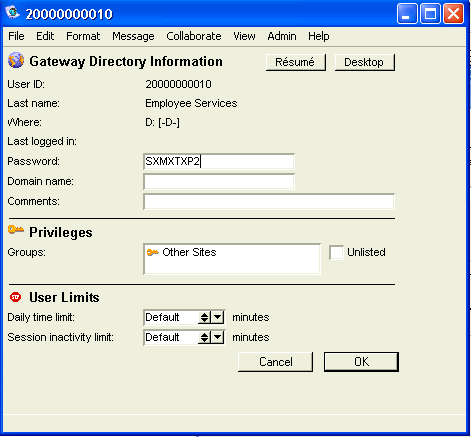
8 Click Directory Information and fill in "Password":
9 Click OK.
Note
If you already use Directory filtering, you can choose to specify one or more gateways in "Allow this group to view these groups" on the Department group form, see our online help or press F1 when you have the form open.
10 Open the Customer Services Config folder.
11 Double-click the Basic Internet Setup form.
12 Clear "Enable SMTP" and "SMTP server domain name", on the Mail tab.
13 Select "Enable HTTP" and "Enable FTP", on the Web & FTP tab, and enter www.huskyplanes.com in "HTTP server domain name" and ftp.huskyplanes.com in "FTP server domain name".
The final step is to configure the domain names and Mail Exchange (MX) records on your DNS server.
Now, Husky Planes’ customer web and Directory traffic will route through the Employee Services clustered service, and all employee traffic will route through the primary Internet Services.
Clustering services by protocols and domains: scenario 3
You can cluster your Internet Services by combining protocols and domains in your setup. In this scenario, we decided to separate HTTP/FTP and SMTP/NNTP services for both employees and customers. In total, we have four Internet Services machines running a combination of domains and protocols.
The diagram below outlines the structure we created:
To accomplish the above configuration, we followed these steps:
Note
Leave any fields not discussed in steps cleared.
1 Create three new clusters, following the same steps in Creating a simple clustered service:
• C News & Dir Services Config
• C Web Services Config
• E Web & Dir Services Config.
Husky's primary Internet Services routes all employee mail and news. We do not support customer mail services.
The Clustered Services folder should look like this:
2 Open the the C Web Services Config folder.
3 Double-click the Basic Internet Setup form.
4 Enter the required information on the General tab.
5 Select "Enable HTTP" and "Enable FTP", on the Web & FTP tab, and enter www.customer.huskyplanes.com in "HTTP server domain name" and ftp.customer.huskyplanes.com in "FTP server domain name".
6 Enter the name of the gateway, C Web Services, in "Service account" on the Service tab.
This name must match the entry in "Service name" on the Main tab in the C Web Services gateway form.
7 Clear all fields on the remaining tabs.
8 Open the C News & Directory Services Config folder.
9 Double-click the Basic Internet Setup form and click the News tab.
10 Select "Enable NNTP" on the News tab.
11 Enter customernews.huskyplanes.com in "NNTP server domain name" and the name of the server that provides your news feed in "NNTP feed server".
12 Select "Enable Finger" and "Enable LDAP", on the Directory tab.
13 Enter the name of the gateway, C News & Directory Services, in "Service account" on the Service tab.
This name must match the entry in Service name on the Main tab on the C News & Directory Services gateway form.
The next step is to configure your employee services:
1 Open the E Web & Dir Services Config folder.
2 Double-click the Basic Internet Setup form and click the Web & FTP tab.
3 Select "Enable HTTP" and "Enable FTP".
4 Enter www.employee.huskyplanes.com in "HTTP server domain name" and ftp.employee.huskyplanes.com in "FTP server domain name".
5 Click the Directory tab.
6 Select "Enable Finger" and "Enable LDAP" on the Directory tab.
7 Click the Service tab.
8 Enter the name of the gateway, E Web & Dir Services in "Service account" on the Service tab:
This name must match the entry in Service name on the Main tab on the E Web & Dir Services gateway form.
9 Open the primary Internet Services folder.
10 Double-click the Basic Internet Setup form and click the Mail tab.
11 Select Enable SMTP, "Enable POP3", and "Enable IMAP4".
12 Click the Mail tab.
13 Enter mail.huskyplanes.com in "SMTP server domain name".
14 Select "Enable NNTP" and enter news.huskyplanes.com in "NNTP server domain name", on the News tab.
15 Click the Service tab.
16 Enter the name of the gateway (Internet) in "Service account".
This name must match the entry in "Service name" on the Main tab on the Internet gateway form.
Note
"Service account" and "Service account number" should already be filled in on the Internet gateway form.
The next step is to configure the gateway forms:
1 Open the C News & Dir Services gateway form.
2 Enter Customer in Allow these groups to use this service, to limit this service to your customers.
3 Open the C Web Services gateway form.
4 Enter Customer in Allow these groups to use this service, to limit this service to your customers only.
5 Open the E Web & Dir Services gateway form.
6 Enter "Employee" in Allow these groups to use this service, to limit this service to your employees only.
7 Open the Internet gateway form.
8 Enter "Employee" in "Allow these groups to use this service", to limit this service to your customers only.
The final step is to configure the domain names and Mail Exchange (MX) records on the DNS server.
Now there are different Internet Services clusters supporting different services on different domains.
Using the Multiple Sites & Languages form
The Multiple Sites & Languages form is an Internet Services configuration file located in the Internet Services folder on the administrator’s Desktop. Use the Multiple Sites & Languages form to:
• specify multiple web sites and languages
• enable security certificates.
For a description of each field on this form, see our online help or press F1 when you have the form open.
Specifying multiple web sites and languages
Use the Multiple Sites & Languages form if you want to maintain a single site with multiple languages or multiple sites with multiple languages. If you support a single web site with one language, you do not have to change this form. If you support multiple languages on a single web site, you must enter the language codes on this form and you must have the language settings files (for example, fr.rez or es.rez) present on your system (see, Understanding languages). If you support a multi-site setup, you must enter the relevant information on this form.
Husky Planes has a multi-site multi-language setup:
This is Husky Planes’ Multiple Sites & Languages form configuration:
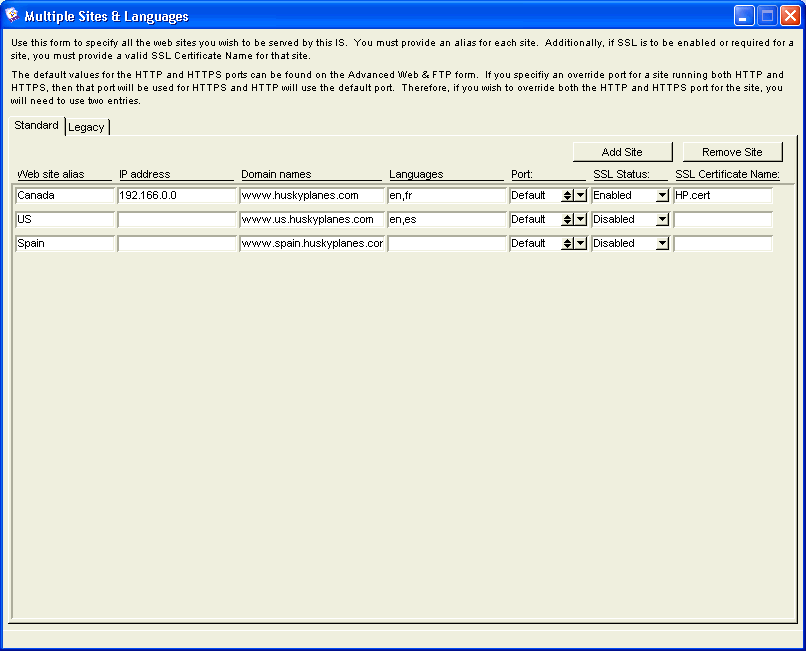 If you have registered different domain names for your multiple- site setup, and therefore have unique IP addresses for each, you would enter all of this information on the form. For information on using the Multiple Sites & Languages form when creating your web site(s), see Creating your web sites. If you have registered different domain names for your multiple- site setup, and therefore have unique IP addresses for each, you would enter all of this information on the form. For information on using the Multiple Sites & Languages form when creating your web site(s), see Creating your web sites.Creating your web sites
A FirstClass web site consists of FirstClass web templates, FirstClass content (a post office), and site content (a home page). Content is what is displayed to the user and templates control how this content is displayed. Together, these comprise your users’ web site experience.
In this chapter we will discuss:
The default Internet Services web site setup
When you install Internet Services, by default the following items are placed in the Internet Services/WWW folder on the administrator’s Desktop:
• .templates folder
The standard template set.
• .mobiletemplates folder
The template set for handheld devices.
• .webmailtemplates folder
The template set for webmail users.
• .OnlineHelp
FirstClass online help documents and online books.
• Images folder
Your web site images.
• ClientDownloads folder
For information on this folder, go to the Start here/Add users folder located on the administrator’s Desktop.
• Home Page document
The default home page for your web site. For information on developing web site content, see Publishing content to the web.
FirstClass web templates define the FirstClass user interface — the look and feel of your Desktop when you log in with a web browser. FirstClass objects include:
• conferences
• folders
• FirstClass messages
• FirstClass documents
and the different views of these objects (conference and list views).
You can keep the default web template view provided by the shipping templates, or customize your own, see Creating custom templates.
Displaying different templates sets
By default, there are three sets of templates in the WWW folder: .templates, .mobiletemplates, and .webmailtemplates. All three sets display a different user interface depending on how your users log in and how your site is configured.
If you are running the standard template set (in either regular or Enhanced mode) or the Webmail templates for your entire site, you can set them on the Display tab on the Global Site Preferences form. If you are running a multi-site setup using custom templates or need to steer users to different template sets, you may have to use the HeaderMatch document.
Standard templates
The .templates folder contains the default templates you see when logging in through any Internet browser. The standard template set can also be viewed in Enhanced mode by selecting this choice on the Global Site Preferences form. The Enhanced view mode maps the FirstClass user interface more closely with the web and provides for exact icon positioning and a framed window when in split-view mode. This setting can only be viewed using Internet Explorer. If you view templates in the Enhanced mode using Netscape, you will see the default standard view.
Let's see how Roy Allan's Desktop looks in both standard and enhanced modes:
Standard mode
Enhanced mode
Mobile templates
The .mobiletemplates folder contains the templates you see when logging in using a handheld device. These templates use lightweight HTML and focus more on links and text rather than on complex graphical interfaces. The mobile templates support these browsers: Blazer, Microsoft Pocket Internet Explorer, and Opera browser for the Symbian OS. They also support screen readers for the visually impaired, for example JAWS. For information on using Mobile templates, see our online help.
This is what Roy Allan's Desktop looks like when he logs in with his handheld device:
Note
You can choose to view your listings on two lines by enabling the "Expanded list view" field on the Preferences form.
Web mail templates
The interface and functionality of the .webmailtemplates is less complex than the standard templates. You may want to use this "simpler" interface for your staff if they only require certain basic features and not the full compliment of features the standard templates offer. Since Webmail features are controlled by permissions, you can provide different sets of users with different features. See [Link]FirstClass Administrator's Guide for information on setting individual and group permissions. The different features you can provide are:
• viewing the Mailbox
• creating new Messages, using the Address Book, Memos, and folder creation
• all of the above features plus using Calendars, and Conferences.
For information on using use Webmail templates, see our online help.
With the second level of features enabled, this is what Lyn Ericksson sees when she logs into her Desktop:
If you want to provide your users with the ability to use conferences, there is a bit more work involved. As with the other feature sets, you first need to provide the correct permission set. Then you must create a conference on the administrator's Desktop and Model it on your users' Desktops.
Note
This conference must reside on your users' Desktops for them to see it.
You can choose either a single conference configuration or multi-conference (subcontainers inside the main conference) configuration.
In either case, you must set the name of the conference you want to appear on the user tab. We created a conference called "My Conferences" and placed it on all of our users' Desktops. This is how we configured the relevant section of the Husky Planes HeaderMatch document:
We have decided to give Lyn the the ability to use calendars and conferences. With this level of permissions, this is what Lyn sees when she logs into her Desktop:
The templates shipped with FirstClass Internet Services are language independent; they draw all of their strings from lang.rez files. This means, instead of having to translate each template on your system, the correct language strings are pulled from the appropriate lang.rez file. The only things you have to translate on your site, if desired, are your home page and objects in your post office (both of which are independent of the language settings files). For information on where images and icons are located and how they are accessed, see How Internet Services accesses images and resources.
Note
Internet Services now uses the .rez extension instead of .fc for all language and settings files. However, .fc files are still supported for legacy purposes. As a standard, language settings files are named lang.rez, where lang is the ISO code name of the language or dialect that you want to represent, for example es.rez for Spanish or en-US for American English.
If you are configuring multiple languages on your site, the order of preference is set by the user's web browser. The first language in this list is the user’s default language. Internet Services uses the following search sequence based on the user’s preferences and how he has configured his browser:
• the user’s default language
• other languages on the user’s browser language list
• the default language defined for your server.
The order in which you define languages for a site on the Multiple Sites & Languages form is not important, except for the first language, which acts as the default language for that site. Otherwise, order has no effect since it is the preference order of the browser that is used.
If you are running a multi-site setup and have separate language folders within the site folder, the same language names must be in the "Languages" field on the Multiple Sites & Languages form. If you do not have separate language folders on your site and just want to support multiple languages, leave this field blank.
If your user's browser requests a language and that language file is in one of the locations in which Internet Services looks, then that language is displayed regardless of the "Languages" field on the Multiple Sites & Languages form. If you do not have a language file on your system that matches the browser's requested language, Internet Services will use the default language specified on the Advanced Web & FTP form.
Language dialects
Internet Services does dialect fallback before it does language fallback, for example, if you have this order in your browser list:
a) English-US (en-us)
b) French (fr)
c) English (en)
Internet Services will search for the desired language in this order:
a) en-US
b) en
c) fr
d) en
Since en-US is a dialect of English, if Internet Services cannot find this in your system settings, it will search for a general en language file before moving on to the next language (French in this case).
Note
If you use unconventional names, browsers may not list them in their preferences unless you instruct them to do so. Language names can consist of any alphanumeric characters and the dash (-). We recommend using ISO specified codes.
If the lang.rez file is not present for a language that you require you have a couple of options:
• take a lang.rez file from a localized FirstClass client, rename it to lang.rez, and all the strings will be translated in the web templates the same way they are displayed in the client
or
• copy the contents of an existing lang.rez file to a new file, translate the strings into any language, and rename the file with the appropriate ISO code.
Note
The client version must match the web template set version, which must be version 6.0 or higher.
If you are creating a lang.rez file from scratch, choose a character set appropriate for your language (see Charset Files on FirstClass Online (FCOL) in FirstClass Webmasters\Resources\General Resources\Charset Files). Use Windows character
sets where possible; if unavailable use Mac OS character sets.
Warning
Keep in mind, if you are translating to a language that cannot use Mac Roman you must select an appropriate character file. Further, you must make this choice before you begin editing or you will have to completely redo the language file once the error is detected.
Location of language files and the order in which they are accessed
Internet Services looks for language files in these areas and in this order:
• the appropriate language subfolder, if you have languages entered on the Multiple Sites & Languages form
If you have languages defined for a site, Internet Services will look in the language folder instead of the site folder.
• the site folder
If you have multiple sites configured, but not multiple languages, Internet Services will look in the appropriate site folder or Internet Services cluster folder, if running a clustered environment.
Note
In a clustered service, your language files should be at the same level as your Global Site Preferences form.
• the Resource Registry (on the server machine)
• the hard disk config folder on the Internet Services machine or in the Internet Services folder, when Internet Services is running on a dedicated machine and as a single site.
Note
Language files located in the site folder override the language files in the config folder.
Creating a single web site
In FirstClass, you can create a single web site with either one language or multiple languages. Creating a single web site is relatively straightforward, as most of the work is done for you upon server setup. Here is the basic structure for a single-language web site and a multiple-language web site respectively:
Both of the above structures have a folder with the site name, site content (home page and other web documents), and folders containing web templates. The multiple-language site has a separate folder for each language containing all of the same folders and documents as the single-language site folder.
The Multiple Sites & Languages form setup for single web sites
If you support a single language web site on your FirstClass system, you don’t need to enter any information on the Multiple Sites & Languages form. If you support multiple languages on your web site, you need to enter the relevant information on the Multiple Sites & Languages form, see Using the Multiple Sites & Languages form. For descriptions of the fields on the Multiple Sites & Languages form, see our online help or press F1 when you have the form open.
Creating multiple web sites
Creating multiple web sites, or multiple web sites with multiple languages is merely an extension of the single-site setup. Regardless of how many extra sites you create, you must always have the basic site structure.
Let’s take a look at the steps involved in creating multiple sites for your organization.
Note
From this point, we’ll refer to any folders containing templates as template folders.
To create multiple web sites:
1 Choose and register a domain name for each of your additional sites.
2 Choose one-word aliases by which your sites will be referred to internally. For example, Canada or Spain.
3 Create separate folders in the WWW folder and use the same name as the aliases you selected in step 2. These are called the site folders.
4 Decide in what languages you want your site content displayed.
Note
You must have the language settings files installed on your system if you want to serve out language specific FirstClass content, see Understanding languages.
5 Create language subfolders under the site folder.
Use the ISO language codes for the names of these subfolders, for example, "fr" for French or "es" for Spanish.
6 Create a template folder(s) in each language folder (if there are multiple languages), or in the site folder (if there is only one language).
Note
This must be done in order to display FirstClass content on your site; otherwise, the contents of your WWW folder will be served out to your users.
If you are using the same templates throughout your web sites you can alias your existing templates to template folders. If you wish to customize templates for a specific site, you must copy the templates and customize them or create new ones from scratch, see Creating custom templates.
7 if you want a unique look for a particular site
Make a copy of the Global Site Preferences form (Ctrl+drag in Windows, Option+drag in Mac), rename it .sitepref, drag it into the site-root folder(s), and customize the appearance of that site.
Note
If you have multiple Internet Services clusters, place a .sitepref form in the individual site folder(s) for that cluster.
8 Fill in the Multiple Sites & Languages form.
For each web site on the Husky Planes web server, we defined a web site alias and registered one domain name. The IP address listed indicates the default Husky Planes web site.
We have the ISO names of our site language folders in the next field. The order of the languages is important only for the first language, as it is considered the default. After this, you can place the languages in any order.
Note
If you make a change or addition to "Port or SSL Status" (this implies a change to the port(s) listened on), you must restart Internet Services.
Remember
If you have separate domain names registered for user groups or organizational units defined on your system, you must enter these domain names on both the Multiple Sites & Languages form and on the Services tab on the Groups form. See FirstClass Administrator’s Guide for information on organization units and user groups.
For a full description of the fields on this form, see our online help or press F1 when you have the form open.
9 Click Get Config to refresh your changes.
When you make any subsequent changes to the Internet Services config forms (forms inside of the Internet Services folder) and files, click Get Config on the Internet Services Monitor to update your changes, see Monitoring your system. If you still find that your web site is loading old information, do a Flush Cache located on the Internet Services Monitor, see Monitoring your system or a Flush HTTP Cache, located on your Internet Services console.
Husky Planes site setup
Let’s take a look at an example based on the Husky Planes web server. The following diagram represents the different web sites and languages configured on Husky Planes:
In the above example, Husky Planes has three different web sites pointing to the same server machine: Canada, US, and Spain. Canada and US each have separate folders for the two different languages they support. Each folder has a home page in its respective language, but no translated post offices. The Spain site has only an English home page.
Let’s look at three different users accessing these web sites with different languages set in their browsers.
Jacques Bertrand from Canada has two languages set in his browser’s preference list: French as the default and English as his second language. Lucy Tyler from the United States has two languages set in her browser’s preference list: Spanish as the default and English as her second language. Enrico Hernandez has Spanish as his only language choice in his browser’s preference list.
The following table explains what these three different users would see when accessing Husky Planes with their web browsers:
Jacques Lucy Enrico
Canada French English English
US English Spanish Spanish
Spain Default Default Default
Since the Canada site supports both English and French site content and templates:
• Jacques will get the French home page and templates
• Lucy will get the English home page and templates
• Enrico will get the English home page and templates.
Since the US site supports both English and Spanish site content and templates:
• Jacques Bertrand will get the English home page and templates
• Lucy Tyler will get the Spanish home page and templates
• Enrico Hernandez will get the Spanish home page and templates.
Since the Spanish site supports only English site content and templates, all three users get the default, English, only.
Customizing your web user’s interface
You can easily customize your user’s web interface when users log into your FirstClass server using a web browser. This is done through the Global Site Preferences form (or the .sitepref form if you have a multiple-site setup, see Creating your web sites), located in the Internet Services folder on the administrator’s Desktop. In this chapter, we will go
through Husky Planes’ setup of this form, and show which form fields affect which areas on the web site. For Global Site Preferences default settings, see Global Site Preferences defaults in our online help by pressing F1 with the client open. For a description of all the fields on this forms, see our online help or press F1 when you have the form open.
In this chapter, we show which fields on the Global Site Preferences form affect which areas on the web site interface by discussing:
Global Site Preferences form
The Global Site Preferences form lets you customize the display, colors, fonts, and images displayed to the web. These settings are universal for your web site and provide your users’ web experience when they log in.
Note
Users can override these settings only if they have the same settings on their User Preferences form.
For Global Site Preferences default values, see Global Site Preferences defaults.
Global Site Preferences - Display
Use this tab to set the number of items displayed per page, the number of items downloaded from a conference, page width, position of menu items, icon size, and to choose your default template set. Husky Planes uses the standard default settings for optimal system performance. You can also choose the Enhanced layout view on this tab, which provides extra features such as exact icon positioning and a framed window when in split-view mode. The enhanced view is only accessible by Internet Explorer users. For more information, see Displaying different template sets.
Note
The items displayed refer to leaf objects (documents and messages) not container objects (conferences or folders) which are always listed.
Here are the areas on a web site that are affected by the Display tab fields:
Use this tab to set page, toolbar, title and row colors for your web site. All colors are configured in standard RGB numbers. Husky Planes uses the standard defaults for all of the settings except for "Even rows" and "Odd rows", see Global Site Preferences defaults in our online help.
Even rows White
Odd rows Grey
Here are the areas on a web site that are affected by the Colors tab fields:
est changing the colors on your Global Site Preferences form and then viewing your FirstClass Desktop on the web. After each change, remember to do a Get Config and, if you find that your web server is caching old information, also do a Flush Cache. These functions can be found on the Internet Services Console, see Internet Services console or on the Internet Services Monitor,
see Monitoring your system.
Global Site Preferences - Fonts
Use this tab to set titles and text font attributes for your web site. Husky Planes uses the standard defaults for all of the font settings except "Navigation text", see Global Site Preferences defaults in our online help.
Navigation text Geneva, Arial, Sans-Serif, 11, purple.
Here are the areas on a web site affected by the Fonts tab fields:
Global Site Preferences - Images
Use this tab to set unique background images, company logos, and any advertising banners that will appear on your web site. Husky Planes uses the standard default settings, see Global Site Preferences defaults in our online help except for the Husky Planes banner.
Here are the areas on a web site that are affected by the Images tab fields:
How Internet Services accesses images and resources
Images and other resources can reside in a number of different places, depending on the name structure of the resource and how you have configured your site. The default installation now places all resources (except for images specific to web templates) in the Resource Registry for compatibility with the FirstClass client. For information on how to create a resource file, see FirstClass Designer. If you have a standard site without any custom images, the Resource Registry is all you need. However, if you maintain multiple sites or language-site subfolders, you may place your images and other
resources in certain locations for Internet Services to access them, see Web icons and the Icons.rez file and Understanding how languages work in Internet Services.
Once images are entered in the Global Site Preferences form, Internet Services must access them. There are three places where images, logos, and banners can reside and are accessed in this order:
• if the name of the image or resource starts with a tilde (~), for example ~image.jpg, Internet Services looks in the Home Page Folder located on the user’s Desktop
• if the image or resource has a period (.) in the extension (for example, .gif or .jpg), Internet Services looks in the Images folder located in Internet Services > WWW folder > site name folder (if applicable)
The Images folder must be at the same level as your .templates folder. This is the site root level unless you have multiple sites or multiple languages. All images in this folder must have a valid extension (for example, .gif, .png, or .jpg). If you want the same FirstClass client background images to show up when you access your Desktop on the web, you must place them in the Internet Services/WWW/Images folder. The Images folder contains images that cannot reside in pictures.rez. If Internet Services cannot find an image in the Images folder, it will now look in the Resource Registry. This is to allow you to store client backgrounds in the Resource Registry, similar to the FirstClass client, instead of in the Images folder.
• if the image or resource has no extension, Internet Services looks in the pictures.rez file
The Pictures.rez resource file contains images such as Mac OS PICT files (Mac OS image format). These PICT files must not contain an extension in the file name (for example, Default instead of Default.pict). If you mistakenly add an extension to one of these image files, Internet Services will look for them in the Images folder instead of the pictures.rez file.
The Pictures.rez files can reside in the same place as Icons.rez and follow the same override rules, see Web icons and the icons.rez file.
Note
You cannot have an object called Pictures, as the name is reserved for the pictures.rez file. For a list of reserved words, see Reserved words in our online help.
• by a fully qualified path in your document, for example, www.ads.com/myads/ image1.gif.
Web icons and the Icons.rez file
Web icons and any custom icons reside in the Icons.rez file. If you want the same client icons to display when you access your Desktop on the web, you must add them to your Icons.rez file.
The Icons.rez file can reside in these locations (listed in the order they are accessed):
• The current language folder (if you have languages defined on the Multiple Sites & Languages form, see Using the Multiple Sites & Languages form)
• The current site folder (or cluster folder if running a clustered environment)
• The Internet Services folder (server-based)
• The Resource Registry
• The Config folder on the hard disk where Internet Services is running.
If you have multiple sites, you can have an Icons.rez file in each site folder at the root level (at the same level as a .sitepref form). The presence of this file in separate site folders overrides the default Icons.rez for the main site.
After configuring the Global Site Preferences form for Husky Planes, this is what Roy Allen’s Desktop looks like when he logs in through the web:
If a user wants to customize his Desktop, he can do so through his personal web preferences, see our online help or press F1.
Publishing content to the web
Any information on your FirstClass system can be served out to the web. This information includes:
• FirstClass server conferences and folders (original containers or aliases)
• FirstClass documents, folders, conferences
• FirstClass home pages
• HTML documents
• external folders (see our online help or press F1)
• any combination of the above.
Creating a home page using a text editor
You can create home pages using a standard text editor or a FirstClass document. When serving out your home page to the web, Internet Services looks for a file with valid HTML code, a FirstClass document with regular text and images, or a combination of both. The home page must reside in the Internet Services > WWW folder on the administrator’s Desktop. If you support multiple web sites, you can create a distinct home page for each one, see Creating multiple web sites.
You can create an HTML file using a simple text editor. Internet Services will automatically search for HTML files with the following names:
• default.html, default.htm, default.shtml, default.stm
• index.html, index.htm, index.shtml, index.stm
• home.html, home.htm, home.shtml, home.stm
• home page.
Once Internet Services finds a file with one of these names, it automatically opens it. If none of these files exists, the entire contents of the WWW folder will be served out.
Note
Never include more than one home page in any Internet Services folder.
If you wish to have an HTML file which includes references to conferences or external folders, you need to include the appropriate HTML code. FirstClass server conferences and folders in the WWW folder can be referenced by HTML code in the same way any files or folders are referenced. For example, if you have a folder named Services you wish to reference in the same location as the HTML file, use this code:
HTML code <a href=”Services”>Services</a>
Creating a home page using a FirstClass document
Open a home page using a FirstClass document through Message > New Document Special > Site Web Page. This file can contain regular text, literal HTML code or a combination of both. Also, you can name this file anything and it does not require an extension. Keep in mind, any FirstClass document named Home Page that appears in a conference or folder will render as the main page for that container object. Make sure you place this document in the correct location.
The Literal HTML style in the client (Format > Style > Literal HTML) can be used to insert HTML code into messages and documents. To do this, highlight the code you want converted and apply the Literal HTML style to it. This HTML will not run through the normal style run processing and will be output as is for interpretation by the browser.
Creating site content
When Internet Services is first installed, the root public web site is in the WWW folder, and any content you place there is rendered out to the web. As stated earlier, this content can consist of HTML files, or FirstClass content such as conferences, folders, document, and messages. Any content placed here is subject to standard permission restrictions, so placing a restricted conference in your web site will lead to a login dialog that requests for the user to provide a valid user ID and password.
To create site content, open the WWW folder in the Internet Services folder located on the administrator’s Desktop. Place any documents, conferences, or folders (or aliases of these containers) in the WWW folder that you want to serve out to the web. Internet Services renders on the fly, so changes to conferences or folders will be automatically displayed when the user reloads the web page.
Let’s take a look at the contents of the Husky Planes WWW folder:
As you can see, Husky Planes has a number of folders, conferences, and documents that are published to web users. One document, home page, is Husky’s landing page.
The Husky Planes administrator chose to create a home page as a FirstClass document, using a combination of FirstClass editor features, HTML, and Literal HTML. Let’s take a look at the some aspects of the home page source code:
At the top of the home page, we embedded an image. Next, we built our table in standard HTML code, converted it into literal HTML, and referenced conferences we have aliased on our home page.
In the next section of code, we used FirstClass editor features to change the font and color of our text:
 In the final section of code above, we used FirstClass to create links to four areas on our web site (for details on linking, see our online help or press F1). In the final section of code above, we used FirstClass to create links to four areas on our web site (for details on linking, see our online help or press F1).This is what the Husky Planes home page looks like when Internet Services serves it out to the web.
Internet Services only includes HTML templates for the standard forms. If the conferences or folders you publish include customized forms, you must include customized HTML versions of those forms, see FirstClass 7 Designer.
Creating custom templates
You can customize your FirstClass templates to reflect the type and appearance of information that you want served out to your web users. You can make changes to the existing templates, located in the WWW\.templates folder on the 0administrator’s Desktop, or you can create brand new templates to replace the existing ones, see Customizing Web Templates in online Books in our online help.
Creating custom forms and templates
You can create custom templates in different ways:
• copy an existing template into a FirstClass document or text editor, and customize the code
• create a new form using FirstClass Designer, and save it as an HTML document (see FirstClass 7 Designer)
Note
If you want to use custom forms for your web site(s), you must also create an HTML template of this form and place it in the appropriate template folder.
• create a new document in FirstClass or a text editor using HTML, JavaScript, and Internet Services script.
In all cases, use Internet Services script to customize your templates. Internet Services script includes:
• X-FC tags
• global constants
• commands
• functions.
For a complete listing and explanation of Internet Services script, see our online help or press F1. Internet Services script works only in server-parsed HTML files. Internet Services, as shipped, considers the following files to be server-parsed:
• files ending in .SHTML or .SHTM
• include files (.INC)
• templates (from the .templates folder).
Custom templates in the WWW folder
If you are using custom templates, you can put them in a name.templates folder (where name is any name you give the folder) located in the Internet Services\WWW folder on the administrator’s Desktop. You can also place custom templates in the default templates folder (.templates), depending on what browser you want pointing to these templates. When you are arranging your templates in the WWW folder, make sure the correct templates are in the correct folders.
Creating CGIs
While HTML allows you to create only static content, a Common Gateway Interface (CGI) allows you to create active content. An advantage of using CGIs over HTML is that they can be used to create interactive forms or continuously updated fields, such as web hit counters or date fields.
The cgi-bin folder
The cgi-bin folder (an external folder) is located in the same folder as the Internet Services and FirstClass server executables. The cgi-bin folder is not created by default, you must create it.
Since the cgi-bin folder exists on your Internet Services machine, not in the Internet Services folder on the administrator’s Desktop, only a user with access to your physical machine can add or remove CGI executables.
How CGI works on your system
A CGI executable can be written in any language that will create an executable object on your system. For example, C++, Visual Basic, or Perlscript on Windows, and Applescript or Perlscript on Mac.
Note
If you are running a CGI executable written in Perl, your machine must be Perl-enabled.
You must put the CGI executable in the cgi-bin folder.
You can also have subfolders separating CGIs into different categories, depending on the complexity of the CGI. Also, if you have two CGIs with the same name, you must place them in different subfolders within the cgi-bin folder.
Internet Services also supports a cgi-win folder for executables that conform to the WinCGI protocol (for example, Visual Basic applications). The cgi-win folder is also an external folder that is not created by default, so you must create it in the same location as the cgi-bin folder.
Basic CGI syntax
To use the CGI, simply call it from your HTML using the syntax:
• /cgi-bin/executable-name?arguments
or
• /cgi-bin/foldername/executable-name?arguments.
where,
• cgi-bin is the folder name
• foldername a subfolder name
• executable-name the name of your cgi executable
• arguments any additional arguments attached to the cgi executable
You can place a link on a web page to the executable file.
Adding a CGI script
The following is an example of the CGI script we placed on our Husky Planes home page to generate random links for our web site visitors.
Note
The CGI script is discussed only as it relates to FirstClass. There is no discussion of how to configure CGI files or write Perl script.
To add a CGI script on Husky Planes:
1 Create a cgi-bin folder in the same folder as the FirstClass server and Internet Services executable files.
2 in the cgi-bin folder
Create a folder to hold your CGI script files.
Here we created a folder called rand_link:
3 Install all the CGI files in the folder you created in Step 2.
4 Follow the information contained in the CGI ReadMe to configure your executable.
5 Add a link to your company home page (or any other HTML document on your web site) using the line of code provided in the CGI ReadMe document.
6 Log into your web site and test your CGI executable.
In Creating and editing the Aliases document, we will show you how to hide the CGI script we just created from the browser.
Creating and editing the Aliases document
Use the Aliases document to run different scripts from your web server while hiding these paths from users.
The purpose of the Aliases document is to:
• install a CGI written for a different web server (for example a CGI written for an Apache server) where you don’t have access to the CGI source files or they are too complex to modify. For example:
• if a CGI is written in a programming language, such as C or C++ and you only have the executable (.exe) file.
• if a CGI is written in Perl and you are not a Perl programmer.
• trigger CGIs and hide them behind virtual names
This allows you to hide the source of the CGI and even the fact that you are running CGIs on your system. For an example, see Hiding a CGI path on a web page.
• hide or change URLs
This allows you to change the name of a publicly accessible conference on your FirstClass system. You may want to provide an alias of the old name to the new name, for people who have bookmarks or to support requests made through search engines. For an example, see Changing a URL to a publicly accessible conference.
The Aliases document is not a standard item on your system. You must create this document in the Internet Services/WWW folder on the administrator’s Desktop:
Basic Alias document syntax
The basic syntax of each line in the Aliases document is:
keyword website URLpattern URLreplacement
where,
keyword is the word that begins the code line (for example, ScriptAliasMatch or Alias)
website is either * to indicate all web sites (or the only site if the Multiple Sites & Languages form is not used), or a web site alias optionally followed by a period and a language
URLpattern describes the URL to match (depending on the keyword)
URLreplacement substitutes (internally) for the requested URL if the pattern matches
In all cases, the link in the browser will show the URLpattern, and navigate to the URLreplacement.
Note
Both URLpattern and URLreplacement are case insensitive and regular expressions.
Code lines can start with either the ScriptAlias or ScriptAliasMatch keyword, to trigger CGI processing and Alias and AliasMatch keywords for all other HTTP requests.
Aliases document examples
The following are examples of:
• triggering CGIs and hiding them behind virtual names
• hiding or changing URLs.
Hiding a CGI path on a web page
In Chapter Creating CGIs , we placed a CGI on the Husky Planes web site. Now, we are going to provide an alias to the same CGI executable in the Aliases document.
To create an alias to a CGI executable:
1 Create an Aliases document in the Internet Services folder containing the following code:
Note
The following code must be entered on one line.
ScriptAliasMatch * /[Ll]inks /cgi-bin/ and_link/rand_link.pl/arguments (if any).
where,
[Ll]inks is the link name
rand_link is the name of the CGI folder in the cgi-bin folder
rand_link.pl is the CGI executable name
arguments are any additional arguments required for the CGI executable
Note
If you don’t want to match, use ScriptAlias.
2 Close the document.
3 Do a Get Config to update your changes.
You do not need to restart Internet Services.
When a browser requests the URL /Links (or /links) from your server, the request is changed internally to /cgi-bin/ and_link/rand_link.pl/ and the CGI is run as if the requested URL was entered as /[Ll]inks /cgi-bin/ rand_link/rand_link.pl?.
Changing a URL to a publicly accessible conference
You can hide or change URL paths to publicly accessible conferences on your FirstClass system.
For example, on the Husky Planes web site we have a conference called Sold Product Customer Support for the different models of planes we sell. However, we are now moving to a lease-only model for our company but still want to provide support for our customers who have bought our products in the past. Because of our new business direction, the FirstClass administrator has to move the Sold Product Customer Support conference inside another conference called Old Product Support. Since most customers who require customer support have the original conference URL bookmarked in their browsers, we must ensure they can still reach it without having to change their bookmark.
To solve this problem, Husky Planes’ administrator created an alias of the URL /Sold Product Customer Support to the URL/Old Product in the Aliases document. Following the basic Aliases document syntax, keyword website URLpattern URLreplacement, she entered this line in the Aliases document:
Alias * "/Sold Product Customer Support"<SP>"/ Old Product Support/Sold Product Customer Support"
The above line of code reroutes customers using their old bookmarks to the new location of the conference.
The Mimetype file
Multipurpose Internet Mail Extensions (MIME), is a specification for formatting documents and messages so they can be sent over the Internet. These documents include server-parsed files and many non-html files such as:
• graphics
• audio
• video.
You set MIME types in the Mimetype file, located in the FCServer/Config folder on your hard drive. Using this configuration file, Internet Services maps file extensions, Macintosh type and Macintosh creator information, to MIME types. You can open this file with any ASCII editor (for example Notepad (Windows) or SimpleText (Mac OS)).
You can use the Mimetype file to:
• associate file types with particular programs
• Render non-template documents
• enable browsers to display files that are not in HTML format
• inform Internet Services of which types of files to parse.
Although you can make changes to your existing Mimetype file, it is usually not necessary for most standard FirstClass systems. By default, the Internet Services Mimetype file is configured to handle most widely used file extensions.
Associating file types with programs
The most common use of the Mimetype file is to associate file types with programs. The standard length for both the Macintosh file type and Macintosh file creator names is four characters. If you have less than four characters, you must use double quotes ("") around the entry and put spaces in for missing characters (for example, "mp3 ").
Mimetype file syntax
The basic MIME type syntax is:
mime type/subtype<tab>Mac type<tab>Mac creator<tab>filename extension
where,
mime type is the type of file
subtype is the subtype of the file
<tab> is a space
Mac type is the Macintosh file type
Mac creator is the browser type
filename extension is the extension of the file.
In keeping with the above syntax, a standard MIME type entry might be:
text/html<tab>text<tab>MSIE<tab>.html
This entry causes all files with an .html extension to be sent to the browser directly.
For video files, you could enter this line of code in the Mimetype file:
video/mpeg MPEG mPEG .mpeg
This entry causes all files with an .mpeg extension to be sent to the browser directly.
Although it is a good idea to put entries in for each variable in the MIME type syntax, the most important entries are the mime type, subtype, and filename extension. These entries must be entered for the MIME type code to work. You can enter question marks (?) for the Mac type and Mac creator variables, for example:
audio/basic ???? ???? .snd
where this entry specifies a basic audio file with the .snd extension, and both Mac type and Mac creator can be anything, as designated by the question mark (?).
Although there are many predefined MIME types, such as GIF graphics files and PostScript files, you can also define your own, by adding a line for each in the Mimetype file. Some commonly used file extensions are:
• .shtml, .shtm, .shm, .inc
• .swm, .swmls, .wml
• .png, .pict, .bmp
• .txt
• .css.
Rendering non-template documents
The Mimetype file can also be used to determine which non-template documents to render.
Typically, when a FirstClass web document is opened, a template is used to render it. However, you may want to create web pages using HTML, or some other markup language such as Extensible Markup Language (XML), to display content on your web site. Internet Services must have a way of sending these files to a browser without using templates. You can accomplish this by associating document extensions with specific file types.
Markup language example
For HTML documents, you could enter this line of code in the Mimetype file:
text/html<tab>text<tab>MSIE<tab>.html
This entry causes all files with an .html extension to be sent to the browser directly.
Non-standard extensions
If you have inherited HTML pages with a nonstandard extension that you want to maintain, for example .wws, you could enter this line of code in the Mimetype file:
text/html<tab>text<tab>MSIE<tab>.wws
This entry causes all files with a .wws extension to be sent to the browser directly.
Enabling browsers to identify non-html files
You can use the Mimetype file to enable browsers to identify non-html files and do something with them instead of just saving them to disk (for example, audio and video files). A typical entry might be:
audio/mp3<tab>"mp3 "<tab>????<tab>.mp3
where,
audio is the file type
mp3 is the subtype of this file, "mp3 " is the Macintosh type (using less than four characters)
???? designates any browser
.mp3 is the filename extension.
Rendering server-parsed files to the web using the Mimetype file
You can also use the Mimetype file to determine which files should be server parsed. Server-parsed files are dynamic web documents (.shtml extension) that are sent to the server before they are displayed by a browser. This is different from static web documents (.html) that are displayed by a browser without passing through the server.
The following diagram illustrates this concept:
When a browser hits a web site and calls a page, Internet Services sends any non server-parsed files to the browser directly. If there are any server-parsed files that need to be displayed, Internet Services first sends the file to the FirstClass server for processing. After processing is complete, the FirstClass server sends the file back to Internet Services, which then forwards it onto the browser to display.
Examples of server-parsed files are:
• files with .shtml extensions
• Internet Services web templates
• any documents that include Internet Services script in the code.
Here are examples of MIME type entries for server-parsed files:
• text/x-server-parsed-html TEXT MOSS .shtml
• text/x-server-parsed-html TEXT MOSS .shm
• text/x-server-parsed-html TEXT MOSS .inc
Note
The Macintosh creator code for Netscape is MOSS.
These lines of code identify any html file with extensions .shtml, .shm, or .inc as server-parsed files.
For more information on sever-parsed files, see Creating custom templates.
Using the Java and FTP folders
Use the Java and FTP folders, located in the Internet Services folder on the administrator’s Desktop, to include Java enabled features on your system and make files available for download.
Java folder
The Java folder contains a FirstClass chat folder (including FirstClass-supplied templates for the Java chat feature), and FaxViewer (a Java application that allows users to view PCX and DCX on the web):
This feature allows your users to chat while logged in over the web. You can also place additional folders, containing your own Java applications, in the Java folder.
If you are running Internet Services on a separate machine from the FirstClass server and you wish to run Java chat:
1 Create a copy of your Inetsvcs.rez file and call it PROXY.rez.
For more information about Inetsvcs.rez, see Starting Internet Services and logging in.
2 Connect your PROXY.rez file to your server.
This file must be on the same machine routing your web traffic.
The number you enter in Retry Login will specify the number of concurrent chat connections you can have. Remember, each connection consumes a session and therefore system memory.
FTP folder
The FTP folder contains conferences, folders, and files available for download using the FTP protocol.
You can upload files to the FTP folder (subject to permissions), create FirstClass documents in it, or alias conferences and folders to it. All information in this folder is available to authenticated users, anonymous users (if you have this option enabled), and FTP clients (any FTP program). You can enable anonymous FTP users on the FTP tab on the Advanced Web & FTP form.
Uploaded files and documents, whether uploaded directly to the FTP folder or to a conference aliased to that folder, are available for FTP download. Messages within an aliased conference will also be available, but not attachments to those messages. Any attachments you wish FTP users to download should be uploaded separately.
For Mac OS environments, files in the FTP folder must be in a suitable form for downloading. For example, multifork Mac files must be in BinHex or MacBinary format, since FTP does not support multifork file transfers. Internet Services does not perform conversion on-the-fly.
Monitoring your system
One of the most important day-to-day activities you will perform as an administrator is monitoring your system. Understanding the monitors and log files, and the information they provide, helps you maintain your Internet Services system to avoid any down time. Use the Internet Services Monitor, located in the Internet Services folder on the administrator’s Desktop, to check session load and determine whether you need to modify any of the protocol settings.
Internet Services Monitor display
The Internet Services Monitor provides information on your Internet Services activity and also lets you update Internet Services changes and empty your cache remotely. Double-click the Internet Services Monitor icon to open the Internet Services Monitor form:
Internet protocols are divided into two groups: outbound and inbound. The outbound group consists of outgoing SMTP mail and NNTP news. The first "Total line" refers only to outbound protocols. On the Mail tab on the Basic Internet Setup form, you set the total number of outbound mail and news sessions at "Max outgoing mail", see our online help or
press F1 when you have the form open.
The inbound group consists of inbound mail and news plus directory and web client connections. The second "Total line" refers only to inbound protocols. On the Service tab on the Basic Internet Setup form, you set the total number of inbound sessions at "Internet sessions", see our online help or press F1 when you have the form open.
Managing system security
System security is best achieved in layers, where multiple layers of security must be overcome to gain access to a system. The more layers that are in place, the more secure your system. However, your system security must not be so arduous that users either bypass it or avoid accessing your system at all. A collaborative system must balance the needs of users to collaborate and share information while also protecting this information from users who should not see it.
An overview of approaches to system security
There are many issues to consider when trying to run server machines connected to the Internet. These issues are a constant threat to the stability and useability of your servers. Defending your servers from improper use and events, such as Denial of Service (DoS), virus attacks, hijacking your server to relay spam email, and other troublesome email requires a vigilance on the part of every FirstClass administrator.
FirstClass Internet Services has traditionally provided the tools needed to combat these threats. However, there are now even more powerful tools to make it easier for you to set up and maintain solid security for your system. Before we discuss the specifics of configuring Internet Services, let's look at some general approaches to security that can help you make your system's Internet Services more secure.
Physically securing the server machine
The first step in preventing Internet Services abuse is to make sure unauthorized individuals cannot tamper with the machine on which your Internet Services resides. These abuses include either physically disabling the machine or loading and reconfiguring software in a way that makes it vulnerable to attack.
Even though Internet Services stores no data on the server machine's hard drive, thus keeping your data safe, your Internet Services can still have its stability and security compromised by such tampering.
Securing the server from network attacks
The next step in preventing Internet Services abuse is at the operating system (OS) level. You should always run your OS vendor's latest security patches to prevent low-level network Denial of Service (DoS) attacks. Next, disable all other network protocols on the Internet Services machine, as any software that accepts network connections is a possible doorway into your system. When Internet Services is running, it should only use those network ports it is configured to serve. File sharing, network logins, network management protocols, and other web servers are all frequently exploited by hackers to gain a foothold on the machine.
Keeping "troublemakers" off your system
If your system logs reveal certain IP addresses are testing your security, trying to infect your system with the "Code Red" virus, or "hogging" your system resources, you should consider blocking them. Bad traffic comes from sites with lax security. Remember, it's better to ban these IP addresses than to let them experiment on your server. Be careful when blocking IPs to be sure they are not either a site you care about or an IP address handed out temporarily, for example by Dynamic Host Configuration Protocol (DHCP) from a big ISP. There are quite a few good Internet sites that can be used to verify the origin of IP addresses, for example, www.samspade.org.
Clamping down on SMTP relaying
If you don't require SMTP relaying on your machine then don't turn it on. If you need it, turn it on in the most restrictive way possible. Finding an "open relay" is the optimal for spammers. This is because it "legitimizes" their junk mail by making it appear to be coming from your Server. Spammers are able to do this because many SMTP servers are incorrectly configured, thus allowing these people to "bounce" or relay off of a vulnerable system. As a result, efforts to track the real culprits are often thwarted as they move on to use the next unsuspecting system.
If your system is used to relay spam email you can expect any, or all, of these things to occur:
• high load on your server as these unwanted messages are processed
• damage to your organization's reputation as questionable material is seen coming from your site
• reduction or denial of your Internet services as ISPs and other Internet organizations begin to recognize you as a spammer.
Remember, unsolicited email uses your precious network bandwidth and server resources to deliver an unwanted, inconvenient, and in many cases offensive experience to your users. Your goal is to try to reject spam as early in the process as possible without actually blocking legitimate email.
An overview of Internet Services security
We have enhanced existing Internet Services security features and created new ones that are even more powerful and easier for you to set up and maintain. Several default behaviors and the reworking of the UCE/Spam tab on the Basic Internet Setup form make it easier to stop spam from bothering your users, and to provide safe SMTP relaying. For more information on Internet Services security, see FirstClass Internet Services Administrator's Guide in our online help.
Here is a summary of the new and enhanced security features and a review of existing ones:
• SMTP AUTH support
This feature lets you offer SMTP mail relaying to users who provide their user IDs and passwords when submitting SMTP messages. This provides a simple, and fairly foolproof, way of verifying who is allowed to relay mail on your system. You can configure most POP3 and IMAP4 mail clients to use SMTP AUTH.
• Realtime Blackhole List (RBL) support
This feature lets you point Internet Services at a RBL server on the Internet (see RBL (Realtime Blackhole List) lookup). Whenever SMTP mail arrives, Internet Services will contact the RBL server to see if the sending site is a known source of spam. If it is, Internet Services can include a warning header in the message or reject the message outright.
• True "No Relay" setting
Internet Services now lets you enable a true "No Relay" setting which, when set, prevents your system from being used as an SMTP relay site. This is useful both for sites that relay, where the administrator is trying to troubleshoot a problem, and for sites that don't relay.
• SMTP mail rules
Internet Services has long supported the idea of filter documents where IP addresses and domain names could be marked as either "trusted" or "bad". This functionality has not changed, but the filter documents have now been further enhanced to allow you to add rules, written in Internet Services script. These rules can examine the content of incoming SMTP message headers and perform specific actions. These actions include NDNs and injecting additional headers in the message stream. Applications of these rules include:
• spam scoring
• spam rejection
• implementing custom JUNK marking rules
• workflow applications.
This feature is especially powerful when combined with the new user-created mail rules (see our online help for more information). Our goal with this feature is to take all of the built-in spam rules from previous Internet Services versions and convert them into a rules document that you can modify to suit your system's needs.
• NNTP crossposting limits
This feature lets you reject NNTP messages that are posted to too many alternate newsgroups.
• IP connection rejecting
This feature lets you reject all IP connections from troublesome sites.
• Reverse DNS lookup
This feature lets you reject SMTP mail from untraceable sites.
How Internet Services executes security features
Internet Services security features are layered and execute in this order:
1 Filter documents, which accept or reject mail based on the sender's IP address or domain name appearing in your filter(s) document.
2 Reverse DNS Lookup, which queries the DNS name against an incoming IP address for validity, if you have it enabled on your system.
3 RBL (Realtime Blackhole List) lookup, which queries up to three RBL services of your choice.
4 SMTP rules, which can scan and insert a message header and score incoming email based on its content.
5 User-created rules (see our online help) which deal with incoming mail based on how the user has configured his rules.
Here is a diagramatic view of the order in which Internet Services security is executed:
About the Internet Services Filters folder
The Filters folder, located inside the Internet Services folder on the administrator’s Desktop can play an important role in securing your FirstClass system. The Filters folder holds files or documents containing mail addresses and domain names of individuals or sites from which you want to restrict mail. These files can be either FirstClass documents or uploaded text files. You can add IP masks (groups of similar IP addresses), IP addresses, domain names, and mail addresses to filter documents. Mail will not be accepted from any sites or addresses listed in these blocking lists. This feature is enabled automatically.
Configuring the UCE/Spam tab on the Basic Internet Setup form
The UCE/Spam tab on the Basic Internet Setup form is now divided into three sections: relaying, handling spam, and blocking IP addresses. If you already have filter files on your system, they will automatically be used. This is how we have configured the Husky Planes UCE/Spam tab:
Handling spam
Internet Services takes a two-pronged approach to controlling spam: provide the tools to reject spam deliveries and mark suspicious messages. These approaches provide layers of protection presented here in order from the outer layer and working inward to your Mailbox.
Blocking IP addresses
The primary feature to help control unwanted access to your system is "Reject connections based on Filters":
This option blocks IP addresses from connecting to your Internet Services on any protocol if they are listed in your filter documents. Any connections from listed addresses are refused immediately, using the least possible processing power and system resources. This makes IP blocking especially useful for ridding yourself of troublemaker machines on the Internet, whether they are trying to hack into your system or deny service to your users. If you already have a hardware firewall, use it to protect your Internet Services machine, since it offloads the effort to a dedicated resource. But for quick blocking of a bad address or for sites that don't run a firewall, this is a good option.
To configure your system to block out unwanted access, all you have to do is:
1 Select "Reject connections based on Filters".
2 Open the Filters folder located in the Internet Services folder on the administrator's Desktop.
3 Create a FirstClass document in your Filters folder listing the addresses you want to block.
We recommend naming the document something like "Blocked IPs" and listing only the IP addresses you wish to block. Other filter documents can contain IP blocks, but if you keep them segregated like this, it is easier to administer them.
4 Click Get Config on the Internet Services Monitor form or restart Internet Services.
Note
You can update your filter documents whenever necessary but always remember to click Get Config or restart Internet Services to activate the changes.
Syntax for filter documents
The format of the blocking list conforms to that used in various Internet anti-spam sites, with one entry per line and domains optionally prefixed with an '@', for example:
# This is a comment line
111.*.*.*
# a mask - this blocks mail from every SMTP server who's IP address starts with 111
123.123.123.123
# an IP block, the SMTP server at 123.123.123.123 cannot deliver mail to us
@spamdomain.com
# a domain block, any server that declares itself part of spamdomain.com or any user@spamdomain.com cannot deliver mail to us
spamdomain2.com
# same as above, slightly different syntax
jill1717@hotmail.com
# this particular address appearing in either the SMTP MAIL FROM or RFC-822 From: header causes mail to be rejected
"Trusted" IP entries take one of two forms: a single IP address per line or an IP mask. Both forms are prefixed with a '+'. Here is an example of a "Trusted IPs" document:
# This is the Trusted IPs document containing the IP addresses for which we are willing to relay
+111.222.111.222
# trusts this IP address 111.222.111.222
+111.*.*.*
# a mask - this trusts every IP address that starts with 111
It should be noted that trusted IP addresses override blocked IP addresses. If you need to block a group of IP addresses but trust a single IP within, you can do this:
# Blocking a group, while trusting one of them
111.*.*.*
# a mask - this blocks every IP address that starts with 111...
+111.222.111.222
# this line trusts this IP address
(111.222.111.222) even though it's IP neighbors are blocked
To create a filter file:
1 Open the Filters folder in the Internet Services folder on the administrator's Desktop.
2 Create a FirstClass document listing the addresses to block.
We recommend naming your document something like Blocked Addresses and listing in it only the mail addresses and domains you wish to block. Other Filters documents can contain blocked addresses, but if you keep them separated like this, it is easier to administer them.
3 Close the document.
4 Click Get Config on the Internet Services Monitor form or restart Internet Services.
Reverse DNS lookup
This feature causes Internet Services to take the IP address of any SMTP server that connects to it and query the configured DNS for an associated domain name. If no domain name is found, Internet Services refuses mail from that server. Since this option relies on querying the DNS server on each inbound SMTP connection, make sure your DNS servers are functioning well in order to maintain good performance. To select this feature, choose "Reject unknown domain names" on the Basic Internet Setup-UCE/Spam tab:
RBL (Realtime Blackhole List) lookup
This feature causes Internet Services to take the IP address of any SMTP server that connects to it and query the configured RBL host(s) to see if the IP address is a known source of spam mail. If it is, Internet Services either refuses mail from that server or optionally tags it with an additional Internet header for later processing by the rules system. In general, the reduction in incoming spam makes up for the additional latency of connecting to the RBL host in processing each connection. However, there may be a slight increase in the number of active SMTP inbound connections with this feature turned on. To enable this feature:
1 Open the Basic Internet Setup form and click the UCE/Spam tab.
2 Choose "Reject unknown domain names" on the Basic Internet Setup-UCE/Spam tab:
Note
If you enable this feature, the order of your RBL hosts should be from most aggressive to least aggressive.
3 Fill in the domain names of the RBL hosts you want to use:
4 Type NDN text at "Help text".
This field should contain the text you want rejected senders to see in their NDN's, for example,"Your mail has been found on our RBL service list and will not be delivered, please contact myRBLhost.com for further information.":
5 Close the form.
If you don't want to reject sites that fail the RBL lookup, you can optionally insert a warning header into the incoming SMTP message instead. To do this, just select "X-RBL-Warning header instead of NDN":
When operating in this mode, the content of the "Help text" field is inserted as the data portion of the "X-RBL-Warning" header in the offending message. In this case, you should replace the "Help text" with something that identifies to the recipients why the mail is being tagged and the name of the RBL site that triggered the header. By doing this, you will make it easier for your end users to write FirstClass user-created mail rules to process their messages.
Note
Make sure you enter "Help text" content that is easy to parse.
NNTP crossposting limit
This feature lets you filter excessively crossposted traffic from any NNTP feeds you are bringing into FirstClass. Crossposting in NNTP newsgroups is considered poor form and is often an indicator that a message is junk mail of some kind. To set a limit, enter it at "NNTP crossposting limit" on the UCE/Spam tab on the Basic Internet Setup form. We suggest you set a minimum of "3" as your limit.
Spam logging
Whenever Internet Services rules on the UCE/Spam tab take effect and block a message from arriving in a user's Mailbox, an entry is added to your server statistics file, for example:
Spam 27 10/22/2001 12:27:54 PM localhost 127.0.0.1 terry@127.0.0.1 Sender Extra
where,
Spam: keyword
The keyword for these entries is always "Spam"
27: FirstClass user ID
10/22/2002: the date
12:27:54 PM: the time
localhost: the host name
127.0.0.1: the IP address
terry@127.0.0.1: the mail address
Sender: the reason code
The reason code can be one of:
• MailRule
• Sender
• RBL
• ReverseDNS
• Host
• RelayReject.
Extra: the extra information
Extra information will contain:
• MailRule type - any NDN text sent
• RelayReject type - the address being relayed
Note
RelayReject is not logged when all relaying is disabled.
Preventing unauthorized mail relaying
By default, relaying obeys the filters and SMTP AUTH settings. If your site does not need to relay you can shut off relaying entirely by selecting "Disable ALL relaying, including SMTP AUTH and trusted IPs" on the UCE/Spam tab on the Basic Internet Setup form:
After you have selected this option, click Get Config on the Internet Services monitor form or restart Internet Services. This setup is easy to administer and extremely secure, as your system allows absolutely no SMTP relaying.
SMTP mail relaying occurs when your Internet Services receives a piece of mail through SMTP that is not destined for a user on your FirstClass system. In this case, Internet Services accepts the message and passes it on (through SMTP) to another SMTP server somewhere on the Internet. There are two scenarios where you may need this type of setup:
• if your Internet Services acts as the Internet contact point for a group of SMTP servers
• if you need to support POP3 or IMAP4 users on your system who send mail outside of your organization.
Your site needs to relay for POP3 or IMAP4 users
If you need to support POP3 and IMAP4 users who send mail outside of your organization, we recommend using SMTP AUTH, which is an extension to the SMTP protocol. This extension means that if a server wants to relay mail from your SMTP server, then it must provide "credentials" (user ID and password authentication) so that you know it is not a spammer. Unless you explicitly disable relaying, Internet Services will do SMTP relaying for those who supply credentials. Since this might be a bit "porous" (especially for sites that support autoregistration), you can configure which FirstClass features a user must have in order to relay. You enable these features on the UCE/Spam tab on the Basic Internet Setup form:
This form lets you limit SMTP relaying to users who you have already entrusted with other "powerful" FirstClass features. After you have checked the features that your relaying users must have to relay off your system, open the Internet Services monitor form and do a Get Config or restart Internet Services. Now your system allows SMTP relaying but only for authenticated users who are enabled with specific FirstClass features.
Your site needs to act as the Internet contact point for a group of SMTP servers
If you have this setup on your site you may find, due to other people's SMTP server software, that the hosts you need to support cannot use SMTP AUTH. For this reason, and for reasons of legacy support, you can configure Internet Services to use trusted IP addresses. This means that a document in the Filters folder contains a list of trusted IP addresses and, for these addresses only, Internet Services will perform SMTP relaying. This configuration is quite secure but does require a fair amount of effort on your part, especially if you have a large number of trusted addresses you need to add to your filter documents. Be careful when creating your filter documents, as entering the wrong IP address, or worse the wrong IP mask, can open you up to being used as a spam relay.
To configure a trusted IP relaying setup:
1 Open the Filters folder in the Internet Services folder on the administrator's Desktop.
2 Create a FirstClass document in your Filters folder listing the trusted IP addresses.
For efficiency, we recommend naming your filter document something like Trusted IPs and using the document only for trusted IP addresses. Other filter documents can contain trusted IPs, but if you keep them in separate documents it is easier to administer them.
3 Close the document.
4 Open the Internet Services monitor form and click Get Config on the Internet Services Monitor form or restart Internet Services.
What if I get "blacklisted" as an open relay?
Because of the proliferation of spam and the difficulty in stopping it, there are a number of organizations (including RBL suppliers) who aggressively identify open relay sites and add them to their blacklists. If your site is blacklisted, there are two actions you can take:
• check your relay settings
You probably got blacklisted because spam came from your site. Lock things down using the methods outlined in this section and try to isolate the problem. If you can't locate the problem, contact the blocking organization and ask for help.
• ask the blocking organization to retest your site after you've located and fixed your relaying problem.
If you follow the directions in this section you can make your site relay proof. However, keep in mind that there are some organizations, for example ORBS, that use flawed relay tests that assume your mail host is "sendmail". If you have configured your system correctly and you still fail their test you should try these options:
• reconfigure Internet Services to act more like sendmail
The main issue with these tests is that Internet Services absorbs some attempts to relay as if it might be delivering the message, when, in fact, it later delivers an NDN. Since the tests do not wait for the NDN, they are "fooled" into thinking the relay worked. By setting "Aliases only" on the Advanced Directory form, located in the Internet Services folder on the administrator's Desktop, you force Internet Services to reject these efforts as they come in:
Using this tactic comes at the expense of your need to configure aliases (or set up automatic aliasing) for all of your Internet mail users.
• inform the blocking organization that you are not relaying, and prove it to them by having them try to relay off your site to some destination account
The better organizations may respond reasonably to this sort of approach.
• convince the sites you care about exchanging mail with not to use their "flawed" service.
SMTP mail rules
All SMTP mail rules are files located in the Filters folder. They are distinguished from the standard filter files by their names, which must start with "rules". These files provide a scripting and configuration system that allows you to customize how your Internet Services handles potential junk mail arriving in your system through SMTP.
Note
You should have a solid understanding of filter documents and basic coding to configure SMTP mail rules.
Let's take a look at this functionality by describing each new file's name and usage:
rules.AttachmentBlock
This file lets you block certain attachment types from arriving via SMTP. When an attachment matches the criteria in this file, it is replaced by a text attachment, the content of which also comes out of this file. An example rules.AttachmentBlock file is:
# This file contains a list of unacceptable file name/file type and creator patterns, one per line.
# It also contains some 'helpful' text that replaces the attachment.
#
# The help text is one or more lines that start with a colon.
# The attachment names are case-insensitive, and use the DOS wildcard convention
# of * and ?
# Macintosh file type and creator patterns can be specified as well,
# using the syntax 'TTTT:CCCC' where TTTT is the file type, and CCCC
# is the creator. Use ? as a wildcard character.
#
# The \@ in the help text will be replaced by the file name which triggered the blocking
#
:This message contained an attachment named \@ that has been discarded
:because it's name or type is considered dangerous or unacceptable by the
:Administrator.
#
# block all executable (Windows) types
*.exe
*.scr
*.com
# Macintosh support - standard Mac executables
'APPL:????'
rules.SubjectBlock
This file contains a list of objectionable words and phrases that are compared against the contents of the RFC-822 Subject header using a built-in facility of the rules system. The rules document (see below) that ships with Internet Services contains a rule for comparing the content of the Subject header against these words. The format of the file is simple: one word or phrase per line and no comments allowed. An example rules.SubjectBlock file is:
Viagra
Get rich
ADV:
rules.MailRules
This file contains lines that represent RFC-822 headers to examine, a test on the header, and an action to perform if the test succeeds. Internet Services ships with a default rules.MailRules file that provides these features:
• replaces all formerly built-in Internet Services spam handling rules
• injects an X-SPAM-Warning Internet header that rates the message as one of: HIGH, MEDIUM, LOW
• injects an X-SPAM-Level header that provides a numeric indication of the likelihood that the file is spam
• injects an X-SPAM-Tests header that shows which spam "tests" this message failed
• controls rules by variables set at the top of the rules file
• controls handling by rules at the bottom of the file
• implements various SMTP crossposting and BCC limits.
The syntax of the mail rules document is based on a combination of Internet Services script and the HeaderMatch document, and is designed to be comfortable for administrators familiar with these Internet Services facilities. The expression part of Internet Services script, in turn, is based loosely on C and JavaScript. The mail rules component gives access to the RFC-822 headers as they are being received, and lets you set attributes of the message, change or discard the header, add a new header, or discard or NDN the message. There is also a facility for comparing the words in a header (typically the Subject) against a list of objectionable words and phrases.
Mail rules can be designated to run before any headers are received, when specific headers are received, as each header is received, or when the end of the header indicator is reached. Comments may be placed in the file, and must begin with the # character. Because built-in variables give mail rules access to information about the message being processed, they must be used carefully or misleading or incorrect results will occur, for example, using #To before the To: header has been received will fail.
The syntax of the default rules.MailRules file is:
<header> ":" 1*<sp> <condition> 1*<sp> <action>
where:
<header>
::= '*' means any/all header
::= '^' means before any headers
::= '' (empty) means end of headers
::= <RFC822 header name> (e.g. From)
<sp>
::= ASCII SPACE or TAB
<condition>
::= ["NOT" 1*<sp>] <">simple expression<">// supports * and ?, case insensitive
::= ["NOT" 1*<sp>] "regexp:" <">complex expression<"> // full regular expression, including tagged groups for replacement
::= "IF" *<sp> "(" <expression> ")" <expression> ::= ["("] <term> [<relational> <expression>] [")"]
<term>
::= [<not>] <lhs> [<conditional> <rhs>]
<relational>
::= <and> | <or>
<conditional>
::= "==" "!=" "|" "&" "~=" <lt> <gt> <le> <ge>
<action>
::= <set> *[1*<sp> AND 1*<sp> <set>]
::= "SPAM" // shorthand for SET $priority=junk AND $machinegenerated=1
::= "DISCARDMESSAGE"
::= "DISCARDHEADER"
::= "DONE" // stop processing rules for this message
::= "INJECT" <"><header>":" <value><"> (can include replacement groups, e.g. \1, \2)
::= "REPLACE" <"><header>":" <value><"> (can include replacement groups, e.g. \1, \2)
::= "NDN" <errcode> [1*<sp> <string>] // implies DONE
<set>
::= "SET" 1*<sp> <variable> *<sp> "=" *<sp> <value> *[ 1*<sp> "AND" 1*<sp> <variable> *<sp> "=" *<sp> <value> ]
<not>
::= "NOT" | "!"
<and>
::= "AND" | "&&"
<or>
::= "OR" | "||"
<gt>
::= "GT" | ">"
<lt>
::= "LT" | "<"
<ge>
::= "GE" | ">="
<le>
::= "LE" | "<="
<variable>
::= "$" <builtin> or 1<alpha>*<alphanum_>
@inblocklist(<string> or <variable>[, <case>]) // <case> is "yes", "no", "true", "false" // default is "yes"
@seenheader(<string> or <variable>)
@istrustedip(<string> or <variable>)
@istrustedaddress(<string> or <variable>)
@isspamip(<string> or <variable>)
@isspamaddress(<string> or <variable>)
@islocaladdress(<string> or <variable>)
// the following behave the same as Internet Services script statements
@split(...)
@substr(...)
@length(...)
@indexof(...)
@upper(...)
@lower(...)
@rand()
// the following are built in variables
Name
$MachineGenerated
Value
"1", "0"
Readonly/Readwrite
Readwrite
Name
$Priority
Value
"Normal", "Urgent", "Bulk", "Junk"
Readonly/Readwrite
Readwrite
Name
$IsNewsArticle
Value
"1", "0"
Readonly/Readwrite
Readonly
Name
$IsSpammer
Value
"1", "0"
Readonly/Readwrite
Readwrite
Name
$MessageID
Value
<contents of Message-ID header>
Readonly/Readwrite
Readonly
Name
$Subject
Value
<contents of subject header>
Readonly/Readwrite
Readwrite
Name
$From
Value
<contents of From: header>
Readonly/Readwrite
Readonly
Name
$Sender
Value
<contents of MAIL FROM:>
Readonly/Readwrite
Readonly
Name
$#To
Value
<number of To: recipients>
Readonly/Readwrite
Readonly
Name
$#Cc
Value
<number of Cc: recipients>
Readonly/Readwrite
Readonly
Name
$#BCC
Value
<number of BCC recipients>
Readonly/Readwrite
Readonly
Name
$HaveReplyTo
Value
"1", "0"
Readonly/Readwrite
Readonly
Name
$HaveResentReplyTo
Value
"1", "0"
Readonly/Readwrite
Readonly
Name
$SenderIP
Value
<IP address of sending SMTP host>
Readonly/Readwrite
Readonly
Name
$MyIP
Value
<IP address of this host>
Readonly/Readwrite
Readonly
Name
$Authenticated
Value
"1", "0"
Readonly/Readwrite
Readonly
Name
$AuthCanRelay
Value
"1", "0"
Readonly/Readwrite
Readonly
Example rules.MailRules file
# initialize variables
^: if (1) SET $lowspam=25 AND $medspam=50 AND $highspam=75
^: if (1) SET $xpostlimit=25
Rules to set spam levels
Subject: if (@inblocklist($subject)) SET $spamlevel += 75 AND $spamtests += "SUBJECTBLOCK;"
Subject: " " SET $spamlevel += 85 AND $spamtests += "SUBJ_HAS_SPACES;"
Errors-To: "*" SET $spamlevel -= 20
From: regexp:".*<.*[0-9]+@+>.*" SET $spamlevel += 25 AND $spamtests += "FROM_ENDS_IN_NUMS;"
Message-ID: not "@" SET $spamlevel += 33 AND $spamtests += "INVALID_MSGID;"
Message-ID: regexp:"^<.+\@>$" SET $spamlevel += 33 AND $spamtests += "INVALID_MSGID_2;"
X-Mailer: "Extractor" SET $spamlevel += 75 AND $spamtests += "X-MAILER;"
X-Mailer: "Floodgate" SET $spamlevel += 75 AND $spamtests += "X-MAILER;"
X-Mailer: "Group Mail" SET $spamlevel += 75 AND $spamtests += "X-MAILER;"
X-Mailer: "Millennium Mailer" SET $spamlevel += 75 AND $spamtests += "X-MAILER;"
X-Mailer: "AutoMail" SET $spamlevel += 75 AND $spamtests += "X-MAILER;"
: IF ($#BCC > 0 && ($#To + $#Cc) == 0) SET $spamlevel += 75 AND $spamtests += "NO_RECIPIENTS;"
#: IF (NOT @seenheader("Subject")) SET $spamlevel += 50 AND $spamtests += "NO_SUBJECT;"
#: IF (NOT @seenheader("Date")) SET $spamlevel += 50 AND $spamtests += "NO_DATE;"
#: IF (NOT @seenheader("Message-ID")) SET $spamlevel += 50 AND $spamtests += "NO_MESSAGE_ID;"
# crosspost limiting rule
:IF (($#BCC + $#To + $#Cc) > $xpostlimit) SET $spamlevel += 75 AND $spamtests += "CROSSPOST_EXCEEDED;"
Rules to deal with spam levels
: IF ($spamlevel >= $highspam) NDN 550 "Sorry, your message has triggered a spam block, please contact the postmaster"
: IF ($medspam <= $spamlevel && $spamlevel < $highspam) INJECT "X-SPAM-Warning: HIGH"
: IF ($lowspam <= $spamlevel && $spamlevel < $medspam) INJECT "X-SPAM-Warning: MEDIUM"
: IF (0 < $spamlevel && $spamlevel < $lowspam) INJECT "X-SPAM-Warning: LOW"
: IF ($spamlevel > 0) INJECT "X-SPAM-Level: $spamlevel"
: IF ($spamlevel > 0) INJECT "X-SPAM-Tests: $spamtests"
: if ($spamlevel > 0) INJECT "X-FC-Icon-ID: 2"
FirstClass user-created mail rules
Any FirstClass user with the appropriate privilege can create mail rules for their own Mailbox and any conferences for which they have the appropriate permissions. For information on how to create and use these mail rules, see the Mail Rules article in this issue.
Internet Services tags all messages that make it through the multi-layered spam blocking facilities with 'X-SPAM-xxxx' headers. You can test these headers using your own mail rules to file or discard messages you believe are spam. Here is an example of what the Internet header looks like for a message with a 'High' X-SPAM-warning:
Using mail rules in conjunction with SMTP rules provides both you and your users the ability to efficiently deal with Internet spam on your system.
Creating Internet security certificates
Certificates are a way of securing the transmission of private documents on the Internet using the Secure Socket Layer (SSL) protocol. You can enable a security certificate for your entire system and for POP3, IMAP4, and LDAP protocols.
Note
You enable certificates for POP3 and IMAP4 on the Advanced Mail form and LDAP on the Advanced Directory form, press F1 when you have the form open.
If you are using a 'wildcard' certificate for your system, for example, *.centrinity.com, you can use it for the other protocols as well. Otherwise, you need separate certificates for each protocol.
If you are using security certificates, you must place them in the SSL Certificates folder, located in the Internet Services folder on the administrator’s Desktop:
This section takes you through the process of generating your certificate request, sending the request to a certificate authority and, finally, creating the security certificate document for your system.
SSL protocol overview
The primary goal of the SSL protocol is to provide privacy and reliability between two communicating applications. The SSL protocol uses certificates to create a private key to encrypt data that is transferred over the SSL connection. At the lowest level of this protocol is the SSL Record Protocol. This protocol is layered on top of a reliable transport protocol, for example TCP/ IP.
The SSL Record Protocol is used to encapsulate various higher-level protocols. One such encapsulated protocol, the SSL Handshake Protocol, allows the server and client to authenticate each other and to negotiate an encryption algorithm and cryptographic keys before the application protocol transmits or receives its first byte of data. Encryption is used after an initial handshake to define a secret key.
One advantage of SSL is that it is application protocol independent. This means a higher-level protocol can layer on top of the SSL Protocol transparently.
Both Netscape Navigator and Internet Explorer support SSL, and many web sites use the protocol to obtain confidential user information, such as credit card numbers. By convention, Web pages that require an SSL protocol connection start with HTTPS, instead of HTTP and will have a browser lock(s) on the bottom of the secured web page:
SSL support in Internet Services
Internet Services supports the Secure Socket Layer standard as a method of providing secure communication over the HTTP protocol. Internet Services supports SSLv2, SSLv3, and TLSv1 and both strong and weak (export) encryption levels. Internet Services does not support the use of IDEA encryption algorithms in SSL.
Creating a security certificate for your system
To create a security certificate for your FirstClass system:
1 Shut down FirstClass server.
or
Create a blank or a dummy post office on a separate machine.
2 Start FirstClass Tools.
3 Select Configure > Make Certificate Package.
4 Enter a password:
Note
You can choose any alphanumeric password you wish. Record this password in a secure place, as you will need to use it later.
5 Click OK.
You now have to fill out a request form.
6 Complete the Certificate Request Information form.
Note
You must fill in every field on the Certificates form.
Country name
The name of your country. For example, CA for Canada.
State or province name
The full name of your state or province. For example, Ontario.
Locality name
The full name of your city. For example, Markham.
Organization name
The full name of your organization. For example, Husky Planes Inc.
Organization unit name
The full name of the department or area in your organization for the web site. For example, Sales, Engineering, or Marketing.
If your web site is for your entire company, repeat the company name in this field.
Domain name
Web site domain name. For example, www.huskyplanes.com.
Email address
Web site email address. For example, sales@huskyplanes.com.
After you have completed the form, press OK and follow the instructions.
7 Move the mouse over the screen to generate random data.
Note
Moving the mouse over the screen generates random information needed to generate the certificate.
Information that represents both an RSA private key and the certificate request is gathered, and text-like output is displayed to this form:
8 Copy both sections of the above information to a text file.
9 Shut down FirstClass Tools and start your FirstClass server.
If you are using a blank or dummy post office on a separate machine, use this server, not your live server.
10 Open the Internet Services/Certificates folder, on the administrator’s Desktop, and create a new FirstClass document.
11 Paste the first section of the text from Step 8 (starting with ----BEGIN RSA PRIVATE KEY ----) into the document you created in the Certificates folder in Step 10.
12 Close the document and name it something meaningful ending with one of the following extensions: .cert, .crt, or .pem.
13 Choose a certificate authority, for example, VeriSign.
14 Request an SSL certificate on your certificate authority’s web site and, when prompted, paste the second section of the text from Step 7 (starting with ----BEGIN CERTIFICATE REQUEST----) into the text field provided.
To see a list of certificate authorities in the Netscape browser:
Note
Third-party vendors issue security certificates for a small fee.
i) Select Communicator > Tools >Security Info, while in the browser.
ii) Click Signers, located on the Certificates window.
To see a list of certificate authorities in the Microsoft Internet Explorer browser:
i) Select Tools > Internet Options.
ii) Click Certificates on the Content tab.
iii)Click the Trusted Root Certification Authorities tab.
A certificate will be emailed back to you, containing this information:
15 Paste the above text (starting with ----BEGIN CERTIFICATE---- and ending with ----END CERTIFICATE---- ) above the text in the document you created in Step 10.
16 Enter this line between the two paragraphs in the document:
password: <password here>
where <password here> should be replaced with the password you entered in step 4.
This is what your document should look like:
17 Open the Multiple Sites & Languages form and enter the certificate name (from Step 12) in "Certificate".
If you are not running multiple sites, enter the certificate name on the Advanced Web and FTP form. If you are running multiple sites enter the certificate name(s) on the Multiple Sites & Languages form and leave the Advanced Web and FTP form blank. Use the same procedure if you are running clustered services on your system except configure the forms for each cluster.
Change "SSL Status" to either "Enabled" or "Required". "Enabled" instructs Internet Services to accept both secure and unsecure connections for the web site. "Required" instructs Internet Services to only accept secure connections.
Note
If you want to support SSL in a multi-site setup, you must purchase separate security certificates and pick unassigned port numbers (except for port 443 that is the default port) for each site.
17 Restart Internet Services.
Your Internet Services console should include a line that reads "Initialized 1 HTTPS listeners".
Note
When you enable HTTPS, the SSL connection is in use. This means extended server-side include (XSSI) variables that describe the connection become available (are set) and can be used in XSSI scripts. Internet Services supports all industry standard XSSI variables, with the exception of SSL_VERSION_INTERFACE. For a full listing of the variables used in Internet Services, see our online help or press F1.
|

