| |
FirstClass 7 Tools Reference
Contents
Copyright 2001 by Centrinity Inc.
SOF3022.0A
Centrinity Inc.
905-762-6000 or 1-800-763-8272
Web: www.centrinity.com,
Notices
You must accept the FirstClass License Agreement before you can use this product. If you do not accept the terms of the License Agreement, do not install the software and return the entire package within 30 days to the place from which you obtained it for a full refund. No refunds will be given for returned products that have missing components.
Information in this document is subject to change without notice. Certain features and products described in this document may not be currently available in all geographic regions. Distribution or reproduction of this document in whole or in part must be in accordance with the terms of the License Agreement.
All rights reserved. FirstClass is a registered trademark of a Centrinity Inc. subsidiary used under license. Centrinity, the Centrinity logo, and the FirstClass logo are trademarks of Centrinity Inc. All other trademarks are property of their respective owners.
This edition applies to Release 7.0 of FirstClass and to all subsequent releases and modifications until otherwise indicated in new editions. This document is bound by international copyright law and the FirstClass Software License Agreement and Limited Warranty included with every FirstClass product.
Technical support
Telephone technical support is available to registered administrators at the following numbers:
Toll free in North America: 1-800-346-9108
Toronto: 905-762-7060
International: +353-61-725-200.
Online support questions may be directed to support@centrinity.com.
Introduction
FirstClass Tools is an application that assists you in administering the FirstClass server. It allows you to perform administrative tasks such as:
• changing the server name
• adding, upgrading, removing and/or registering licenses
• displaying a list of sessions
• creating new sessions; opening, editing and removing existing sessions
• rebuilding user directories or restoring old user directories from a rebuild
• diagnosing volumes and directory items.
The sections in this reference will walk you through performing each of these steps.
What you need to know
You must have a basic working knowledge of the FirstClass server and client administration including gateways, batch administration, user setup, and routine administration. If you are interested in advanced administrator functions, see the FirstClass server online help material.
Starting FirstClass Tools
The FirstClass Tools application resides in your Server folder. The file is called Fctools.exe (Windows®) or FirstClass Tools (Mac® OS). It has the following icon:
The FirstClass server must be shut down before FirstClass Tools is launched. When the server has been shut down, double-click the icon or filename to start FirstClass Tools.
Note
If Mac OS file sharing is turned on, FirstClass Tools will not start.
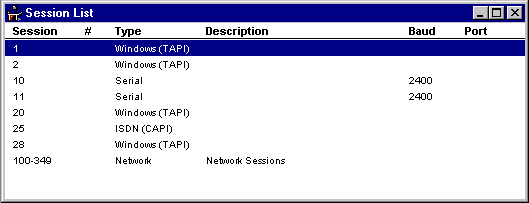
When you open FirstClass Tools, the Session List screen will appear.
Busy out all modems
After the post office has been licensed, it is a good idea to put all modems in a state of busy when the server is shut down so users cannot connect to the FirstClass server while maintenance is being performed. This should be common practice when you start FirstClass Tools.
To busy out the modems, choose File > Busy Out All Modems from the FirstClass Tools menu.
Licensing through FirstClass Tools
When you start FirstClass Tools for the first time, you will be prompted to add your licenses.
When licensing a server for the first time, the server license must first be applied to the server. Additional licenses can be added in any order. This section describes how to register, add, remove, and upgrade licenses. It also outlines your registration agreement, and discusses the different types of licenses.
Registering your license
When you purchase an upgrade for your server, you must register that upgrade with Centrinity in order to receive continued technical support.
To register:
1 Upgrade your system as described in Upgrade/TradeUp ReadMe.
2 Email, fax, or mail the registration form on the administrator’s Desktop as directed on the form.
The online registration form is available on the administrator’s Desktop.
License types
Adding licenses requires that you perform the upgrade procedure. See Upgrading a license for the procedure to follow to upgrade your server.
The following license types are discussed throughout this section:
• regular user licenses
• session licenses
• MP Option license
• FirstClass Unified Communications licenses
• text-to-speech engine licenses.
Note
You cannot make copies of a license diskette. If the diskette is damaged, contact Centrinity to receive a replacement diskette.
To view your current system configuration, choose Diagnostics > Diagnose Volumes, and select the Configuration tab. See Configuration Information for more information.
Time-limited server licenses
Some sites have time-limited server licenses. These licenses require regular renewal. They control the period of time in which the server will operate, not the number of sessions or the features available. If you have a time-limited server, your server will notify you of the upcoming expiry and of the options available for purchasing a license renewal. You will receive these notices in sufficient time to renew your license before expiry.
Regular user and session licenses
You can add regular user or session licenses to any registered FirstClass server. Licenses can only be added to one server; you cannot have the same license on two different servers at the same time. However, you can transfer a license diskette from server to server, if your licensing needs to be changed, by removing it from the original server and then adding it to the other server. This option only pertains to license diskettes, not license files, as license files are linked to a specific server serial number.
Note
Educational sites must use regular user licenses for all of their students and staff.
MP Option license
An MP Option license is necessary if you require more than 250 network sessions. Note that the Mac OS does not support more than 250 licenses; therefore, the MP Option license is not applicable to the Mac OS. Make sure that you have sufficient memory for the additional network sessions you will be configuring. Assuming you have already configured 250 network sessions, the following configuration is recommended before adding the MP Option license:
• high performance disk system
Recommended throughput levels are: 80 MB/s for up to 500 sessions, 160 MB/s for up to 1500 sessions. If more than 1500 sessions, contact Centrinity to help you engineer your system to address intended usage patterns.
• dual 1GHz processors for more than 750 concurrent users (minimum dual 500MHz processor otherwise)
• 128 Mb RAM (minimum 100K RAM per session, 250K preferred, plus 16 Mb)
• 100Mb Ethernet (or better) network adapter
• Windows 2000 Server or Advanced Server, with latest Service Pack applied (minimum Windows NT 4.0 Service Pack 5).
After upgrading your license, you will be able to use FirstClass Tools to configure more than 250 network sessions and you will be able to create more than 300 groups.
Unified Communications license
The FirstClass Unified Communications license gives you access to Voice Services. This includes the ability to receive email, voice and fax messages in one central location, the FirstClass Mailbox. Additionally, you can access your voice, fax, and text messages using the telephone.
Text-to-speech engine licenses
Text-to-speech engine licenses are required for Voice Services. For more information, see FirstClass Voice Services Administrator’s Guide.
Regular and session users
A FirstClass user can be classified as either a regular user or a session (remote) user. Both can connect to your server using any protocol. You can only add as many regular users as you have regular user licenses. You can add as many remote users as you wish but the number that can log in at any one time is limited by the number of session licenses you have.
Session licenses are shared by remote users, while regular users have dedicated sessions that are always available to them up to the server maximum concurrency limit. This means that a regular user can always log in, but a remote user will only be able to log in if an unused session license is available.
Licensing the post office
When you initially install the FirstClass server, the post office has no serial number. To assign a serial number, use the FirstClass server license diskette that came in your server package, or the server license file provided to you.
Warning
Do not install the same license on two different servers. This is a violation of your license agreement, and two servers with the same license will not communicate properly with each other.
(Double-click to enlarge)
Licensing using a diskette
To license the post office from diskette:
1 Make sure the license diskettes are write protected.
2 Start the FirstClass Tools application.
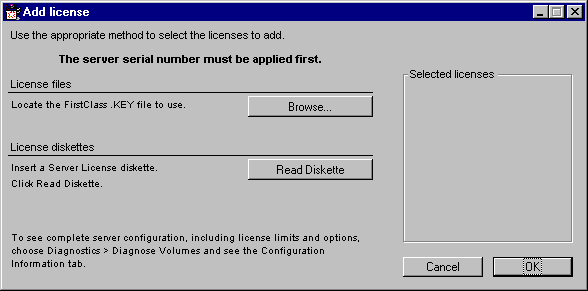
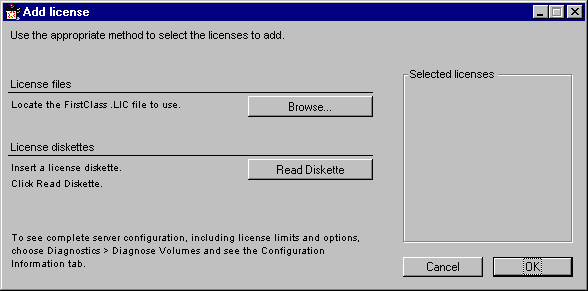
If you haven't licensed your server, the Add license form appears. If the Add license form does not appear, display it by choosing Configure > Add License.
3 Insert the server license diskette.
Note
You must insert the server license diskette first. After the server has been assigned a serial number, you can add licenses in any order.
Mac OS: FirstClass Tools updates your license limits and ejects the diskette. (If the diskette doesn’t eject automatically, click Eject on the Add license form). Repeat this step for each additional license diskette.
Windows: Click Read Diskette. Eject the diskette. Repeat this step for each additional license diskette.
4 Click OK.
5 Exit from FirstClass Tools (Windows) or Quit (Mac OS).
6 Restart both the FirstClass server and Internet Services.
Licensing using a file
1 To license the post office from a file:
2 Start the FirstClass Tools application.
If you haven’t licensed your server, the Add license form appears. If the Add license form does not appear, display it by choosing Configure > Add License.
3 Click Browse (Windows) or Choose (Mac OS).
4 Select the license file that Centrinity provided.
Note
You must apply the server license file first (nnnnnnn.KEY). After the server has been assigned a serial number you can add one or more license files (nnnnnnn.LIC) in any order. These files can also be added using Batch Admin. See the online help for information.
If you receive an error message when you try to add licenses, make sure you have already applied a server serial number (nnnnnnn.KEY).
5 Click OK.
The license is immediately updated.
6 Exit from FirstClass Tools (Windows) or Quit (Mac OS).
7 Restart both the FirstClass server and Internet Services.
Upgrading a license
If you received a trade up pack with a copy of the FirstClass Upgrade Instructions, you should follow the steps outlined in that document for upgrading, and only refer to this document when adding additional user, session, MP Option, or FirstClass Unified Communications licenses. To upgrade, follow these steps:
(Double-click to enlarge)
Upgrading using a diskette
To upgrade the post office from diskette:
1 Shut down both the FirstClass server and Internet Services if you have not already done so.
Do not insert your license diskette yet.
2 Make sure that the license diskettes are write protected.
3 Start the FirstClass Tools application.
4 Choose Configure > Add License.
5 Insert the license diskette.
Note
You can add licenses in any order.
Mac OS: FirstClass Tools updates your license limits and ejects the diskette. (If the diskette does not eject automatically, click Eject on the Add license form.) Repeat this step for each additional license diskette.
Windows: Click Read Diskette. Eject the diskette. Repeat this step for each additional license diskette.
6 Click OK.
Upgrading using a file
1 To upgrade the post office from a file:
2 Start the FirstClass Tools application.
3 Choose Configure > Add License.
4 Click Browse (Windows) or Choose (Mac OS).
Note
You can add licenses in any order.
5 Select the license file that Centrinity provided (nnnnnnn.LIC).
6 Click OK.
The license is immediately updated.
Removing a license
You may need to remove a license. For example, you may want to move a license to a different server. If your post office becomes corrupt, you may need to remove all of your licenses.
(Double-click to enlarge)
Removing a license using a diskette
To remove an existing license that was added from a diskette:
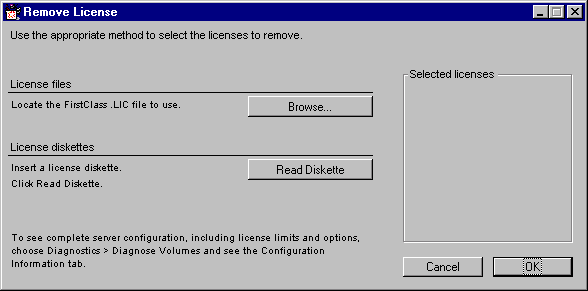
1 Choose Configure > Remove License from the FirstClass Tools menu.
2 Insert the diskette containing the license you want to remove.
Mac OS: FirstClass Tools removes the license and ejects the diskette. (If the diskette doesn’t eject automatically, click Eject on the Add license form). Repeat this step for each license you want to remove.
Windows: Click Read Diskette. Eject the diskette. Repeat this step for each license you want to remove.
3 Click OK.
Removing a license using a file
To remove an existing license that was added from a file:
1 Choose Configure > Remove License from the FirstClass Tools menu.
2 Click Browse (Windows) or Choose (Mac OS).
Note
You can remove licenses in any order. However, the server license cannot be removed using this method. This license can only be removed using the Remove ALL licenses option. See Removing all licenses at once for information.
3 Select the license file you want to remove (nnnnnnn.LIC).
4 Click OK.
The license is immediately updated.
Removing all licenses at once
Warning
Before attempting this procedure, make sure you have all of your license diskettes/files available, as you will need them to relicense your post office.
To remove all licenses at once:
1 Choose Diagnostics > Diagnose Volumes.
2 Select the Options tab.
3 Click Remove ALL licenses.
Changing the server name
During installation of the FirstClass server, you will be requested to give a name to your server, and a name to your server site. FirstClass Tools allows you to change one or both of these names after installation, if desired.
Changing a name
To change the server network name or the site name, follow the steps below:
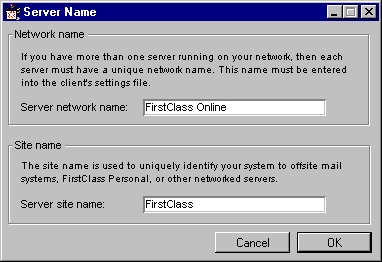
1 Choose Configure > Server Name from the FirstClass Tools menu.
2 Change one or both of the "Server Network Name" and "Server Site Name" fields when the Server Name form appears.
3 Click OK.
4 Exit from the FirstClass Tools application and restart the FirstClass server.
Server network name
The server network name is a unique name by which your FirstClass server will be known on the Local Area Network (LAN). Users connecting to your server with AppleTalk or IPX network sessions specify this name in their settings files. Administrators who set up gateways connecting to your server with AppleTalk or IPX network sessions specify this name in the Server field of the Connection tab on the Gateway Configuration form.
If you change this name, you must notify all users and administrators of gateways who connect to your server by AppleTalk or IPX so they can reconfigure their gateways.
Server site name
The site name will identify the FirstClass server within a FirstClass network to offsite mail systems and networked servers. This name will often be the same as the server network name.
The server site name is used for routing mail within a FirstClass network. When administrators of other servers in the FirstClass network add a gateway or route to your server, the gateway or route name is the server site name for your server.
If you change the site name, you must notify all administrators who have gateways to your server, so they can reconfigure their gateways.
Adding and configuring sessions
Now that you have licensed the post office and defined names for the server network and the site, you can start adding sessions. There are two types of sessions: network sessions and modem sessions. This chapter discusses each of these sessions and explains how to add and configure them.
Viewing the Session List
The Session List screen opens automatically every time FirstClass Tools is started. This list includes the network sessions that were defined, as well as each modem session.
If this screen does not open, or if it was closed and you wish to reopen it, choose Configure > List Sessions from the FirstClass Tools menu.
(Double-click to enlarge)
Session support
Windows supports up to 250 network and modem sessions combined. Mac OS 9 also supports up to 250 combined sessions, but previous Mac OS versions only support 100 combined sessions. The FirstClass Tools application checks for the Mac OS version and sets the limit accordingly. The MP Option configuration on Windows supports up to 5000 combined sessions. These are the limits on the number of concurrent sessions running on your server. They are not limits on the total number of users you can have.
Network sessions
Network sessions are configured by you and limited by your hardware and the amount of memory you have. See FirstClass Administrator’s Guide for minimum and recommended requirements.
After system usage, the available memory on your server machine will be divided equally among all the users logged in— with the exception of the administrator and gateways, which will get four times the amount of memory normal users will get.
To determine the number of network sessions you need to configure, add the number of users you expect to have logged on concurrently, the number of Internet sessions you expect to have, and, if applicable, the number of Voice Services ports (from the Brooktrout card(s)). Internet Services will use three sessions when it is first started (for the Internet Service account, SMTP, and NNTP), and additional sessions up to the number you specified in the Internet Sessions field on the Service tab of the Basic Internet Setup form. For more information, see our online help.
Setting up network sessions
Setting up network sessions involves the following tasks:
• Configure TCP/IP, IPX, or AppleTalk.
Remember, these protocols are optional. You only have to configure the ones you actually intend to use.
• Add the number of network sessions.
Note
TCP/IP is the preferred protocol. Internet Services requires TCP/IP. If you do not install TCP/IP, you will not be able to run Internet Services.
Configuring Windows NT for TCP/IP, AppleTalk, and IPX
To enable network access to the server on a Windows NT machine, follow the tasks listed under the appropriate protocol.
Configuring TCP/IP:
1 Install a network interface card (NIC) and the corresponding driver software on the server computer.
2 Configure the TCP/IP protocol on the computer using Control Panel > Network.
For detailed instructions, see your Windows documentation.
Configuring AppleTalk:
1 Install a network interface card (NIC) and the corresponding driver software on the server computer.
2 Configure the AppleTalk protocol on the computer using Control Panel > Network.
If you are using a Windows NT Workstation, install AppleTalk Protocol. If you are using Windows NT Server, install Services for Macintosh.
For detailed instructions, see your Windows documentation.
Configuring IPX:
1 Install a network interface card (NIC) and the corresponding driver software on the server computer.
2 Configure the IPX protocol on the computer.
If you are using a Windows NT Workstation, install Client Services for NetWare, SAP Agent, and NWLink IPX/SPX Compatible Transport. If you are using Windows NT Server, install Gateway Services for NetWare, SAP Agent, and NWLink IPX/SPX Compatible Transport.
For detailed instructions, see your Windows NT documentation.
By default, Windows NT Workstation supports a single IPX frame type. When you configure the NWLink IPX/SPX Compatible Transport, you can select the frame type to be used, or select Auto Detected if you want NT to identify the frame type automatically. To support multiple frame types, you must modify the Windows NT Registry. For more information, see our online help.
Configuring a Mac OS server for TCP/IP, IPX, and AppleTalk
To enable network access to the server on a Mac OS machine, follow the tasks listed under the appropriate protocol.
Configuring TCP/IP:
1 Make sure that the server computer has a network interface card (NIC) or LocalTalk connector installed.
2 Configure TCP/IP using the Control Panel.
3 Select a network connection for the computer.
For detailed instructions, see your Mac OS documentation.
Configuring IPX:
1 Make sure that the server computer has a network interface card (NIC) or LocalTalk connector installed.
2 Make sure no third party IPX implementation (for example, MacIPX) is installed.
Configuring AppleTalk:
1 Make sure that the server computer has a network interface card (NIC) or LocalTalk connector installed.
2 Configure and activate AppleTalk on the computer.
3 Select a network connection for the computer.
For detailed instructions, see your Mac OS documentation.
Adding network sessions
To add network sessions or modify the session numbers, make sure that the Session List is displayed, and then:
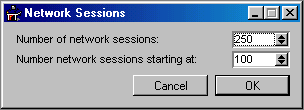
1 Choose Configure > Network Sessions.
2 Enter the number of connections you wish to configure (valid range is between 1 and 250, with no MP Option, otherwise 1-5000).
3 Enter the number at which you want network sessions to start (valid range is between 1 and 32000, inclusive).
If you will also be configuring modem sessions, you may find it convenient to set this to a high number (for example, 100) and start modem sessions at 1. This will make it easy for you to distinguish sessions using the session monitor.
This example shows a system with 250 network sessions between the values of 100 and 350.
4 Click OK.
Corresponding information will appear in the Session List screen.
Adding and configuring modem sessions
To allow users to dial into your FirstClass server, you must configure one or more modem sessions. A modem session is the way in which you configure the modem to work with the FirstClass server. The number of modem sessions is simply the number of modems available. The FirstClass server supports up to five modem sessions.
To increase the number of remote sessions supported by your server, contact Centrinity Sales or your reseller.
Note
The FirstClass server requires a minimum of 100KB of memory for each additional modem network session you configure.
Before configuring a modem session, make sure that you have the necessary equipment (see FirstClass Administrator’s Guide). To configure modem sessions, follow these steps for each modem attached to your server:
1 Make sure that the modem and modem cable have been installed according to the manufacturer’s instructions.
2 Test the modem using the FirstClass client software.
Make sure you can connect to another modem.
3 Choose Configure > List Sessions from the FirstClass Tools menu.
4 Choose File > New Session.
The following protocol options are available for Windows:
• Windows modem (TAPI)
• FirstClass modem
• ISDN (CAPI) adapter.
The following protocols are available for Mac OS:
• serial
• Comm Toolbox
• Comm Toolbox Serial.
Based upon your selection, the appropriate forms will appear.
Windows modems
Choosing Windows Modem indicates that the user will connect to the server via a standard modem connection.
When you choose Windows Modem as your protocol, a list of your available modems will be listed under "Windows (TAPI) modem to use for connection".
If one or all of the available modems is not displayed, click Modems Control Panel to launch a wizard that will assist you in adding modems to your list. After selecting a modem, click Modem Setup if you wish to modify the modem properties.
Enter the session number. Click Save.
FirstClass modems
Choosing FirstClass Modem indicates that the user will connect to the server using a non-TAPI (Telephony API) modem.
The FirstClass Modem setting requires information for connections, cable options, and speed options, as well as session ID and session file name. See the appropriate fields under Session field descriptions (below) for details about each field.
ISDN (CAPI) adapters
Select the adapter and enter the session number. Set the B1, B2, and B3 protocols. Consult your ISDN (CAPI) adapter documentation for additional information.
Serial modems
The Serial setting requires information for connections, cable options, and speed options, as well as session ID and session file name. See the appropriate fields under Session field descriptions (below) for details about each field.
Comm Toolbox
Enter the number of sessions and the session ID. See the appropriate fields under Session field descriptions (below) for details about each field.
Comm Toolbox Serial
The Comm Toolbox Serial setting requires information for connections, cable options, and speed options, as well as session ID and session file name. See the appropriate fields under Session field descriptions (below) for details about each field.
When all of the required information has been entered, click Save.
Session field descriptions
These descriptions include all of the settings that may appear on the Session tab of the Session Information screen, specifically if FirstClass Modem is the selected protocol for Windows, or Serial or Comm Toolbox Serial is the selected protocol for Mac OS.
The Advanced tab of the Session Information screen allows you to configure the advanced connection options and the trace options. It is not recommended that you adjust these settings unless directed to do
so by Centrinity Customer Support. For information about the advanced connection options, see the FirstClass server online help material about modems and troubleshooting.
Connections
Modem
Defines the type of modem you have. If you didn’t install the Modem Files option when you installed the FirstClass server, the list will be empty. Run the installation program again, select Custom Install, and install this component. If your modem isn’t in the list, check the Conferences > Software Libraries > Modem Settings conference on FirstClass.com.
If you still can’t find your modem, choose a compatible modem with the same speed as your own modem. You can also create your own modem setup (see FirstClass server online help material on modems).
Port
The communication or COM port to which the modem is connected.
Windows: The provided list contains ports up to port 32 in Windows. If you need more than 32 ports or need to use a different naming scheme, use a text editor such as Windows Notepad to edit the PORTLIST.TXT file in the FirstClass server subdirectory.
Mac OS: This list contains all of the available ports on your server computer (including TelePort, Hurdler, and Quadralink ports, if you have installed any optional hardware ports).
On a Hurdler card, Port #1 is at the top of the card (away from the Nubus connector).
Phone
Whether the modem is connected to a touch tone or pulse line.
Speaker
Whether you want the modem speaker to be turned on or off during dialing and negotiation. Some modems will ignore this selection.
Script
The script file to be used by the client for this connection. Connection scripts are optional for standard modem connections. The list contains all the script files you have created.
Cable Options
The cable options are automatically set to the values appropriate for the modem type you selected. Before changing these fields, refer to your modem documentation.
H/W Handshake
Whether to use hardware flow control. You must select this option if you are using a high-speed modem or a modem that supports data compression or error correction, or both.
DTR Hangup
Whether to use the Data Terminal Ready (DTR) pin to notify the modem when to hang up a call.
Carrier Detect
Whether your modem supports carrier detection. Centrinity generally recommends that you use carrier detection.
Speed Options
The speed options are automatically set to the values appropriate for the modem type you selected. Before changing these fields, refer to your modem documentation.
Auto Speed
Whether the FirstClass server should automatically set the speed of the communication or COM port to the speed reported in the CONNECT message received from the modem. If you do not select Auto Speed, the FirstClass server does not change the port speed. Auto Speed is not generally recommended for modems with speeds greater than 2400 bps and can cause some connection problems.
Baud Rate
The baud rate at which the FirstClass server will attempt to make the connection between the computer and the modem.
Additional Options
Session ID
The ID number for this session. This number identifies the session in the statistics and log files.
Session File Name
Displays the name of the file that stores this session’s configuration information. The FirstClass server automatically generates this file name.
Comments
Displays any comments defined in the MDM file for the selected modem.
Advanced field descriptions
The Advanced tab requires the same information for whichever protocol you select. Update the following fields as required:
Link Options
Window
Refers to the size of the sliding window, in packets. Options are:
Auto The computer will negotiate with the modem to determine the largest possible window size. This is recommended unless one of the special cases described below applies to you.
4 Choose this if you are connected over a very slow link with little or no delay, such as a modem connection with a speed of 2400 bps.
8 Choose this if you are connected over a link with long delays, such as a Wide Area Network (WAN) or satellite link.
Packets
Indicates the maximum packet size. You may need to set this if you are communicating over multiple network types. Larger packets are more efficient, but will slow down the response to other commands while file transfers are in progress.
As an example, if your network has a modem connection to an X.25 network, the modem can support communication speeds of up to 14400 bps, but the maximum speed of the X.25 network is 2400 bps. In this case, you would need to lock the packet size to 232 bytes. These are the packet size options:
Auto Choose this if you do not know what kind of modem you will be communicating with, or if you will be communicating with different types of modems (for example, some will have speeds of 2400 bps and others will have speeds of 14400 bps). This is always recommended unless one of the special cases described below applies to you.
128 Choose this for packet networks that cannot support 232.
232 Choose this if you will be communicating with 2400 bps modems.
512 Choose this if you will be communicating with 9600 bps or 14400 bps modems, or networks.
Lock
Specifies whether you want to decrease the packet size if transmission errors are encountered. Options are:
None Allows FirstClass to change the packet size. This value is recommended.
size Locks the packet size at the specified size.
Encrypt
Specifies whether you want to encrypt transmitted data. Options are:
On Encrypts data. This is most frequently used on networks.
Off Does not encrypt data. Choose this if you are using a modem that supports V.42bis or MNP 5 compression (because encrypted data cannot be compressed).
Trace Options
Trace options determine if, and what type of, debugging will be performed while the system is running. Note that activating any of these options may affect the performance of the server.
Send
Log all send activity.
Receive
Log all incoming mail.
Connect
Log connection information such as who connected, what time they connected, and the duration of the connection.
Modem/Scripts
If you use a modem and require a special connection script to connect to the FirstClass server, you can create a connection script file, then choose this file here.
Errors
Log all errors generated by the system.
Opening or editing an existing session
To open or edit an existing session, the Session List must be open. If it is not, choose Configure > List Sessions from the menu. In the Session List window, do one of the following:
• double-click on the desired session or
• right-click on the desired session and choose Open Session.
When the session is open, make the required changes, then click Save.
Removing an existing modem session
To remove a modem session, follow these steps:
1 Highlight the session you wish to remove.
2 Right-click and choose Remove Session, or choose File > Remove Session from the FirstClass Tools menu.
Rebuilding the Directory
If your Directory becomes damaged as a result of a power or disk failure, you must rebuild the Directory. For other problems, it is wise to perform diagnostics to narrow down the problem. For more information, see Performing diagnostics.
When to perform a rebuild
Aside from damage as a result of a power or disk failure, other scenarios under which you would perform a rebuild include:
• inconsistencies in the Directory
Error code 1050: User directory contains inconsistent data. The server has detected problems in the FirstClass Directory, the database that contains users, conferences, and routes registered on the server.
Error code 2007: Lookup error: The recipient’s name could not be found in the Directory.
• unexpected differences between Directory lists sorted by name and by user ID (using the Admin > List Directory command)
• a user that you know exists does not appear in a Directory list
• the following error is generated when a user who appears in a Directory list tries to log in:
Error 4105: File does not exist. This error occurs if a user tries to access a file or folder that does not exist. This usually indicates that the object was manually deleted by the user, rather than FirstClass, or that the file was damaged and removed by Trash Collection.
• duplicate entries exist for a user or conference
• running Diagnostics returns any errors (see Performing diagnostics for more information).
Note
You do not have to rebuild your Directory after a normal backup. Unless you encounter the circumstances described above, or are asked to rebuild by Centrinity Customer Support, you should not rebuild your Directory.
Performing a standard rebuild
If you need to perform a rebuild, you should always start with a standard rebuild before attempting the advanced options.
Warning
Before you rebuild your Directory, make sure all post office volumes are mounted. For example, if some of your volumes are networked volumes, make sure you are logged into the network. If you fail to do so, the users, conferences and gateways on unavailable volumes may be deleted from the Directory during a rebuild.
To perform a standard rebuild, follow these steps:
1 Shut down the FirstClass server and any other applications.
2 Open FirstClass Tools.
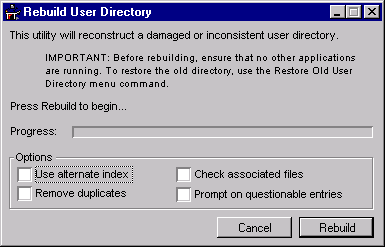
3 Choose File > Rebuild User Directory.
During your first attempt at rebuilding your Directory, do not select any of the options near the bottom of the form. For more information, see Using advanced rebuild options.
4 Click Rebuild.
Warning
A Directory can only be restored from a rebuild once. Therefore, if you now run the server and discover that the standard rebuild did not resolve your Directory problems, try restoring the old Directory and using some of the advanced rebuild options.
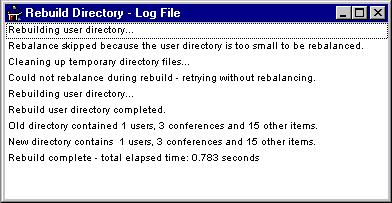
When the rebuild is complete, the Rebuild User Directory screen will close and the Rebuild Directory - Log File screen will open. This file lists the results of the rebuild.
Restoring a Directory after a rebuild
You should restore a Directory as soon as you discover that a rebuild did not solve the problem. If you attempt to rebuild again without performing a restore, you will not be able to recover the previous Directory.
Use the following procedure to restore your Directory:
1 Shut down the server and any other applications.
2 Open FirstClass Tools.
3 Choose File > Restore Old User Directory.
Warning
You should not restore the old Directory unless the rebuild has completed and not fixed the problems in your post office. A Restore of the post office from backup should not be used if the standard rebuild has failed. A restore of your User Directory is not the same as a restore of your post office from backup. It does not replace a damaged post office with an earlier version, it merely performs an undo of a rebuild.
Click OK when prompted to confirm restoring the directory.
Using advanced rebuild options
If a standard rebuild fails, you can try again using one or more of the advanced rebuild options.
Warning
Before performing this procedure, try performing a standard rebuild first. If that fails to correct the problem, make sure you restore the directory before attempting another rebuild or using the advanced options. These options are useful if your first rebuild attempt doesn’t correct the problem, but can cause problems if not used correctly.
1 Choose File > Rebuild User Directory.
2 Modify the following fields as needed:
Use Alternate Index
Uses a backup index. Remote names and routes are not included in the alternate index. If you select this option, they will be deleted from the Directory.
Select this option after a failed rebuild —for example, if the main index to the Directory is damaged. If your rebuild fails when you select this option, the alternate index is also damaged. In this case, you will have to restore your FirstClass post office from a recent backup.
Remove Duplicates
Removes all duplicate entries from the Directory. Select this option if the Directory contains duplicate entries for the same conference or user. Duplicate entries might occur if you have converted a server that is using an older version of the FirstClass server software. This option increases the rebuild time by 25%.
Check Associated Files
Checks to make sure that all entries defined in the Directory exist. Occasionally, as a result of a power failure or other problem, the Directory might become inconsistent with the FirstClass post office, so that it contains entries for items no longer in the post office. Select this option if you want the rebuild process to check every entry in the Directory to make sure that the associated files and folders exist. If the files or folders are not found, that entry is deleted from the Directory.
Prompt on Questionable Entries
Displays a prompt when it encounters a damaged entry and allows you to specify whether to keep or delete the entry. Select this option if you want to make decisions about each damaged entry individually. If you don’t select this option, FirstClass server automatically deletes all damaged entries.
3 Click Rebuild.
Using advanced settings
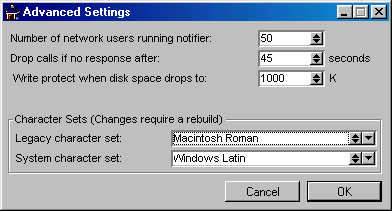
Advanced Settings include the following:
• number of network users that can run Network Notifier at a time
• number of seconds to maintain the phone connection on an unresponsive line before dropping the line
• minimum amount of disk space that the system can drop to before write protecting the hard drive
• character sets used.
Accessing Advanced Settings
To open the Advanced Settings screen, choose Configure > Advanced Settings from the FirstClass Tools menu. A screen similar to the one below will appear.
Number of network users running Network Notifier
This value indicates the number of regular users (users who can connect either remotely or across a network) who are running Network Notifier. The FirstClass server maintains a list of these users and automatically notifies them when it delivers mail to their Mailboxes. Set this value to the number of users plus 10%, with a minimum of ten extra users. For example, if 40 users are using Network Notifier, set this value to 50. If 140 users are using Network Notifier, set this value to 154.
Drop calls if no response after
This value indicates the number of seconds to keep an unresponsive line open before dropping it. For example, if this value is set to 45, the FirstClass server will listen on the line; if the system has not heard any activity after 45 seconds, it will disconnect the line, freeing it for another call.
Write protect when disk space drops to
This value indicates the minimum amount of free disk space, in kilobytes, required on a volume. When the amount of disk space available on a volume reaches this amount, the server stops accepting messages from users and gateways on that volume until more space becomes available. This option prevents the corruption of data that may occur if a volume runs completely out of disk space.
You should enter a value large enough so that when it is reached you can reset it to a smaller amount and allow user activity to continue while you either clear disk space or acquire additional volumes. Five percent of your maximum volume size is a good starting point. Heavy use systems may want a larger value.
Character sets
These values indicate the default character sets that are used for all of the screens and documents in the system. FirstClass 6 and higher uses the System character set.
Performing diagnostics
The FirstClass Diagnostics tool allows you to check any volume or the Directory for possible problems. It also provides you with information about your system configuration. Problems that are reported by the Directory Item diagnostics tool can sometimes be solved by performing a rebuild. See Rebuilding the Directory for more information.
A rebuild will not solve every problem. Before attempting a rebuild, you should first try to narrow down the problem. You can do this by following these steps:
Note
You only need to proceed to the next step if the current step did not report any errors.
1 Diagnose volumes.
This checks the folder structure. For more information, see Diagnosing volumes.
2 Diagnose Directory items.
This checks user records. For instructions, see Diagnosing Directory items.
If there appears to be inconsistencies in the Directory, you may want to consider performing a rebuild at this point. See Rebuilding the Directory for more information.
3 Diagnose specific users.
If you suspect a problem with a specific Directory entry, you can perform diagnostics based on that criteria. For more information, see Options for Volumes or Directory Items.
Opening Diagnostics
The Diagnostics tool will diagnose problems on either the system volume or the directories. To launch the Diagnostics tool, choose Diagnostics from the FirstClass Tools menu, then choose Diagnose Volumes or Diagnose Directory Items, depending upon what you wish to diagnose.
Diagnosing volumes
A diagnosis of volumes should be performed for system maintenance purposes, or to verify folder structure. You should pay particular attention to information such as the amount of disk space still available, the amount of space that is being used by log files, and whether there are any folders missing.
When you choose to diagnose volumes, a screen opens up that contains four tabs. These tabs contain a diagnostics overview, details of the diagnosis, system information, and options that allow you to customize the diagnostics function. When you are ready, click Diagnose to begin the diagnostics process.
At any time during the progress of a diagnosis, you can click the Stop button to cancel the action. This button is only available while the diagnosis is being performed.
Diagnostic Overview
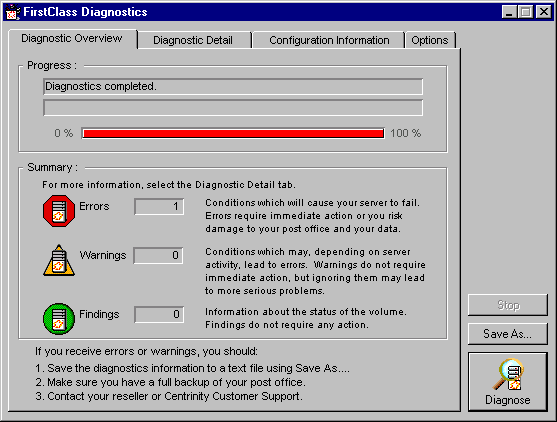
The Diagnostic Overview tab graphically indicates the status of the diagnosis via a progress indicator at the top of the screen in the Progress frame, and reports the results at the bottom of the screen in the Summary frame. The results are separated into three categories: errors, warnings, and findings.
Errors
Errors are conditions that will cause your server to fail. These errors require immediate action or you risk damage to your post office and your data.
Warnings
Warnings are conditions that may lead to errors, depending upon system activity. Warnings do not require immediate action, but ignoring them may lead to more serious problems.
Findings
Findings are simply information about the status of the volume diagnosed. Findings do not require any action.
(Double-click to enlarge)
Acting upon errors and warnings
If errors or warnings are found, follow these steps.
1 Save the diagnostics information to a text file using Save As.
2 Make sure that you have a full backup of your post office.
3 Contact Centrinity Customer Support if you require assistance in resolving the problems.
Diagnostic Detail
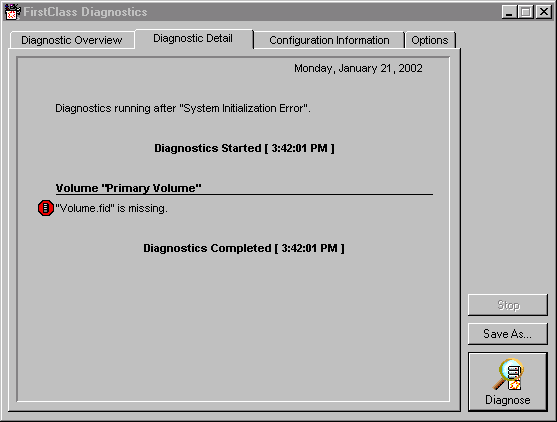
This tab provides a detailed summary of the findings of the diagnostics tool. There are two sections. One provides information on the diagnostic options selected. The other describes the availability of the volumes at the time of diagnosis, and lists all the items (and whether they were errors, warnings, or findings) for each volume.
(Double-click to enlarge)
Configuration Information
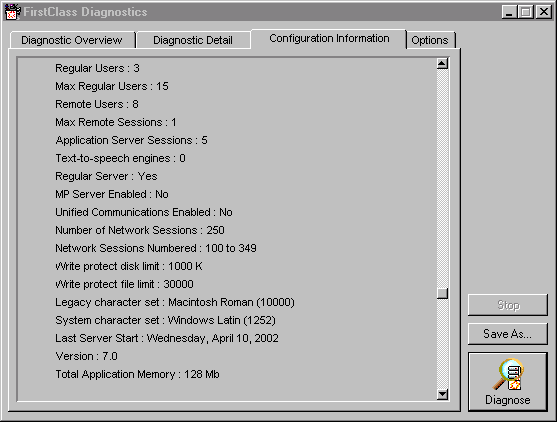
This tab provides you with detailed configuration information about FirstClass server and your server machine. You should save this information to a text file (using the Save As button) before calling Centrinity Customer Support. The five sections of configuration information include:
• the version of FirstClass Tools you are using and the amount of memory it is using
• your server machine and its software and hardware
• your FirstClass server, the number of users and sessions you have, and includes some information on your FirstClass server system settings
If the ServLock file in your post office is unreadable or absent, the "Last Server Start", "Version", and "Total Application Memory" fields will be listed as not available.
• all the licenses you have installed
• the volumes on your system that have a status of full or limited use.
For an explanation of those terms and how to change the status of a volume, see the FirstClass server online help material.
(Double-click to enlarge)
Options
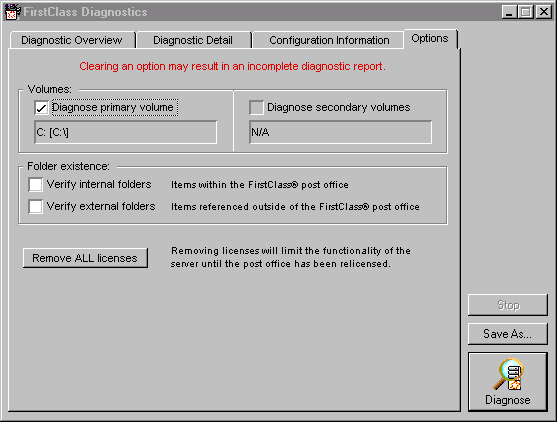
The Options tab allows you to set the system areas that you would like diagnosed.
(Double-click to enlarge)
The options are:
Diagnose primary volume
Check this box to select your primary post office volume. This is the master volume on which your post office was first installed.
Diagnose secondary volumes
Check this box to select secondary volumes. You can use the popup to select either all secondary volumes or an individual volume.
Verify internal folders
Check this box to have the diagnostics tools verify the existence of folders within the FirstClass post office. Any folders that are missing or renamed will result in an error report, since the problem will affect FirstClass performance.
Verify external folders
Check this box to have the diagnostics tools verify the existence of folders outside of the FirstClass post office. This includes any external folders that have been opened. If a folder was created but never opened within FirstClass, the diagnostics tool will not attempt to verify its existence.
Initialization problems
If your post office is damaged or improperly installed, you will be taken immediately to the diagnostic detail tab when you start FirstClass Tools, and a system initialization message will be displayed.
Diagnostics - System Initialization Error
Click "Diagnose" and the Diagnostic Detail tab will display the appropriate diagnosis.
Remove ALL licenses
See Removing all licenses at once for information.
Diagnosing Directory items
A diagnosis of Directory items should be performed when there seems to be damage to user records, specifically if users or conferences seem to be missing. The most common setting is General Overview, which should find most of the damage. However, if a specific folder was listed as damaged, you can run a test for specific entries, and then specify the folder to check. This will produce a more detailed report.
When you choose to diagnose Directory items, a screen opens up that contains three tabs. These tabs contain diagnostics results, details of the diagnosis, and options that allow you to customize the diagnostics function. When you are ready, click Diagnose to begin the diagnostics process.
At any time during the progress of a diagnosis, you can click the Stop button to cancel the action. This button is only available while the diagnosis is being performed.
Diagnostic Overview
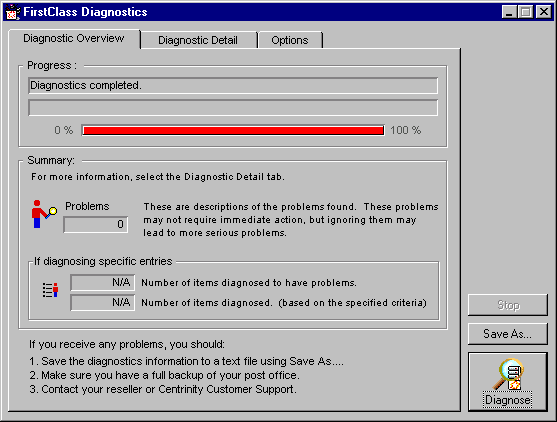
The Diagnostic Overview tab graphically indicates the status of the diagnosis via a progress indicator at the top of the screen in the Status frame, and reports the results at the bottom of the screen in the Summary frame. The results are displayed in three sections.
(Double-click to enlarge)
The first section lists the number of problems that were encountered during the diagnosis. These problems may not require immediate action, but ignoring them may lead to more serious problems.
Below the number of problems, you will find two additional boxes. These two boxes may require attention only if the Options tab information was set to diagnose specific entries. These boxes refer, respectively, to the number of items that were diagnosed to have problems, and the total number of items that were diagnosed.
For example, a diagnostic request with the option set for Specific directory entries with the option to Verify specific entries checked could report six problems found, one item diagnosed as having a problem, and fifty total items diagnosed. This means that the six problems reported only affected one item of the fifty items checked.
Acting upon errors and warnings
If problems are found, follow these steps:
1 Save the diagnostics information to a text file using Save As.
2 Make sure you have a full backup of your post office.
3 Use the Options tab to narrow down the problem.
4 See Rebuilding the Directory to determine whether a rebuild will solve the problem.
Warning
A Directory can only be restored from a rebuild once. Therefore, if you now run the server and discover that the standard rebuild did not resolve your Directory problems, try restoring the old Directory and using some of the advanced rebuild options.
Contact Centrinity Customer Support if you are unable to solve the problem yourself or would like further guidance.
Diagnostic Detail
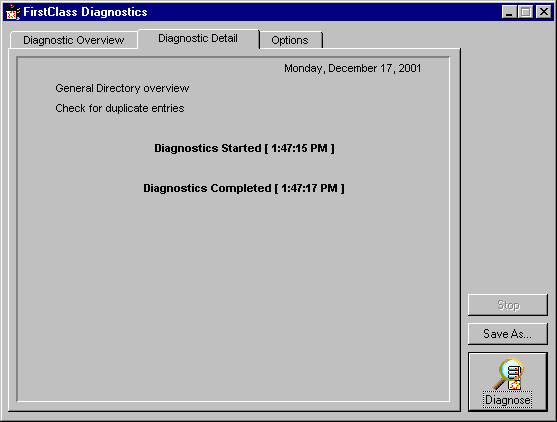
This tab provides a detailed summary of the findings of the diagnostics tool. There are two sections. One provides information on the diagnostic options selected. The other describes the time that the diagnostics started and completed, and lists all the problem items.
(Double-click to enlarge)
Options
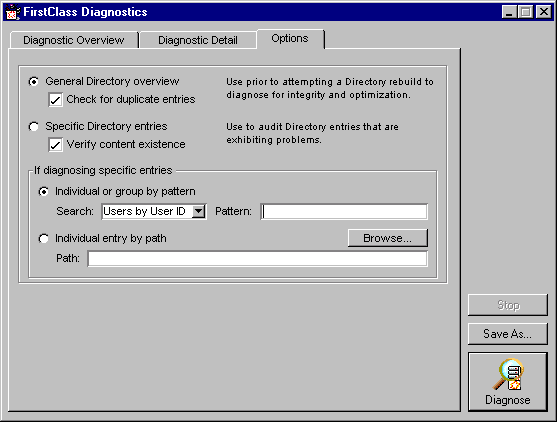
The Options tab allows you to set the system areas that you would like diagnosed. The options are:
(Double-click to enlarge)
General directory overview
Verifies the integrity of all of the directories, and ensures that they are optimized.
"Check for duplicate entries" verifies that every entry is unique.
Specific directory entries
Searches specific entries based upon criteria outlined in the fields below. This option would be used on specific entries that appear to be exhibiting problems.
"Verify content existence" verifies that every entry that is checked contains content to make sure that the record is actually used.
Individual or group by pattern
Only applies if the "Specific directory entries" field is selected. Checks a specific user (by user ID or client ID), conference or gateway that matches the criteria that you enter in the "Pattern" field.
"Pattern" is the character or string of characters that will appear at the beginning of any word in each record.
For example, the pattern "an fe" would return results such as:
Anne Ferrin
Angus Ferlong
Annamarie Ferrari
George Andrew Ferlisi
Individual entry by path
Verifies the existence and integrity of the specified path. Enter the path in the field provided or click Browse to display a directory listing where you can select the path to check.
Make certificate package
FirstClass Tools aids in creating certificate packages. To access this feature, choose Configure > Make Certificate Package. For detailed information and instructions on making certificate packages, see FirstClass Internet Services Administrator’s Guide.
|

